Nissan Sentra B18 (2020-2025) Service Manual: Seat Belt :: Removal and Installation
Front Seat Belt. Exploded View
Exploded View
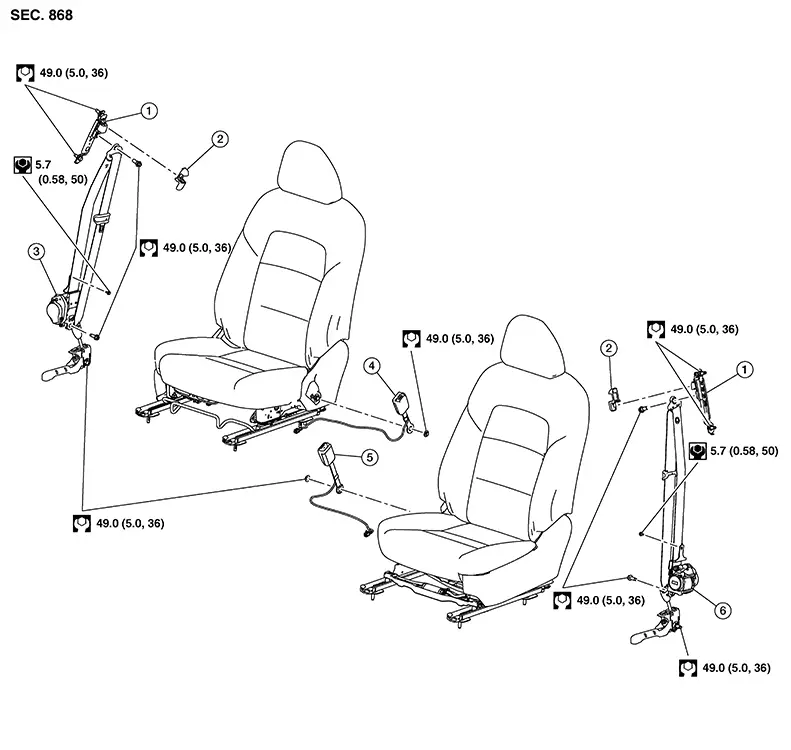
|
1. |
Seat belt height adjuster |
2. |
Seat belt height adjuster cover |
3. |
Front seat belt retractor (RH) |
|
4. |
Front seat belt buckle (RH) |
5. |
Front seat belt buckle (LH) |
6. |
Front seat belt retractor (LH) |
Front Seat Belt Retractor
Removal and Installation
Removal and Installation
REMOVAL
Warning:
-
Before servicing the SRS, place the ignition switch in the OFF position, disconnect both battery terminals then wait at least three minutes.
-
Do not drop the seat belt retractor. Always handle it with care.
-
Always point pre-tensioner cylinder away from body when handling.
-
Slide the front seat to the full forward position.
-
Disconnect negative and positive battery terminals, then wait at least three minutes. Refer to Battery Disconnect.
-
Remove the center pillar lower finisher. Refer to Removal and Installation.
-
Pull floor trim (1) in the direction shown to access the front seat belt pre-tensioner (lap belt).
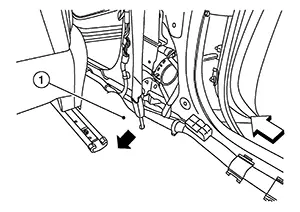
Note:
: Front

RH side shown, LH side similar
-
Remove bolt (A) from the front seat belt pre-tensioner (lap belt).
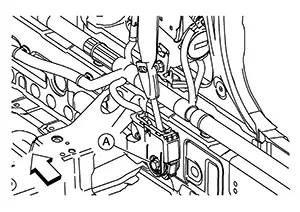
Note:: Front
RH side shown, LH side similar
-
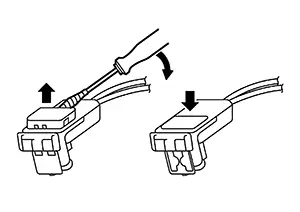
Disconnect the harness connector (A) from the front seat belt pre-tensioner (lap belt).
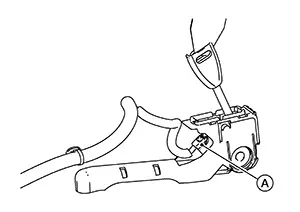
CAUTION:
-
For removing/installing the front seat belt pre–tensioner (lap belt) harness connector, insert a thin screwdriver wrapped in tape into the notch, then lift the lock and remove the harness connector as shown.
-
Install the harness connector with the lock raised, and push the lock into the harness connector as shown.
-
After installing the harness connector, check that the lock is pushed in securely.
-
-
Pull seat belt height adjuster cover in the direction shown and remove.
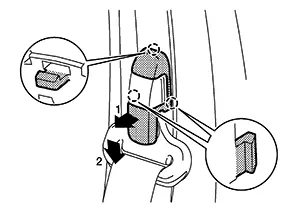

: Pawl
-
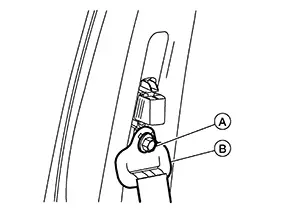
Remove the D-ring anchor bolt (A) with D-ring anchor (B).
-
Disconnect the harness connector (A) from the front seat belt pre-tensioner [shoulder belt (1)].
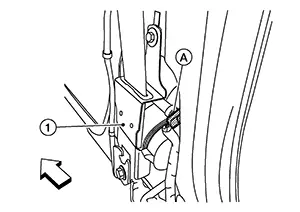
Note:: Front
RH side shown, LH side similar
CAUTION:
-
For removing/installing the front seat belt pre-tensioner (shoulder belt) harness connector, insert a thin screwdriver wrapped in tape into the notch, then lift the lock and remove the harness connector as shown.
-
Install the harness connector with the lock raised, and push the lock into the harness connector as shown.
-
After installing the harness connector, check that the lock is pushed in securely.
-
-
Remove the lower bolt (A), then upper screw (B), and remove the front seat belt retractor from Nissan Sentra vehicle.
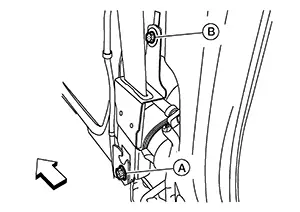
Note:: Front
RH side shown, LH side similar
INSTALLATION
Installation is in the reverse order of removal.
CAUTION:
-
Tighten D-ring anchor bolt and front seat belt retractor bolts and screw to specification. Refer to Exploded View.
. -
Make sure the seat belt height adjuster is locked in the lowest position and is aligned with center pillar upper finisher opening during installation.
-
Make sure both the D-ring anchor and seat belt height adjuster operate freely.
-
Always perform an inspection after repair to be sure the system is functioning within specifications. Refer to Inspection.
Seat Belt Height Adjuster
Removal and Installation
Removal and Installation
REMOVAL
Remove center pillar upper finisher. Refer to Removal and Installation.
Remove
bolts (A) and seat belt height adjuster (1) from Nissan Sentra vehicle. 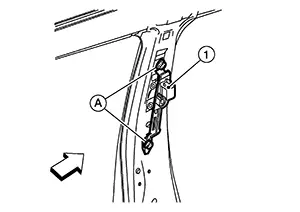 Note:
Note:
LH shown, RH similar.
|
|
: Front |
INSTALLATION
Installation is in the reverse order of removal.
CAUTION:
-
Make sure that the seat belt height adjuster is locked in the lowest position and is aligned with the center pillar upper finisher opening during installation.
-
Tighten the D-ring anchor bolt and seat belt height adjuster bolts to specification. Refer to Exploded View.
-
Make sure both the D-ring anchor and seat belt height adjuster operate freely.
-
Always perform an inspection after repair to make sure the system is functioning within specifications. Refer to Inspection.
Front Seat Belt Buckle
Removal and Installation
Removal and Installation
REMOVAL
Warning:
-
Before servicing the SRS, place the ignition switch in the OFF position, disconnect both battery terminals then wait at least three minutes.
Remove the front seat from Nissan Sentra vehicle. Refer to Removal and Installation (Driver side) or Removal and Installation (Passenger side).
Disconnect
the front seat belt buckle harness connector and remove harness
attachments from the front seat.
Note:
Take note of harness routing and attachment locations for correct installation.
Remove front seat belt buckle anchor nut and front seat belt buckle.
Installation
Installation is in the reverse order of removal.
-
Tighten the front seat belt buckle anchor nut to specification. Refer to Exploded View.
-
Always perform an inspection after repair to make sure the system is functioning within specifications. Refer to Inspection.
-
If passenger seat is removed, perform zero point reset function after the front passenger seat is installed in the Nissan Sentra vehicle and all bolts are tightened to specification. Refer to Special Repair Requirement.
Rear Seat Belt. Exploded View
Exploded View
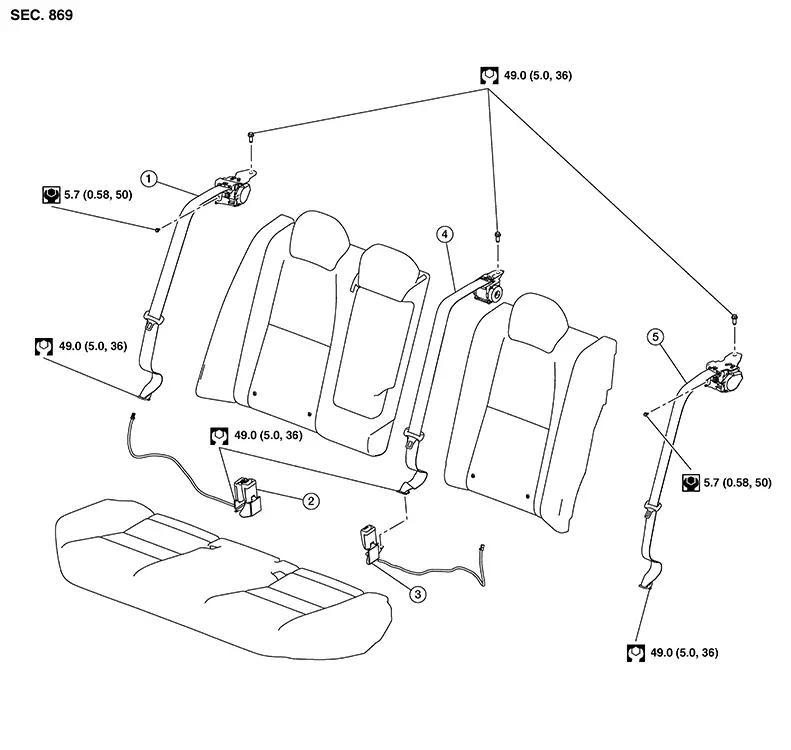
|
1. |
Rear seat belt retractor (RH) |
2. |
Rear seat belt buckle (RH/ Center) |
3. |
Rear seat belt buckle (LH) |
|
4. |
Rear seat belt retractor (Center) |
5 . |
Rear seat belt retractor (LH) |
Rear Seat Belt Retractor
Removal and Installation
Removal and Installation
Rear Seat Belt Retractor (LH/RH)
REMOVAL
Warning:
-
Before servicing the SRS, place the ignition switch in the OFF position, disconnect both battery terminals then wait at least three minutes.
-
Do not drop the seat belt retractor. Always handle it with care.
-
Always point pre-tensioner cylinder away from body when handling.
Remove the rear parcel shelf finisher. Refer to Removal and Installation.
Remove the
rear seat belt lower anchor bolt (A). 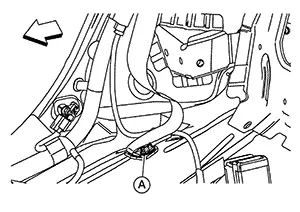
|
|
: Front |
RH side shown, LH side similar
Remove
bolts (A) and (B) from the rear seat belt pre-tensioner (1). 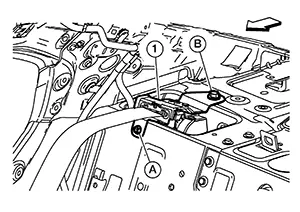
|
|
: Front |
RH side shown, LH side similar
Lift up
rear seat belt retractor in the direction shown, then disconnect
harness connector (A), and remove rear seat belt retractor. 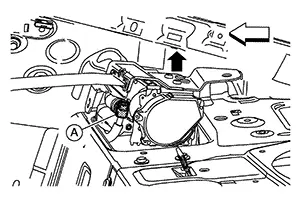
|
|
: Front |
RH side shown, LH side similar
CAUTION:
-
For removing/installing the rear seat belt pre-tensioner harness connector, insert a thin screwdriver wrapped in tape into the notch, then lift the lock and remove the harness connector as shown.
-
Install the harness connector with the lock raised, and push the lock into the harness connector as shown.
-
After installing the harness connector, check that the lock is pushed in securely.
INSTALLATION
Installation is in the reverse order of removal.
-
Tighten the rear seat belt retractor bolts and lower anchor bolts to specification. Refer to Exploded View.
-
Always perform an inspection after repair to be sure the system is functioning within specifications. Refer to Inspection.
-
After installation is complete, check that no system malfunction is detected causing the air bag warning lamp to illuminate.
-
If a malfunction is indicated by the air bag warning lamp after repair or replacement of the malfunctioning parts, perform the SRS final check. Refer to SRS Final Check.
Rear Seat Belt Retractor (Center)
REMOVAL
Warning:
-
Before servicing the SRS, place the ignition switch in the OFF position, disconnect both battery terminals then wait at least three minutes.
-
Do not drop the seat belt retractor. Always handle it with care.
Remove rear parcel shelf finisher. Refer to Removal and Installation.
Remove the
rear lower anchor bolt (A). 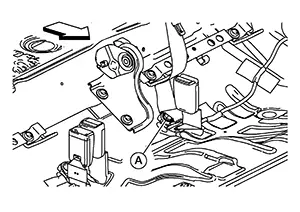
|
|
: Front |
Remove bolt
(A) and remove the rear seat belt retractor (1). 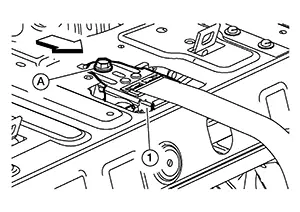
|
|
: Front |
INSTALLATION
Installation is in the reverse order of removal.
-
Tighten the rear seat belt retractor bolts and lower anchor bolts to specification. Refer to Exploded View.
-
Always perform an inspection after repair to be sure the system is functioning within specifications. Refer to Inspection.
-
After installation is complete, check that no system malfunction is detected causing the air bag warning lamp to illuminate.
-
If a malfunction is indicated by the air bag warning lamp after repair or replacement of the malfunctioning parts, perform the SRS final check. Refer to SRS Final Check.
Rear Seat Belt Buckle
Removal and Installation
Removal and Installation
Rear Seat Belt Buckle (RH/Center)
REMOVAL
Warning:
-
Before servicing the SRS, place the ignition switch in the OFF position, disconnect both battery terminals then wait at least three minutes.
Remove rear pillar lower finisher. Refer to Removal and Installation – Rear Pillar Lower Finisher.
Disconnect
the harness connector (A) and release the harness from
attachments. 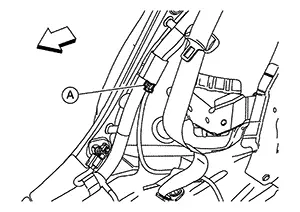
|
|
: Front |
Take note of harness routing and attachment locations for correct installation.
Remove bolt
(A) and the rear seat belt buckle (1) from Nissan Sentra vehicle. 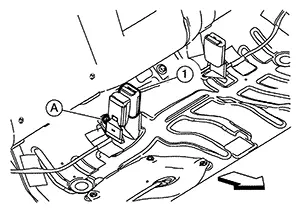
|
|
: Front |
INSTALLATION
Installation is in the reverse order of removal.
-
Always perform an inspection after repair to be sure the system is functioning within specifications. Refer to Inspection.
-
Tighten the rear seat belt buckle anchor bolt to specification. Refer to Exploded View.
Rear Seat Belt Buckle (LH)
REMOVAL
Warning:
-
Before servicing the SRS, place the ignition switch in the OFF position, disconnect both battery terminals then wait at least three minutes.
Remove rear pillar lower finisher. Refer to Removal and Installation – Rear Pillar Lower Finisher.
Disconnect
the harness connector (A) and release the harness from
attachments. 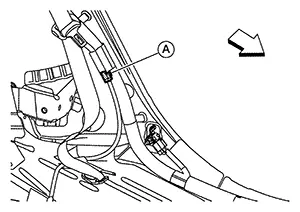 Note:
Note:
Take note of harness routing and attachment locations for correct installation.
|
|
: Front |
Remove bolt
(A) and the rear seat belt buckle (1) from Nissan Sentra vehicle. 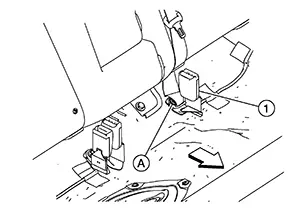
|
|
: Front |
INSTALLATION
Installation is in the reverse order of removal.
-
Always perform an inspection after repair to be sure the system is functioning within specifications. Refer to Inspection.
-
Tighten the rear seat belt buckle anchor bolt to specification. Refer to Exploded View.
Latch (lower Anchors and Tether for Children) System. Exploded View
Exploded View
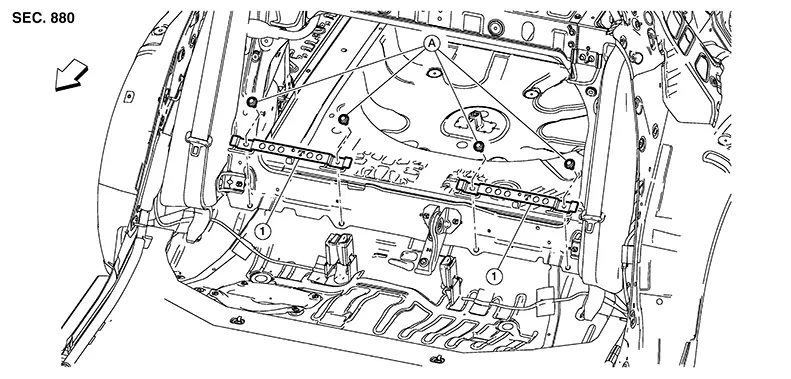
|
1. |
LATCH bracket (LH/RH) |
A. |
Refer to Removal and Installation. |
|
Front |
Removal and Installation
Removal and Installation
REMOVAL
Remove rear seatback. Refer to Removal and Installation.
Remove LATCH bracket bolts and remove LATCH bracket.
INSTALLATION
Install and
tighten LATCH bracket bolts to specification in the sequence
shown: 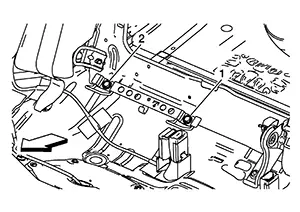
|
LATCH bracket bolts |
: 50 N·m (5.1 kg-m, 37 ft-lb) |
|
|
: Front |
RH side shown, LH side similar
-
Always perform an inspection after repair to be sure the system is functioning within specifications. Refer to Inspection.
Top Tether Strap Child Restraint. Removal and Installation. Removal and Installation
Removal and Installation
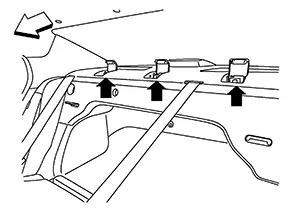
The top tether strap child restraint system ( )
are part of the Nissan Sentra vehicle structure and are not serviceable.
)
are part of the Nissan Sentra vehicle structure and are not serviceable.
|
|
: Front |
Other materials:
Fuel Pump
Component Inspection
Component Inspection
CHECK FUEL PUMP
Turn ignition switch OFF.
Disconnect “fuel level sensor
unit and fuel pump� harness connector.
Check the resistance between
...
U2140-87 Can Comm Err (ecm)
Dtc Description
DTC Description
DTC DETECTION LOGIC
DTC No.
CONSULT screen terms
(Trouble diagnosis content)
DTC detection condition
...
B272d Front Buzzer
Dtc Description
DTC Description
DTC DETECTION LOGIC
DTC No.
CONSULT screen terms
(Trouble diagnosis content)
DTC detection condition
...