Nissan Sentra Service Manual: Rear combination lamp
Exploded view
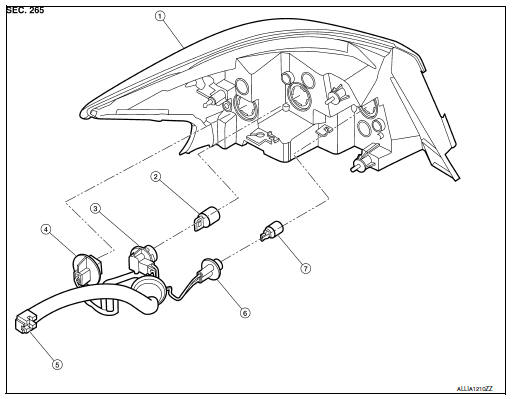
- Rear combination lamp
- Rear turn signal lamp bulb
- Rear turn signal lamp socket
- LED lamp harness connector
- Rear combination lamp harness connector
- Back-up lamp bulb socket
- Back-up lamp bulb
Removal and installation
Removal
- Partially remove trunk side finisher. Refer to INT-43, "TRUNK SIDE FINISHER : Removal and Installation".
- Remove the rear combination lamp nuts (B).
- Disconnect the harness connector (A) from the rear combination lamp.
- Pull the rear combination lamp rearward and remove.
Installation
Installation is the reverse order of removal.
Bulb replacement
WARNING:
Do not touch bulb while it is lit or right after being turned off. Burning may result.
CAUTION:
- Do not touch glass surface of the bulb with bare hands or allow oil or grease to get on it to prevent damage to bulb.
- Do not leave the bulb out of the lamp reflector for a long time
because dust, moisture, smoke, etc.
may affect the performance of the lamp.
REAR TURN SIGNAL LAMP BULB
Removal
- Remove the rear combination lamp. Refer to EXL-126, "Removal and Installation".
- Rotate the rear turn signal lamp bulb socket counterclockwise and remove.
- Remove the rear turn signal lamp bulb from bulb socket.
Installation
Installation is in the reverse order of removal.
CAUTION:
After installing, be sure to install the bulb socket securely to ensure watertightness
STOP/TAIL LAMP
The stop/tail lamp is integrated into the rear combination lamp and is serviced as an assembly. Refer to EXL- 126, "Removal and Installation".
BACK-UP LAMP BULB
Removal
- Remove the rear combination lamp. Refer to EXL-126, "Removal and Installation".
- Rotate the back-up lamp bulb socket counterclockwise and remove.
- Remove the back-up lamp bulb from bulb socket.
Installation
Installation is in the reverse order of removal.
CAUTION:
After installing, be sure to install the bulb socket securely to ensure watertightness.
 License plate lamp
Removal and Installation
REMOVAL
Remove the license lamp finisher. Refer to EXT-44, "Removal and
Installation".
Disconnect the harness connector (A) from the license plate
lamp ( ...
 Combination switch
Exploded view
Combination switch
Combination switch harness connector
Front
NOTE:
Shown with the steering wheel removed for clarity only.
Removal and installation
REMOVAL
CAUTION:
...
Other materials:
Wiring diagram
Base audio
Wiring diagram
...
Tcm branch line circuit
Diagnosis Procedure
1.Check connector
Turn the ignition switch off.
Disconnect the battery cable from the negative terminal.
Check the following terminals and connectors for damage, bend and loose
connection (unit side and connector
side).
TCM
Harness connector f50
Harness co ...
SPORT mode switch
Adjusts the throttle sensitivity and transmission
points (CVT only) to enhance performance. Press
the SPORT button on the instrument panel to
activate. The SPORT mode indicator light (on the
speedometer) will illuminate. The SPORT mode
indicator light will remain lit while the mode is
acti ...
