Nissan Sentra B18 (2020-2025) Service Manual: Rear Brake Piping
Exploded View
Exploded View
DRUM BRAKE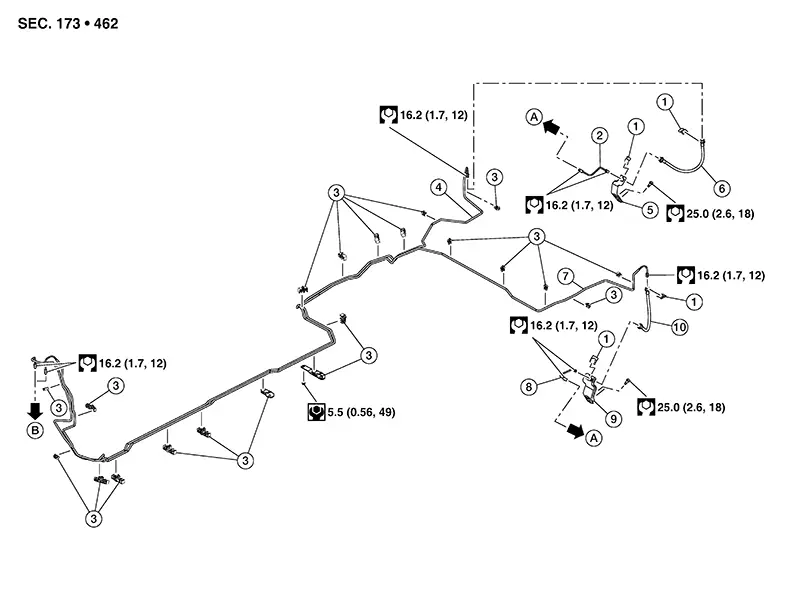
|
1. |
Lock plate |
2. |
Brake tube (RH) to wheel cylinder (RH) |
3. |
Clamp |
|
4. |
Brake tube to rear (RH) |
5. |
Brake hose bracket (RH) |
6. |
Brake hose (RH) |
|
7. |
Brake tube to rear (LH) |
8. |
Brake tube (LH) to wheel cylinder (LH) |
9. |
Brake hose bracket (LH) |
|
10. |
Brake hose (LH) |
A. |
To wheel cylinder. Refer to Exploded View. |
B. |
To ABS actuator and electric unit (control unit). Refer to Exploded View. |
|
1. |
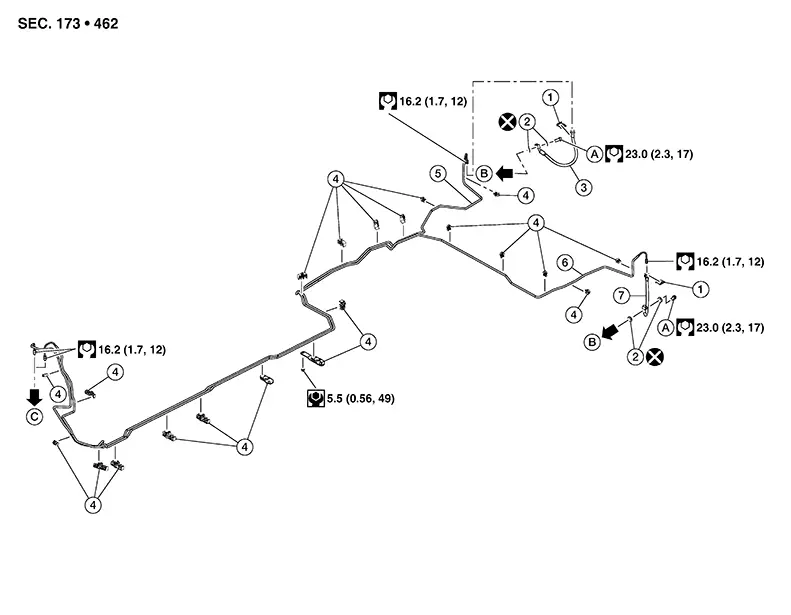
Lock plate |
2. |
Copper sealing washers |
3. |
Brake hose (RH) |
|
4. |
Clamp |
5. |
Brake tube to rear (RH) |
6. |
Brake tube to rear (LH) |
|
7. |
Brake hose (LH) |
A. |
Union bolt |
B. |
To rear brake caliper assembly. Refer to Exploded View. |
|
C. |
To ABS actuator and electric unit (control unit). Refer to Exploded View. |
Removal and Installation
Removal and Installation
DRUM BRAKES
CAUTION:
-
All hoses and piping (tubes) must be free from excessive bending, twisting and pulling.
-
Do not spill or splash brake fluid on painted surfaces. Brake fluid may seriously damage paint. Wipe it off immediately and wash with water if it gets on a painted surface.
-
Do not allow foreign matter (e.g. dust) and oils other than brake fluid to enter the master cylinder reservoir tank.

When removing components such as hoses, tubes/lines, etc., cap or plug openings to prevent fluid from spilling.
REMOVAL
Remove the reservoir cap from the master cylinder reservoir tank.
Remove the rear wheel and tire using power tool. Refer to Removal and Installation.
Loosen the flare nuts using a flare nut wrench. Separate the brake tubes from the brake hose. Refer to Exploded View.
CAUTION:
-
Do not scratch the flare nut and the brake tube.
-
All brake hoses and tubes must be free from excessive bending, twisting and pulling.
Remove the lock plates and remove the brake hose from the Nissan Sentra vehicle.
Loosen the flare nut using a flare nut wrench. Remove the brake tube from the wheel cylinder.
INSTALLATION
Connect the brake tube to the wheel cylinder. Temporarily tighten the flare nut by hand until it does not rotate further. Refer to Exploded View.
Connect the brake hose to the brake tube. Temporarily tighten the flare nut by hand until it does not rotate further. Attach the brake hose to the bracket with the lock plate.
CAUTION:
Check that the brake hoses and tubes are not bent or twisted.
Tighten the flare nuts to the specified torque using a flare nut crowfoot and a torque wrench.
CAUTION:
Do not scratch the flare nut and the brake tube.
Refill with new brake fluid and bleed air from the brake system. Refer to Bleeding Brake System.
CAUTION:
Do not reuse drained brake fluid.
Install the rear wheel and tire to the Nissan Sentra vehicle. Refer to Removal and Installation.
Perform the inspection after installation. Refer to Inspection.
DISC BRAKES
CAUTION:
-
All hoses and piping (tubes) must be free from excessive bending, twisting and pulling.
-
Do not spill or splash brake fluid on painted surfaces. Brake fluid may seriously damage paint. Wipe it off immediately and wash with water if it gets on a painted surface.
-
Do not allow foreign matter (e.g. dust) and oils other than brake fluid to enter the master cylinder reservoir tank.
When removing components such as hoses, tubes/lines, etc., cap or plug openings to prevent fluid from spilling.
REMOVAL
Remove the reservoir cap from the master cylinder reservoir tank.
Remove the rear wheel and tire using power tool. Refer to Removal and Installation.
Loosen the flare nuts using a flare nut wrench. Separate the brake tubes from the brake hose. Refer to Exploded View.
CAUTION:
-
Do not scratch the flare nut and the brake tube.
-
All brake hoses and tubes must be free from excessive bending, twisting and pulling.
Remove the
union bolt (A) and the brake hose from the brake caliper. Remove
and discard the copper sealing washers (1). 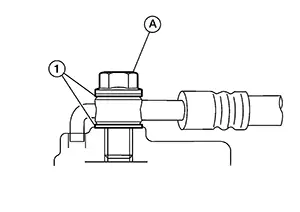
CAUTION:
Do not reuse copper sealing washers.
Remove the lock plates and remove the brake hose.
INSTALLATION
Assemble
the union bolt (A) and the copper sealing washers (1) to the brake
hose and install it as an assembly to the brake caliper. Align the
brake hose L-pin by aligning it with the brake caliper hole, and
tighten the union bolt to the specified torque. Refer to Exploded View.
CAUTION:
Do not reuse copper sealing washers.
Connect the brake hose to the brake tube. Temporarily tighten the flare nut by hand until it does not rotate further. Attach the brake hose to the bracket with the lock plate.
CAUTION:
Check that the brake hoses and tubes are not bent or twisted.
Tighten the flare nuts to the specified torque using a flare nut crowfoot and a torque wrench.
CAUTION:
Do not scratch the flare nut and the brake tube.
Refill with new brake fluid and bleed air from the brake system. Refer to Bleeding Brake System.
CAUTION:
Do not reuse drained brake fluid.
Install the rear wheel and tire to the Nissan Sentra vehicle. Refer to Removal and Installation.
Perform the inspection after installation. Refer to Inspection.
Other materials:
B2083-23 Request Sw (fr)
Dtc Description
DTC Description
DTC DETECTION LOGIC
DTC No.
CONSULT screen terms
(Trouble diagnosis
content)
DTC Detection Condition
...
Manifold Absolute Pressure Sensor
Component Inspection
Component Inspection
CHECK MANIFOLD ABSOLUTE PRESSURE
(MAP) SENSOR-1
Turn ignition switch OFF.
Start engine and warm it up to normal
operating temperature.
Turn ...
Diagnosis System (bcm)
Common Item
Consult Function (bcm - Common Item)
CONSULT Function (BCM - COMMON ITEM)
BCM
Refer to CONSULT Function (BCM - COMMON ITEM).
Intelligent Key
Consult Function (bcm - In ...