Nissan Sentra B18 (2020-2025) Service Manual: Parking Brake System
Inspection
INSPECTION
Lever Stroke
Operate the parking brake lever with a force of 196 N (20.0 kg-f, 44.1 lb-f). Check that the lever stroke is within the specified number of notches. (Check it by listening to the clicks of the ratchet.)
|
Number of notches |
: Refer to Parking Brake Control. |
When brake warning lamp turns ON, check that the lever stroke is within the specified number of notches. (Check it by listening to the clicks of the ratchet.)
|
Number of notches |
: Refer to Parking Brake Control. |
Inspect Components
-
Make sure that the attachment conditions (looseness, backlash, etc.) of each component are normal.
-
Check the following:
-
Device assembly for bends, damage and cracks. Replace if any damage is noted.
-
Cables and equalizer for wear and damage. Replace if any damage is noted.
-
Parking brake switch. Replace if it does not work correctly.
-
Adjustment
ADJUSTMENT
Remove the cup holder finisher. Refer to Exploded View.
Pull the parking brake lever.
Insert a
suitable tool onto the adjusting nut (A) and rotate the adjusting
nut to fully loosen the cable, then release the parking brake
lever. 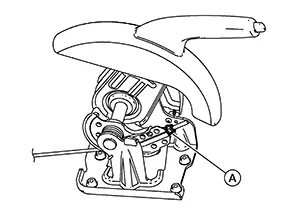
CAUTION:
Do not reuse the adjusting nut if the nut is removed.
Note:
It is not necessary to remove the adjusting nut.
Depress the brake pedal with a force of 196 N (20.0 kg-f, 44.1 lb-f) about 10 times with the engine on.
CAUTION:
Make sure to securely operate the brake pedal.
Check that there is no drag on the rear brake drum when the brake pedal is released. If any brake drum drag is found, perform the following procedure: Remove the brake shoes. Refer to Removal and Installation. Push the pistons into the wheel cylinder.
CAUTION:
Push both pistons simultaneously.
Install the brake shoes. Adjust the brake shoe clearance. Rotate the brake drum and check for drag again. If any drag is found, replace rear brake assembly parts if necessary.Adjust the cable with the following procedure: Adjust the parking brake lever stroke by turning the adjusting nut using a suitable tool.
CAUTION:
-
Do not reuse the adjusting nut if the nut is removed.
-
To prevent damage, do not bend parking brake cables.
|
Number of notches |
: Refer to Parking Brake Control. |
CAUTION:
If any drag is found, verify the parking brake components are installed and adjusted correctly.
Install the cup holder finisher. Refer to Exploded View.


Other materials:
Removal and Installation
Removal and Installation
REMOVAL
Remove
front pillar finisher (LH/RH). Refer to Removal and Installation.
Remove
front camera unit. Refer to Removal and Installation.
Remove
inside mirror. Refer to Removal and Installation.
Remove the
cowl top cover. Refer to Removal ...
Additional Service When Replacing Combination Meter
Work Procedure
Work Procedure
When replacing the combination meter, perform the
following procedure before and after replacement.
BEFORE REPLACEMENT
CONSULT
Note the odometer mileage of the combination meter.
...
Flasher
Consult Function (bcm - Flasher)
CONSULT Function
(BCM - FLASHER)
DATA MONITOR
Note:
The following table includes information (items)
inapplicable to this Nissan Sentra vehicle. For information (items) applicable to
this vehicle, refer to CONSULT display items.
...
