Nissan Sentra B18 (2020-2025) Service Manual: P0365 Exhaust Valve Timing Control Position Sensor
Dtc Description
DTC Description
DTC DETECTION LOGIC
|
DTC |
CONSULT screen terms (Trouble diagnosis content) |
DTC detection condition |
|
|
P0365 |
CMP SEN/CIRC-B1 (Camshaft position sensor “B� circuit bank 1) |
Diagnosis condition |
Engine: Cranking or running (idle speed or more than 800 rpm) |
|
Signal (terminal) |
EVT control position sensor signal |
||
|
Threshold |
|
||
|
Diagnosis delay time |
— |
||
Possible Cause
-
Harness or connectors
-
Exhaust camshaft position sensor circuit is open or shorted.
-
Sensor power supply 1 circuit is shorted.
-
-
Exhaust camshaft position sensor
-
Exhaust camshaft
-
Starter motor
-
Starting circuit
-
Battery deterioration
-
Sensor power supply 1 circuit sensors
FAIL-SAFE
Engine Control System
|
Engine operating condition in fail-safe mode |
||
|---|---|---|
|
Fail safe mode |
Nissan Sentra Vehicle behavior |
|
|
Device fix mode |
|
|
Idle Start/Stop System
When a DTC is detected, the start/stop indicator lamp blinks slowly and the idle start/stop system operation is prohibited.
When ECM detects error while operating the idle start/stop system, ECM restarts the engine.
Confirmation Procedure
Confirmation Procedure
-
CHECK DTC PRIORITY
If DTC P0365 is displayed with DTC P0643, first perform the trouble diagnosis for DTC P0643.
Is applicable DTC detected?
YES >>Perform diagnosis of applicable. Refer to DTC Description.
NO >>GO TO 2.
-
PRECONDITIONING
If DTC Confirmation Procedure has been previously conducted, always perform the following procedure before conducting the next test.
-
Turn ignition switch OFF and wait at least 10 seconds.
-
Turn ignition switch ON.
-
Turn ignition switch OFF and wait at least 10 seconds.
TESTING CONDITION:
Before performing the following procedure, confirm that battery voltage is more than 10.5 V at idling.
>>GO TO 3.
-
-
PERFORM DTC CONFIRMATION PROCEDURE-1
-
Start engine and let it idle for at least 5 seconds.
If engine does not start, crank engine for at least 2 seconds.
-
Check 1st trip DTC.
Is 1st trip DTC detected?
YES >>Proceed to DTC Diagnosis Procedure.
NO >>GO TO 4.
-
-
PERFORM DTC CONFIRMATION PROCEDURE-2
-
Keep the engine speed at more than 800 rpm for at least 5 seconds.
-
Check 1st trip DTC.
Is 1st trip DTC detected?
YES >>Proceed to DTC Diagnosis Procedure.
NO-1 >>To check malfunction symptom before repair: Refer to Intermittent Incident.
NO-2 >>Confirmation after repair: INSPECTION END 
-
Dtc Diagnosis Procedure
DTC Diagnosis Procedure
-
CHECK DTC PRIORITY
If DTC P0365 is displayed with DTC P0643, first perform the trouble diagnosis for DTC P0643.
Is applicable DTC detected?
YES >>Perform diagnosis of applicable. Refer to DTC Description.
NO >>GO TO 2.
-
CHECK STARTING SYSTEM
Turn ignition switch to START position.
Does the engine turn over? Does the starter motor operate?
YES >>GO TO 3.
NO >>Check starting system. Refer to Work Flow (With 165-DSS-5000P), Work Flow (Without 165-DSS-5000P).
-
CHECK EXHAUST CAMSHAFT POSITION SENSOR POWER SUPPLY CIRCUIT-1
-
Turn ignition switch OFF.
-
Disconnect exhaust camshaft position sensor harness connector.
-
Turn ignition switch ON.
-
Check the voltage between exhaust camshaft position sensor harness connector terminals.
Exhaust camshaft position sensor
Voltage
(Approx.)
Connector
+
−
Terminals
F57
1
2
5 V
Is the inspection result normal?
YES >>GO TO 9.
NO >>GO TO 4.
-
-
CHECK EXHAUST CAMSHAFT POSITION SENSOR POWER SUPPLY CIRCUIT-2
Check the voltage between exhaust camshaft position sensor harness connector and ground.
+
−
Voltage
(Approx.)
Exhaust camshaft position sensor
Connector
Terminal
F57
1
Ground
5 V
Is the inspection result normal?
YES >>GO TO 7.
NO >>GO TO 5.
-
CHECK EXHAUST CAMSHAFT POSITION SENSOR POWER SUPPLY CIRCUIT-3
-
Turn ignition switch OFF.
-
Disconnect ECM harness connector.
-
Check the continuity between exhaust camshaft position sensor harness connector and ECM harness connector.
Exhaust camshaft position sensor
ECM
Continuity
Connector
Terminal
Connector
Terminal
F57
1
F24
28
Existed
Is the inspection result normal?
YES >>GO TO 6.
NO >>Repair or replace error-detected parts.
-
-
CHECK SENSOR POWER SUPPLY 1 CIRCUIT
Refer to DTC Diagnosis Procedure.
Is the inspection result normal?
YES >>INSPECTION END
NO >>Replace malfunctioning parts.
-
CHECK EXHAUST CAMSHAFT POSITION SENSOR GROUND CIRCUIT
-
Turn ignition switch OFF.
-
Disconnect ECM harness connector.
-
Check the continuity between exhaust camshaft position sensor harness connector and ECM harness connector.
Exhaust camshaft position sensor
ECM
Continuity
Connector
Terminal
Connector
Terminal
F57
2
F24
30
Existed
-
Also check harness for short to power.
Is the inspection result normal?
YES >>GO TO 8.
NO >>Repair or replace error-detected parts.
-
-
CHECK ECM GROUND CIRCUIT
Check the continuity between ECM harness connector and ground.
ECM
Ground
Continuity
Connector
Terminal
F24
5
Ground
Existed
65
F25
69
E16
157
159
162
Is the inspection result normal?
YES >>INSPECTION END
NO >>Repair or replace error-detected parts.
-
CHECK EXHAUST CAMSHAFT POSITION SENSOR INPUT SIGNAL CIRCUIT
-
Check the continuity between exhaust camshaft position sensor harness connector and ECM harness connector.
Exhaust camshaft position sensor
ECM
Continuity
Connector
Terminal
Connector
Terminal
F57
3
F24
29
Existed
-
Also check harness for short to power.
Is the inspection result normal?
YES >>GO TO 10.
NO >>Repair or replace error-detected parts.
-
-
CHECK EXHAUST CAMSHAFT POSITION SENSOR
Refer to Component Inspection.
Is the inspection result normal?
YES >>GO TO 11.
NO >>Replace exhaust camshaft position sensor. Refer to Exploded View.
-
CHECK CAMSHAFT (EXT)
Check the following.
-
Accumulation of debris to the signal plate of camshaft
 rear end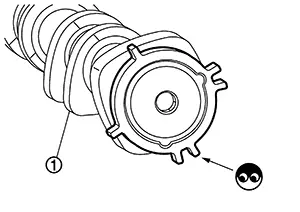
-
Chipping signal plate of camshaft rear end
Is the inspection result normal?
YES >>INSPECTION END
NO >>Remove debris and clean the signal plate of camshaft rear end or replace camshaft. Refer to Exploded View.
-
Other materials:
Front Suspension. Preparation. Preparation
Preparation
Special Service Tools
Special Service Tools
The actual shape of the tools may differ from those
illustrated here.
Tool number
(TechMate No.)
Tool name
Description
...
Automatic Emergency Braking (AEB) with Pedestrian Detection
WARNING
Failure to carefully follow all warnings and instructions for proper use of
the Automatic Emergency Braking (AEB) with Pedestrian Detection system could result
in serious injury or death.
The AEB with Pedestrian Detection system on the Nissan Sentra is a supplemental
driver assis ...
Preparation. Preparation
Preparation
Special Service Tools
Special Service Tools
The actual shape of the tools may differ from
those illustrated here.
Tool number
(TechMate No.)
Tool name
...