Nissan Sentra Service Manual: On board refueling vapor recovery(ORVR)
Component Function Check
1.CHECK ORVR FUNCTION
Check whether the following symptoms are present.
- Fuel odor from EVAP canister is strong
- Cannot refuel/Fuel odor from the fuel filler opening is strong while refueling.
Are any symptoms present? YES >> Proceed to EC-468, "Diagnosis Procedure".
NO >> INSPECTION END
\Diagnosis Procedure
1.INSPECTION START
Check whether the following symptoms are present.
A: Fuel odor from EVAP canister is strong.
B: Cannot refuel/Fuel odor from the fuel filler opening is strong while refueling.
A or B
A >>GO TO 2.
B >>GO TO 7.
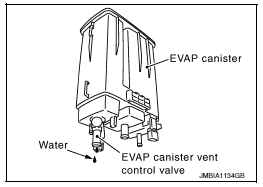
2.CHECK EVAP CANISTER
- Remove EVAP canister with EVAP canister vent control valve and EVAP control system pressure sensor attached. Refer to FL-15, "Removal and Installation".
- Weigh the EVAP canister with EVAP canister vent control valve and EVAP control system pressure sensor attached.
The weight should be less than 2.1 kg (4.6 lb).
Is the inspection result normal? YES >> GO TO 3.
NO >> GO TO 4.
3.CHECK IF EVAP CANISTER IS SATURATED WITH WATER
Check if water will drain from EVAP canister Does water drain from the EVAP canister? YES >> GO TO 4.
NO >> GO TO 6.

4.REPLACE EVAP CANISTER
Replace EVAP canister with a new one. Refer to FL-15, "Removal and Installation".
>> GO TO 5.
5.DETECT MALFUNCTIONING PART
Check the EVAP hose between EVAP canister and vehicle frame for clogging or poor connection.
>> Repair or replace EVAP hose. Refer to FL-15, "Removal and Installation".
6.CHECK REFUELING EVAP VAPOR CUT VALVE
Check refueling EVAP vapor cut valve. Refer to EC-470, "Component Inspection".
Is the inspection result normal? YES >> INSPECTION END
NO >> Replace refueling EVAP vapor cut valve with fuel tank. Refer to FL-10, "Removal and Installation".
7.CHECK EVAP CANISTER
- Remove EVAP canister with EVAP canister vent control valve and EVAP control system pressure sensor attached. Refer to FL-15, "Removal and Installation".
- Weigh the EVAP canister with EVAP canister vent control valve and EVAP control system pressure sensor attached.
The weight should be less than 2.1 kg (4.6 lb).
Is the inspection result normal? YES >> GO TO 8.
NO >> GO TO 9.
8.CHECK IF EVAP CANISTER IS SATURATED WITH WATER
Check if water will drain from EVAP canister.
Does water drain from the EVAP canister? YES >> GO TO 6.
NO >> GO TO 11.
9.REPLACE EVAP CANISTER
Replace EVAP canister with a new one. Refer to FL-15, "Removal and Installation".
>> GO TO 10.
10.DETECT MALFUNCTIONING PART
Check the EVAP hose between EVAP canister and vehicle frame for clogging or poor connection.
>> Repair or replace EVAP hose. Refer to FL-14, "Exploded View".
11.CHECK VENT HOSES AND VENT TUBES
Check hoses and tubes between EVAP canister and refueling control valve for clogging, kinks, looseness and improper connection.
Is the inspection result normal? YES >> GO TO 12.
NO >> Repair or replace hoses and tubes.
12.CHECK FILLER NECK TUBE
Check recirculation line for clogging, dents and cracks.
Is the inspection result normal? YES >> GO TO 13.
NO >> Replace filler neck tube.
13.CHECK REFUELING EVAP VAPOR CUT VALVE
Check refueling EVAP vapor cut valve. Refer to EC-470, "Component Inspection".
Is the inspection result normal? YES >> GO TO 14.
NO >> Replace refueling EVAP vapor cut valve with fuel tank. Refer to FL-10, "Removal and Installation".
14.CHECK FUEL FILLER TUBE
Check filler neck tube and hose connected to the fuel tank for clogging, dents and cracks.
Is the inspection result normal? YES >> GO TO 15.
NO >> Replace fuel filler tube. Refer to FL-10, "Exploded View".
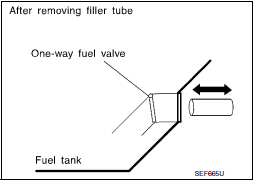
15.CHECK ONE-WAY FUEL VALVE-1
Check one-way valve for clogging.
Is the inspection result normal? YES >> GO TO 16.
NO >> Repair or replace one-way fuel valve with fuel tank. Refer to FL-10, "Removal and Installation".
16.CHECK ONE-WAY FUEL VALVE-2
- Check that fuel is drained from the tank.
- Remove fuel filler tube and hose. Refer to FL-10, "Exploded View".
- Check one-way fuel valve for operation as per the following.
When a stick is inserted, the valve should open, when removing stick it should close.
Do not drop any material into the tank.
Is the inspection result normal? YES >> INSPECTION END
NO >> Replace fuel filler tube or replace one-way fuel valve with fuel tank. Refer to FL-10, "Removal and Installation".
Component Inspection
1.INSPECTION START
Will CONSULT be used? Will CONSULT be used? YES >> GO TO 2.
NO >> GO TO 3.
2.CHECK REFUELING EVAP VAPOR CUT VALVE
 With CONSULT
- Turn ignition switch OFF.
- Remove fuel tank. Refer to FL-10, "Removal and Installation".
- Drain fuel from the tank as per the following:
- Remove fuel feed hose located on the fuel gauge retainer.
- Connect a spare fuel hose, one side to fuel gauge retainer where the hose was removed and the other side to a fuel container.
- Drain fuel using “FUEL PUMP RELAY” in “ACTIVE TEST” mode with CONSULT.
- Check refueling EVAP vapor cut valve for being stuck to close as per the
following.
Blow air into the refueling EVAP vapor cut valve (from the end of EVAP/ORVR line hose), and check that the air flows freely into the tank.
- Check refueling EVAP vapor cut valve for being stuck to open as per the following.
- Connect vacuum pump to hose end.
- Remove fuel gauge retainer with fuel gauge unit.
Always replace O-ring with new one.
- Turn fuel tank upside down.
- Apply vacuum pressure to hose end [−13.3 kPa (−0.136 kg/cm3, −1.93 psi)] with fuel gauge retainer remaining open and check that the pressure is applicable.
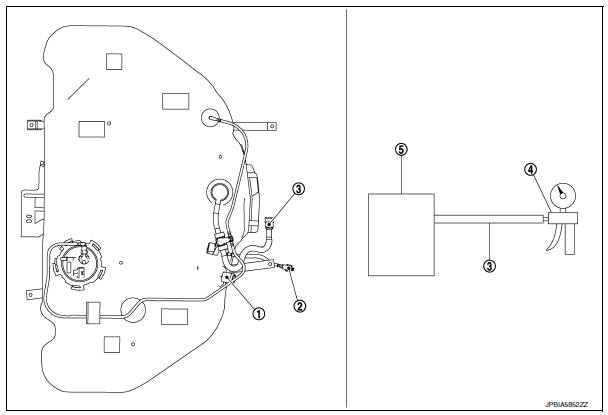
- Filler tube
- Recirculation line
- EVAP/ORVR line
- Vacuum/pressure handy pump
- Fuel tank
Is the inspection result normal? YES >> INSPECTION END
NO >> Replace refueling EVAP vapor cut valve with fuel tank. Refer to FL-10, "Removal and Installation".
3.CHECK REFUELING EVAP VAPOR CUT VALVE
 Without CONSULT
- Turn ignition switch OFF.
- Remove fuel tank. Refer to FL-10, "Removal and Installation".
- Drain fuel from the tank as per the following:
- Remove fuel gauge retainer.
- Drain fuel from the tank using a handy pump into a fuel container.
- Check refueling EVAP vapor cut valve for being stuck to close as per the
following.
Blow air into the refueling EVAP vapor cut valve (from the end of EVAP/ORVR line hose), and check that the air flows freely into the tank
- Check refueling EVAP vapor cut valve for being stuck to open as per the following.
- Connect vacuum pump to hose end.
- Remove fuel gauge retainer with fuel gauge unit.
Always replace O-ring with new one.
- Turn fuel tank upside down.
- Apply vacuum pressure to hose end [−13.3 kPa (−0.136 kg/cm3, −1.93 psi)] with fuel gauge retainer remaining open and check that the pressure is applicable.
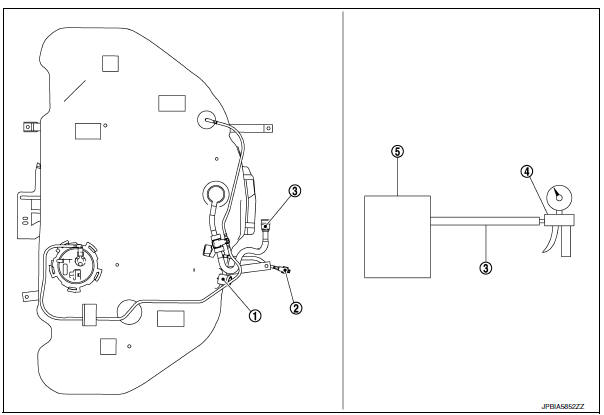
- Filler tube
- Recirculation line
- EVAP/ORVR line
- Vacuum/pressure handy pump
- Fuel tank
Is the inspection result normal? YES >> INSPECTION END
NO >> Replace refueling EVAP vapor cut valve with fuel tank. Refer to FL-10, "Removal and Installation".
 Malfunction indicator lamp
Component Function Check
1.CHECK MIL FUNCTION
Turn ignition switch ON.
Check that MIL lights up.
Is the inspection result normal?
YES >> INSPECTION END
NO >> Proceed to EC-467, ...

Other materials:
Brake fluid
Drain and Refill
CAUTION:
Do not spill or splash brake fluid on painted surfaces. Brake
fluid may damage paint. If brake fluid is
splashed on painted areas, wash it away with water immediately.
Prior to repair, turn the ignition switch OFF, disconnect the ABS
actuator and electric uni ...
Off-road recovery
If the right side or left side wheels unintentionally
leave the road surface, maintain control of the
vehicle by following the procedure below. Please
note that this procedure is only a general guide.
The vehicle must be driven as appropriate based
on the conditions of the vehicle, road and t ...
Three-point type seat belt with retractor
WARNING
Every person who drives or rides in this
vehicle should use a seat belt at all
times.
Do not ride in a moving vehicle when
the seatback is reclined. This can be
dangerous. The shoulder belt will not
be against your body. In an accident,
you could be thr ...
