Nissan Sentra B18 (2020-2025) Service Manual: Oil Cooler
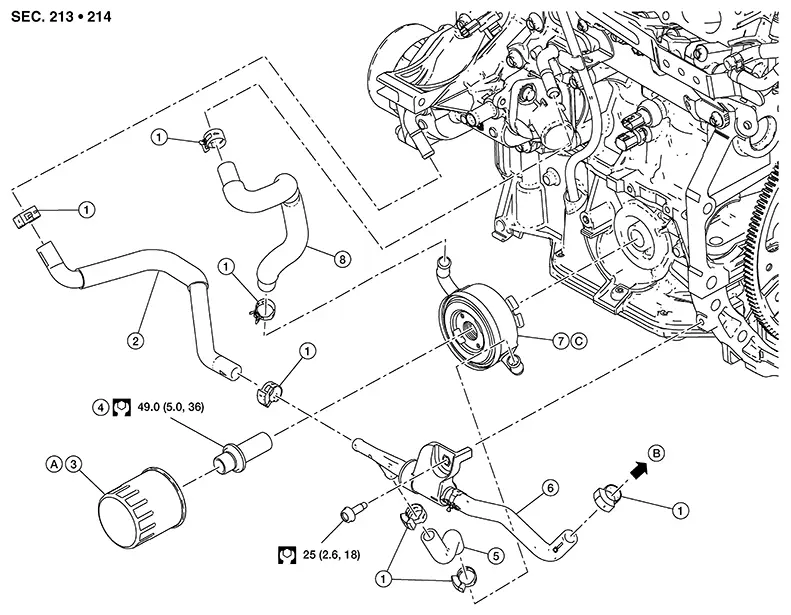
Exploded View
|
1. |
Clamp |
2. |
Water hose A |
3. |
Oil filter |
|
4. |
Connector bolt |
5. |
Water hose B |
6. |
Heater thermostat housing |
|
7. |
Oil cooler |
8. |
Water hose C |
A. |
Refer to Removal and Installation. |
|
B. |
To CVT oil warmer. Refer to Exploded View. |
C. |
Refer to Removal and Installation. |
|
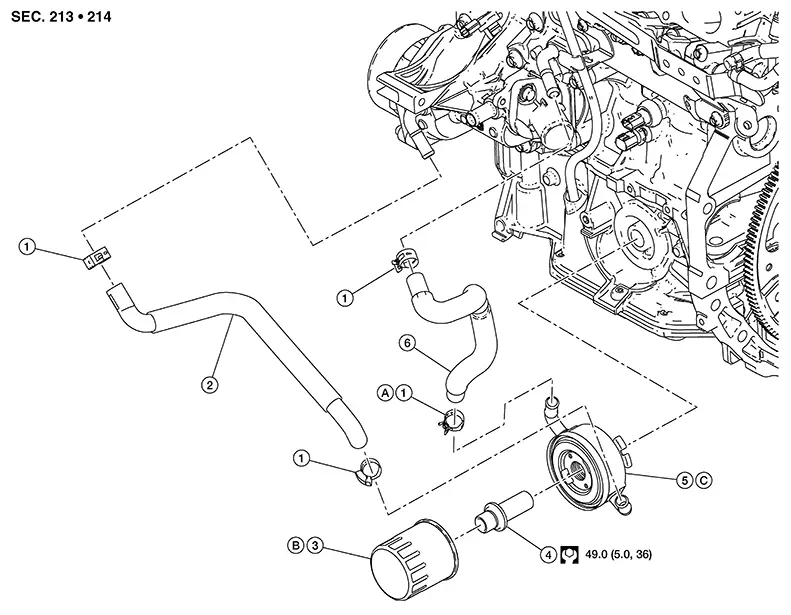
1. |
Clamp |
2. |
Water hose A |
3. |
Oil filter |
|
4. |
Connector bolt |
5. |
Oil cooler |
6. |
Water hose B |
|
A. |
Refer to Removal and Installation. |
B. |
Refer to Removal and Installation. |
Removal and Installation
REMOVAL
Warning:
Be careful not to get burn yourself, as engine oil and engine coolant may be hot.
Note:
When removing components such as hoses, tubes/lines, etc., cap or plug openings to prevent fluid from spilling.
Drain
engine coolant from radiator and cylinder block. Refer to Draining. Note:
Perform this step when removing water hoses.
Remove the oil filter. Refer to Removal and Installation.
For CVT models, disconnect water hose B and water hose C from the oil cooler.
-
When removing oil cooler only, pinch water hoses near oil cooler to prevent engine coolant from spilling out.
-
Remaining engine coolant in piping will come out. Use a tray to collect it.
CAUTION:
Perform this step when the engine is cold.
For M/T models, disconnect water hose A and water hose B from the oil cooler.
-
When removing oil cooler only, pinch water hoses near oil cooler to prevent engine coolant from spilling out.
-
Remaining engine coolant in piping will come out. Use a tray to collect it.
CAUTION:
Perform this step when the engine is cold.
Loosen the connector bolt and remove the connector bolt and oil cooler.
INSTALLATION
Installation is the reverse order of removal.
-
Tighten the connector bolt (2) after aligning the stopper (A) on the oil pan (upper) side with protrusion of oil cooler (1).
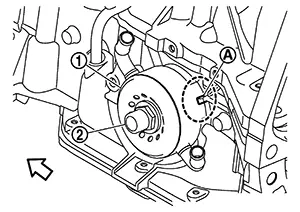

: Engine front
Inspection
INSPECTION AFTER REMOVAL
Oil Cooler
Check oil cooler for cracks. Check oil cooler for clogging by blowing through engine coolant inlet. If necessary, replace oil cooler.
INSPECTION AFTER INSTALLATION
Check the engine oil level and the engine coolant level and add engine oil and engine coolant. Refer to Inspection (ENGINE OIL) and Inspection (ENGINE COOLANT).
Start the engine, and check that there is no leakage of engine oil or engine coolant.
Stop the engine and wait for 10 minutes.
Check the engine oil level and the engine coolant level again. Refer to Inspection (ENGINE OIL) and Inspection (ENGINE COOLANT).

 Oil Pump
Exploded View
Exploded View
Oil pump is integrated in the oil pan (upper).
Refer to Exploded View. ...
Other materials:
Consult Data Link Connector (dlc) Circuit
CONSULT Data
Link Connector (DLC) Circuit
INSPECTION PROCEDURE
If the CONSULT cannot diagnose the system properly,
check the following items.
Symptom
Check item
...
Front Auxiliary Input Jacks
Removal and Installation
Removal and Installation
REMOVAL
Remove
cluster lid C. Refer to Removal and Installation.
Using a
suitable tool, release pawls on the front auxiliary input jacks
(1), then remove from the front of cluster lid C (2).
...
Automatic speed control device (ASCD)
AUTOMATIC SPEED CONTROL DEVICE (ASCD) : System Description
SYSTEM DIAGRAM
BASIC ASCD SYSTEM
Refer to Owner's Manual for ASCD operating instructions.
Automatic Speed Control Device (ASCD) allows a driver to keep vehicle at
predetermined constant speed
without depressing accelerator pedal ...
