Nissan Sentra B18 (2020-2025) Service Manual: Mirrors :: Removal and Installation
Inside Mirror. Exploded View
Exploded View
Manual Mirror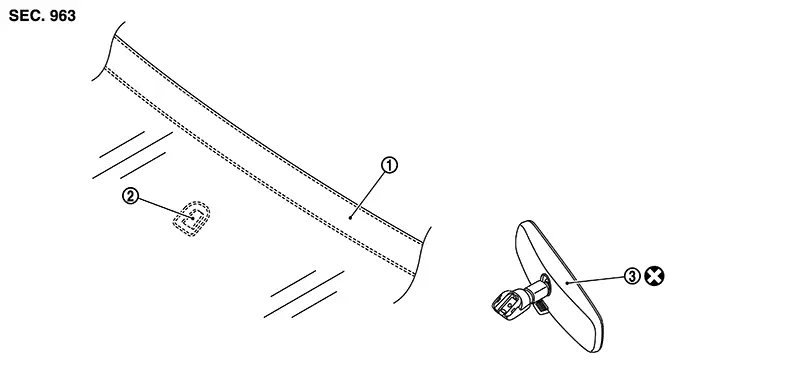
|
1. |
Windshield glass |
2. |
Inside mirror base |
3. |
Inside mirror assembly |
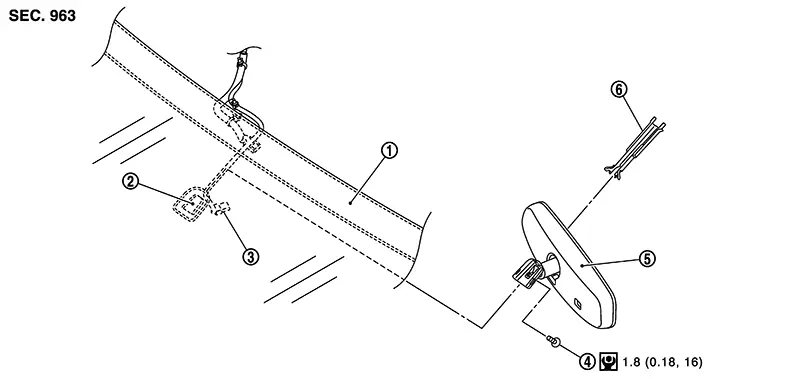
|
1. |
Windshield glass |
2. |
Inside mirror base |
3. |
Harness connector |
|
4. |
Mirror screw |
5. |
Inside mirror assembly |
6. |
Inside mirror cover |
Removal and Installation
Removal and Installation
MANUAL MIRROR
Removal
Insert a
suitable tool (A) under the inside mirror (1). 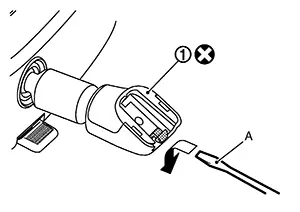
Slide the inside mirror upward while pushing down on the pawl.
CAUTION:
-
Do not reuse the inside mirror disassembled from inside mirror base.
-
Do not use excessive force to remove the inside mirror.
-
Wrap a suitable tool with a shop cloth to avoid damage to the windshield glass.
Installation
Installation is in the reverse order of removal.
CAUTION:
When installing the inside mirror on the mirror base, be sure to push the pawl until it is tightly connected to the mirror base.
AUTO ANTI-DAZZLE MIRROR
Removal
Remove the mirror screw from the mirror base.
Disconnect
the harness connector from the mirror.
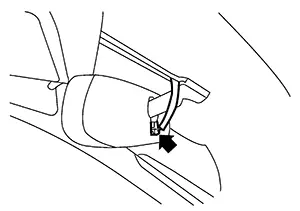
Slide the mirror upward to remove.
Installation
Installation is in the reverse order of removal.
Door Mirror. Exploded View
Exploded View
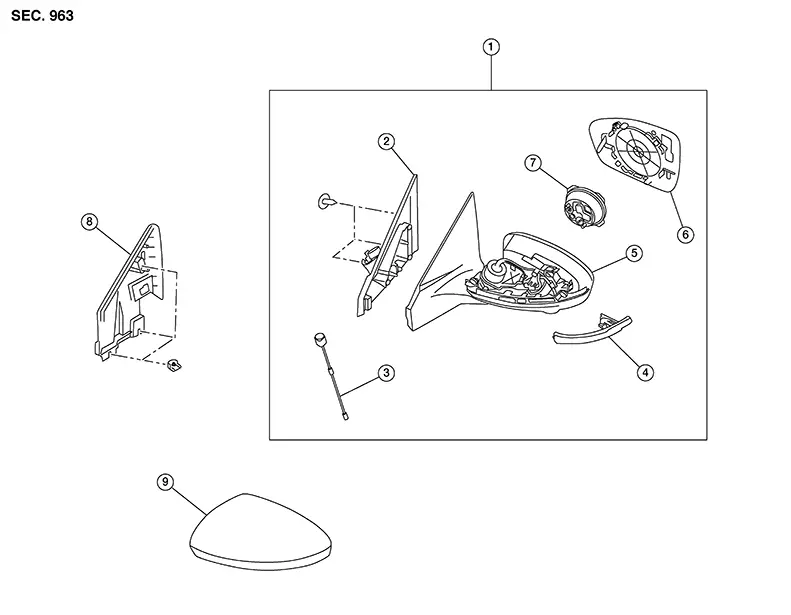
|
1. |
Door mirror assembly |
2. |
Door mirror base cover |
3. |
Side camera (with intelligent around view monitor) |
|
4. |
Turn signal lamp (if equipped) |
5. |
Door mirror housing |
6. |
Glass mirror |
|
7. |
Door mirror actuator |
8. |
Door mirror corner finisher |
9. |
Door mirror cover |
Door Mirror Assembly
Removal and Installation
Removal and Installation
REMOVAL
CAUTION:
Be careful not to scratch or damage the door mirror body when removing.
Remove front door finisher. Refer to Removal and Installation.
Using a
suitable tool, release clips and remove door mirror corner finisher
(1). 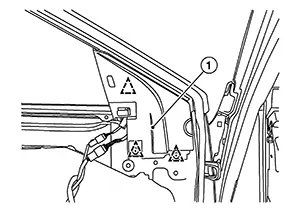
 : Clip
Using a
suitable tool, release clips and remove bolts (A). 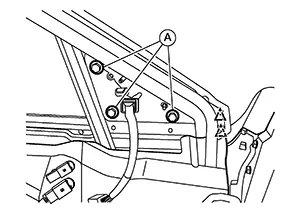
: Clip
Disconnect harness connector and remove door mirror assembly.
CAUTION:
Perform camera image calibration (if equipped with intelligent around view monitor system). Refer to Description.
INSTALLATION
Installation is in the reverse order of removal.
Glass Mirror
Removal and Installation
Removal and Installation
REMOVAL
Using a
suitable tool, release pawls. 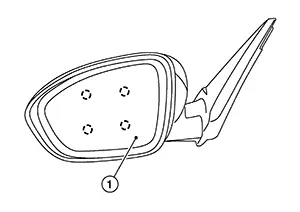
 :
Pawl
:
Pawl
Disconnect harness connectors (if equipped) and remove glass mirror (1).
INSTALLATION
Installation is in the reverse order of removal.
CAUTION:
After installation, visually check that pawls are securely engaged.
Door Mirror Cover
Removal and Installation
Removal and Installation
REMOVAL
Note:
With side turn signal lamp shown, without is similar.
Remove glass mirror. Refer to Removal and Installation.
Using a
suitable tool, release pawls and remove the door mirror cover (1)
from the door mirror assembly. 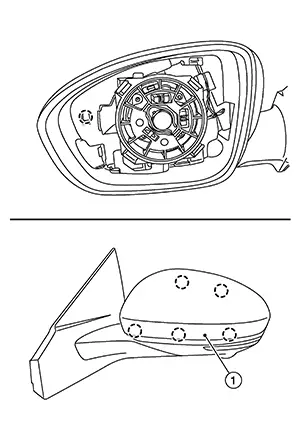
:
Pawl
INSTALLATION
Installation is in the reverse order of removal.
CAUTION:
After installation, visually check that pawls are securely engaged.
Door Mirror Actuator
Removal and Installation
Removal and Installation
REMOVAL
CAUTION:
Be careful not to scratch or damage the door mirror body when removing.
Remove glass mirror. Refer to Removal and Installation.
Remove
screws (A). 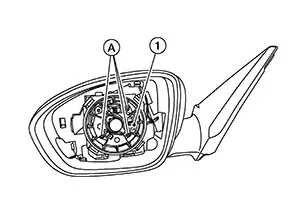
Disconnect harness connector and remove door mirror actuator (1).
INSTALLATION
Installation is in the reverse order of removal.
Main Power Window and Door Mirror Remote Control Switch. Removal and Installation. Removal and Installation
Removal and Installation
REMOVAL
Remove the main power window and door lock/unlock switch. Refer to Removal and Installation.
Using a
suitable tool, release pawls and remove the door mirror remote
control switch (1). 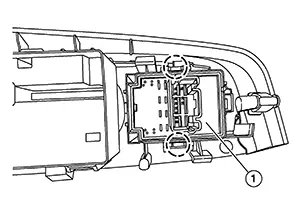
:
Pawl
INSTALLATION
Installation is in the reverse order of removal.
Other materials:
Air Pressure Monitor
Consult Function (bcm - Air Pressure Monitor)
CONSULT Function
(BCM - AIR PRESSURE MONITOR)
Note:
The Signal Tech II Tool [– (NI-50190)] can be used
to perform the following functions. Refer to the Signal Tech II User
Guide for additional information.
Activate and ...
Cannot Set Automatic Speed Control Device (ascd)
Diagnosis Procedure
Diagnosis Procedure
PERFORM SELF-DIAGNOSIS
With CONSULT
Perform ECM self-diagnosis.
Is DTC detected?
YES >>
Perform diagnosis of applicable.
NO >>
GO TO 2.
CHECK BRAKE PEDAL POSITION SWITCH
...
Preparation. Preparation
Preparation
Special Service Tool
Special Service Tool
The actual shape of the tools may differ from those
illustrated here.
Tool number
(TechMate No.)
Tool name
...