Nissan Sentra Service Manual: Inside key antenna
Console
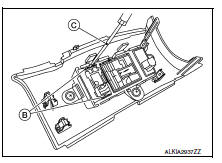
CONSOLE : Removal and Installation
REMOVAL
- Remove the shift selector finisher. Refer to IP-17, "Removal and Installation".
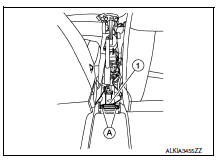
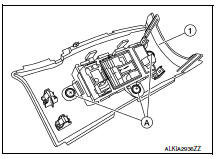
- Remove the inside key antenna (console) screws (A) and inside key antenna (console) (1).
INSTALLATION
Installation is in the reverse order of removal.
Luggage room
Luggage room : removal and installation
REMOVAL
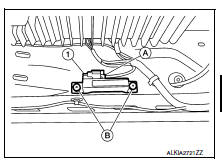
- Disconnect the harness connector (A) from the inside key antenna (luggage room) (1).
- Remove the inside key antenna (luggage room) clips (B), and remove.
INSTALLATION
Installation is in the reverse order of removal.
Outside key antenna
Driver side
Driver side : removal and installation
The driver side outside key antenna and driver side outside handle are serviced as an assembly. Refer to DLK-173, "FRONT DOOR HANDLE : Removal and Installation - Outside Handle".
Passenger side
PASSENGER SIDE : Removal and Installation
The passenger side outside key antenna and passenger side outside handle are serviced as an assembly.
Refer to DLK-173, "FRONT DOOR HANDLE : Removal and Installation - Outside Handle".
Installation is in the reverse order of removal.
Rear bumper
Rear bumper : removal and installation
REMOVAL
- Remove rear bumper fascia. Refer to EXT-20, "Removal and Installation".
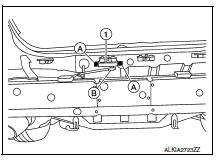
- Disconnect the harness connector (B) from the rear bumper key antenna (1).
- Remove the nuts (A) that retain the rear bumper key antenna (1) to the body.
INSTALLATION
Installation is in the reverse order of removal.
Door request switch
Driver side
Driver side : removal and installation
The driver side door request switch and driver side outside handle are serviced as an assembly. Refer to DLK- 173, "FRONT DOOR HANDLE : Removal and Installation - Outside Handle".
Passenger side
PASSENGER SIDE : Removal and Installation
The passenger side door request switch and passenger side outside handle are serviced as an assembly.
Refer to DLK-173, "FRONT DOOR HANDLE : Removal and Installation - Outside Handle".
Trunk lid finisher
Trunk lid finisher : removal and installation
REMOVAL
- Remove the license lamp finisher. Refer to EXT-44, "Removal and Installation".
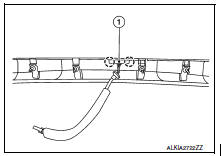
- Release the pawls and remove the trunk lid request switch (1).
 : Pawl
INSTALLATION
Installation is in the reverse order of removal.
Intelligent key warning buzzer
Removal and installation
REMOVAL
NOTE:
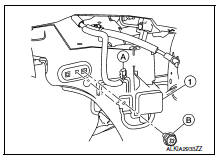
The Intelligent Key warning buzzer is located in the front passenger side area of the engine compartment, near the washer tank.
- Remove the washer tank inlet. Refer to WW-51, "Exploded View".
- Remove the nut (B) and the Intelligent Key warning buzzer (1).
- Disconnect the harness connector (A) from the Intelligent Key warning buzzer (1) and remove.
INSTALLATION
Installation is in the reverse order of removal.
Remote keyless entry receiver
Removal and installation
REMOVAL
- Remove glove box assembly. Refer to IP-22, "Removal and Installation".
- Disconnect the harness connector from the remote keyless entry receiver.
- Remove the screw and remote keyless entry receiver.
INSTALLATION
Installation is in the reverse order or removal.
Intelligent key battery
Removal and installation
- Release the lock knob on the back of the Intelligent Key and remove the key.
- Insert a suitable tool (A) wrapped with a cloth into the slit of the corner and rotate it to separate the upper part from the lower part.
CAUTION:
- Do not insert a tool into the notches of the Intelligent Key to pry it open, as this may damage the circuit board.
- Do not use excessive force when opening the Intelligent Key, as this may result in damage to the internal components.
- Do not touch the circuit board or battery terminal.
- The key fob is water-resistant. However, if it does get wet, immediately wipe it dry.
- Replace the battery with a new one.
Battery replacement :Coin-type lithium battery (CR2032)
- Align the tips of the upper and lower parts, and then push them together until unit is securely closed.
CAUTION:
- When replacing battery, keep dirt, grease, and other foreign materials off the electrode contact area.
- After replacing the battery, check that all Intelligent Key functions work normally.
Trunk lid opener switch
Removal and installation
REMOVAL
- Remove the instrument lower panel LH. Refer to IP-21, "Removal and Installation".
- Remove to the instrument finisher D (1).
- Remove the screws (A) that retain the switch carrier to the instrument finisher (D).
- Release upper tab and lower tab (B) using a suitable tool (C), then remove the trunk lid opener switch from the upper switch carrier.
INSTALLATION
Installation is in the reverse order of removal.
 Trunk lid
Trunk lid assembly
Trunk lid assembly : exploded view
Trunk lid hinge LH/RH
Torsion bar LH/RH
Torsion bar clips
Trunk lid finisher (if equipped)
Emergency release handle
Emergency rel ...

Other materials:
P2858 Clutch B Pressure
DTC Logic
DTC
CONSULT screen terms
(Trouble diagnosis content)
DTC detection condition
Possible causes
P2858
CLUTCH B PRESSURE
(Clutch B Pressure Engagement
Performance)
The auxiliary gearbox gear ratio is 2.232 or
more for the auxiliary gearbox 2GR ratio ...
Ipdm-e branch line circuit
Diagnosis Procedure
1.Check connector
Turn the ignition switch off.
Disconnect the battery cable from the negative terminal.
Check the terminals and connectors of the ipdm e/r for damage, bend and
loose connection (unit side
and connector side).
Is the inspection result normal?
Yes ...
Precaution for Supplemental Restraint System (SRS) "AIR BAG" and "SEAT BELT
PRE-TENSIONER"
The Supplemental Restraint System such as “AIR BAG” and “SEAT BELT PRE-TENSIONER”,
used along
with a front seat belt, helps to reduce the risk or severity of injury to the
driver and front passenger for certain
types of collision. Information necessary to service the system ...
