Nissan Sentra B18 (2020-2025) Service Manual: Hood Assembly
Removal and Installation
CAUTION:
-
Use two people when removing or installing hood due to its heavy weight.
-
Use protective tape or shop cloths to protect surrounding components from damage during removal and installation of hood.
REMOVAL
Support the hood using a suitable tool.
Warning:
Bodily injury may occur if hood is not supported properly when removing hood.
Remove hood insulator.
Disconnect front washer tube at front washer tube check valve splitter. Refer to Exploded View.
Remove hood
hinge to hood nuts (A) and hood.
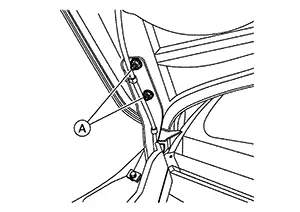 Note:
Note: 
RH side shown; LH similar.
INSTALLATION
Installation is in the reverse order of removal.
CAUTION:
-
Before installing the hood hinge, apply anticorrosive agent onto the surface of the Nissan Sentra vehicle.
-
After installation, perform the hood adjustment procedure. Refer to Adjustment.
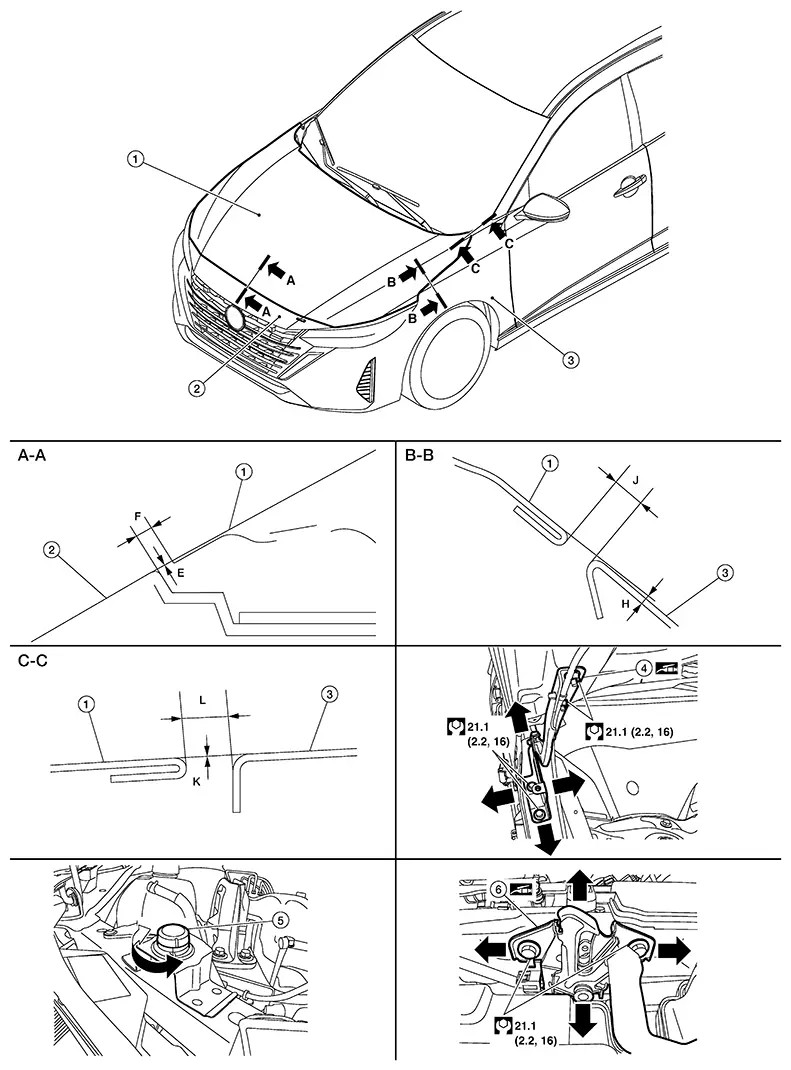
Adjustment
|
1. |
Hood |
2. |
Front fascia |
3. |
Front fender |
|
4. |
Hood hinge |
5. |
Bumper rubber |
6. |
Hood lock |
Check the clearance and the surface height between hood and each part by visual inspection and tactile feel.
If the clearance and the surface height are out of specification, adjust them according to the adjustment procedures.
Unit: mm (in)|
Portion |
Section |
Item |
Measurement |
Standard |
Parallelism |
|---|---|---|---|---|---|
|
Hood - Front fascia |
A - A |
E |
Surface height |
0.8 - 1.3 +1.2, –2.4 (0.03 -0.05 +0.05, –0.09) |
<2.0 (0.08) |
|
F |
Clearance |
4.2 - 5.0 ± 1.5 (0.17 - 0.20 ± 0.06) |
<2.0 (0.08) |
||
|
Hood - Fender |
B - B |
H |
Surface height |
0.1 ± 1.2 (0.00 ± 0.05) |
≤1.5 (0.06) |
|
J |
Clearance |
4.0 ± 1.3 (0.16 ± 0.05) |
≤1.5 (0.06) |
||
|
Hood - Fender |
C - C |
K |
Surface height |
0.0 ± 1.1 (0.00 ± 0.04) |
≤1.5 (0.06) |
|
L |
Clearance |
4.6 - 5.0 ± 1.1 (0.18 - 0.20 ± 0.04) |
≤1.5 (0.06) |
ADJUSTMENT PROCEDURE
Remove hood lock, and then adjust the surface height of hood, and front fender according to the specifications provided.
Engage hood lock with primary striker and check for looseness.
Move hood lock laterally until the center of primary striker and hood lock are vertical when viewed from the front.
After adjustment, tighten hood lock bolts to the specified torque.
Rotate bumper rubber a minimum of 1/2 of a rotation counterclockwise in an upward direction.
CAUTION:
If any looseness is felt in hood striker or hood lock, rotate bumper rubber more than 1/2 of a rotation.
Check that secondary latch is properly engaged with secondary striker with hoods own weight.
Check that hood lock is securely engaged with primary striker when hood is dropped with hood’s own weight from approximately 200 mm (7.8 in) height.
 Exploded View
Exploded View
1.
Hood hinge (RH)
2.
...
 Hood Hinge
Removal and Installation
Removal and Installation
REMOVAL
Remove
hood. Refer to Removal and Installation.
For hood
hinge (RH) disconnect washer hose clips. Refer to Exploded View. ...
Other materials:
Removal and Installation
Removal and Installation
REMOVAL
CAUTION:
When replacing the sonar control unit, perform
"ADDITIONAL SERVICE WHEN REPLACING SONAR CONTROL UNIT". Refer to Work Procedure.
Partially
remove the trunk side finisher (LH). Refer to Exploded View.
Remove bolt
(A) from ...
Brake fluid
Inspection
BRAKE FLUID LEVEL
Make sure that the brake fluid level in the reservoir tank is between
the MAX and MIN lines.
Visually check around the reservoir tank for brake fluid leakage.
If the brake fluid level is excessively low, check the brake system
for leakage.
If brake warning ...
Active Grille Shutter System
System Description
System Description
SYSTEM DIAGRAM
System Description
While driving, the active grille shutter system
closes shutter to reduce air flow to engine compartment for the
purpose of reducing aerodynamic drag, and as a result, improves the
Nissan Sentra vehicle's ...
