Nissan Sentra B18 (2020-2025) Service Manual: Front Seat Belt Retractor
Removal and Installation
REMOVAL
Warning:
-
Before servicing the SRS, place the ignition switch in the OFF position, disconnect both battery terminals then wait at least three minutes.
-
Do not drop the seat belt retractor. Always handle it with care.
-
Always point pre-tensioner cylinder away from body when handling.
-
Slide the front seat to the full forward position.
-
Disconnect negative and positive battery terminals, then wait at least three minutes. Refer to Battery Disconnect.
-
Remove the center pillar lower finisher. Refer to Removal and Installation.
-
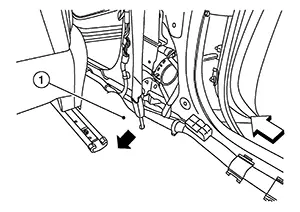
Pull floor trim (1) in the direction shown to access the front seat belt pre-tensioner (lap belt).
Note:
: Front

RH side shown, LH side similar
-
Remove bolt (A) from the front seat belt pre-tensioner (lap belt).
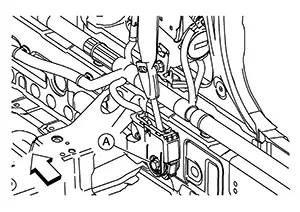
Note:: Front
RH side shown, LH side similar
-
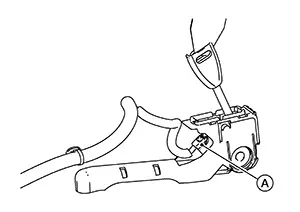
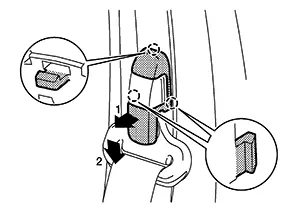
Disconnect the harness connector (A) from the front seat belt pre-tensioner (lap belt).
CAUTION:
-
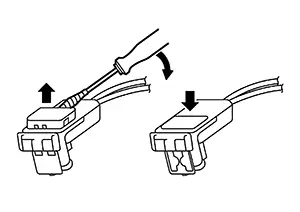
For removing/installing the front seat belt pre–tensioner (lap belt) harness connector, insert a thin screwdriver wrapped in tape into the notch, then lift the lock and remove the harness connector as shown.
-
Install the harness connector with the lock raised, and push the lock into the harness connector as shown.
-
After installing the harness connector, check that the lock is pushed in securely.
-
-
Pull seat belt height adjuster cover in the direction shown and remove.

: Pawl
-
Remove the D-ring anchor bolt (A) with D-ring anchor (B).

-
Disconnect the harness connector (A) from the front seat belt pre-tensioner [shoulder belt (1)].
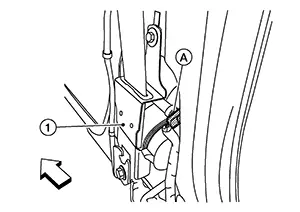
Note:: Front
RH side shown, LH side similar
CAUTION:
-
For removing/installing the front seat belt pre-tensioner (shoulder belt) harness connector, insert a thin screwdriver wrapped in tape into the notch, then lift the lock and remove the harness connector as shown.
-
Install the harness connector with the lock raised, and push the lock into the harness connector as shown.
-
After installing the harness connector, check that the lock is pushed in securely.
-
-
Remove the lower bolt (A), then upper screw (B), and remove the front seat belt retractor from Nissan Sentra vehicle.
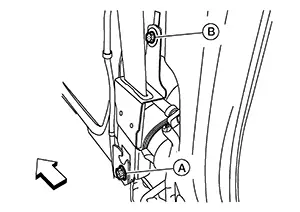
Note:: Front
RH side shown, LH side similar
INSTALLATION
Installation is in the reverse order of removal.
CAUTION:
-
Tighten D-ring anchor bolt and front seat belt retractor bolts and screw to specification. Refer to Exploded View.
. -
Make sure the seat belt height adjuster is locked in the lowest position and is aligned with center pillar upper finisher opening during installation.
-
Make sure both the D-ring anchor and seat belt height adjuster operate freely.
-
Always perform an inspection after repair to be sure the system is functioning within specifications. Refer to Inspection.
 Exploded View
Exploded View
1.
Seat belt height
adjuster
...
 Seat Belt Height Adjuster
Removal and Installation
Removal and Installation
REMOVAL
Remove
center pillar upper finisher. Refer to Removal and Installation.
Remove
bolts (A) and seat belt height adjuster (1) ...
Other materials:
System
Meter system
Meter system : system diagram
Meter system : system description
COMBINATION METER
The combination meter receives signals from switches, sensors and modules to
control the following functions:
Speedometer/tachometer
Warning lamps
Indicator lamps
Meter illumination c ...
Inspection and Adjustment
Inspection and Adjustment
INSPECTION
The Height of Clutch Pedal
Pull back
the floor trim and remove front floor spacer (LH) for access to
floor panel.
Check that
the clutch pedal height (H1) from the floor panel (1) is
within the reference value.
...
Inspection
Inspection
Check tires
for wear and improper inflation.
Check
wheels for deformation, cracks and other damage. If deformed,
remove wheel and check wheel runout.
Remove tire
from wheel and mount wheel on a balancer machine.
CAUTION:
DO NOT use center hole cone- ...
