Nissan Sentra Service Manual: Filament
Inspection and Repair
Inspection
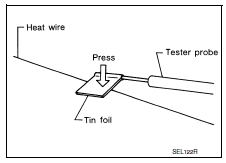
- When measuring voltage, wrap tin foil around the top of the negative probe. Then press the foil against the wire with your finger.
- Attach probe circuit tester (in Volt range) to middle portion of each filament.
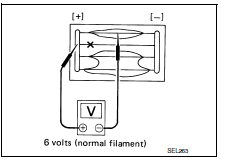
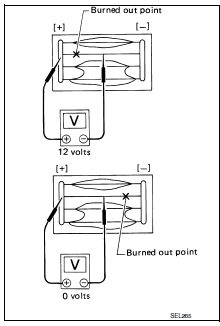
- If a filament is burned out, circuit tester registers 0 or battery voltage.
- To locate burned out point, move probe to left and right along filament.
Test needle will swing abruptly when probe passes the point.
Repair
Repair equipment
- Conductive silver composition (dupont no. 4817 Or equivalent)
- Ruler 30 cm (11.8 In) long
- Drawing pen
- Heat gun
- Alcohol
- Cloth
Repairing procedure
- Wipe broken heat wire and its surrounding area clean with a cloth dampened in alcohol.
- Apply a small amount of conductive silver composition to tip of drawing pen.
Note:
Shake silver composition container before use.
- Place ruler on glass along broken line. Deposit conductive silver composition on break with drawing pen. Slightly overlap existing heat wire on both sides [preferably 5 mm (0.20 in)] of the break.

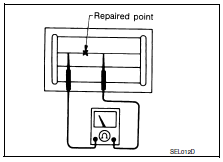
- After repair has been completed, check repaired wire for continuity.
This check should be conducted 10 minutes after silver composition is deposited.
Caution:
Do not touch repaired area while test is being conducted.
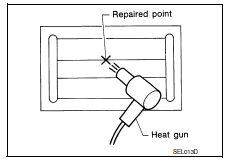
- Apply a constant stream of hot air directly to the repaired area for approximately 20 minutes with a heat gun. A minimum distance of 3 cm (1.2 In) should be kept between repaired area and hot air outlet.
Note:
If a heat gun is not available, let the repaired area dry for 24 hours.

 Condenser
Removal and installation
Removal
Remove the rear pillar finisher. Refer to INT-29, "REAR PILLAR FINISHER
: Removal and Installation".
Disconnect the harness connectors (1), remove ...
Other materials:
Door mirror
Exploded view
Door mirror cover
(with side turn signal lamp)
Door mirror housing
Door mirror actuator
Glass mirror
Door mirror cover
(without side turn signal lamp)
: Pawl
Door mirror assembly
Door mirror assembly : removal and installation
Removal
Caution:
Be careful no ...
Front door finisher
Exploded View
Front door panel
Front door finisher
Inside door handle escutcheon
Main power window and door lock/
unlock switch finisher
Door mirror corner finisher
Grommet
Clip
Pawl
Front
NOTE:
LH side shown; RH similar.
Removal and Installation
CAUTION:
When ...
Sunshade
Exploded View
Sunshade
Moonroof unit assembly
Sunshade stopper (LH/RH)
Front
Removal and Installation
REMOVAL
Remove the headlining. Refer to INT-40, "Removal and Installation".
Remove the sunshade stoppers (1) (LH/RH) from the moonroof
unit assembly side rails (2) ...
