Nissan Sentra Service Manual: Door mirror
Exploded view
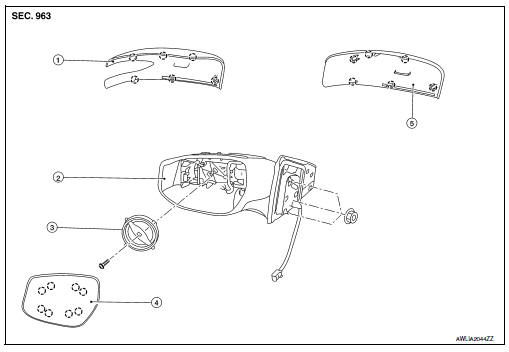
- Door mirror cover (with side turn signal lamp)
- Door mirror housing
- Door mirror actuator
- Glass mirror
- Door mirror cover (without side turn signal lamp)
 : Pawl
Door mirror assembly
Door mirror assembly : removal and installation
Removal
Caution:
Be careful not to scratch or damage the door mirror body when removing.
- Remove front door finisher. Refer to int-15, "removal and installation".
- Disconnect door mirror harness connector.
- Remove door mirror nuts and the door mirror assembly.
Installation
Installation is in the reverse order of removal.
Glass mirror
Glass mirror : removal and installation
Removal
- Put a strip of protective tape (A) on housing assembly.
- Insert a suitable tool (a) into the recess at lower side between glass mirror (1) and actuator (2), and push up pawls to remove glass mirror lower side in the order shown.
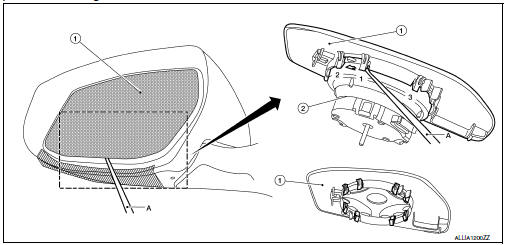
- Insert a suitable tool at (LH and RH) side between glass mirror and actuator, and push up pawls to remove glass mirror (LH and RH) side.
- Disconnect door glass mirror heater harness connectors (if equipped).
- Remove door glass mirror.
Installation
Installation is in the reverse order of removal.
Caution:
After installation, visually check that pawls are securely engaged.
Door mirror cover
Door mirror cover : removal and installation
Removal
Note:
With side turn signal lamp shown, without is similar.
- Remove door glass mirror. Refer to mir-18, "glass mirror : removal and installation".
- Using a suitable tool, disengage door mirror cover pawls to separate the door mirror cover (1) from the door mirror assembly (2).
 Pawl
Pawl
Installation
Installation is in the reverse order of removal.
Caution:
After installation, visually check that pawls are securely engaged.
 Inside mirror
Exploded view
Manual mirror
Windshield glass
Inside mirror base
Inside mirror assembly
Auto anti-dazzle mirror
Windshield glass
Inside mirror base
Harness connector
Mirr ...
 Door mirror remote control switch
Removal and Installation
Removal
Remove the instrument finisher D. Refer to IP-14, "Exploded View".
Using suitable tool (a) release the pawls and remove the door mirror
remote cont ...
Other materials:
Wiring diagram
CVT Control system
Wiring Diagram
CVT Shift lock system
Wiring Diagram
...
Maintenance requirements
Your NISSAN has been designed to have minimum
maintenance requirements with long service
intervals to save you both time and money;
however, some day-to-day and regular maintenance
is essential to maintain your NISSAN’s
good mechanical condition as well as its emissions
and engine performanc ...
Both side headlamps (lo) are not
turned on
Description
The headlamps (both sides) do not turn on in any lighting switch setting.
Diagnosis Procedure
1.Check combination switch (lighting and turn signal switch)
Check the combination switch (lighting and turn signal switch). Refer to
BCS-72, "Symptom Table" (with Intelligent
...
