Nissan Sentra Service Manual: Cooling fan
Component

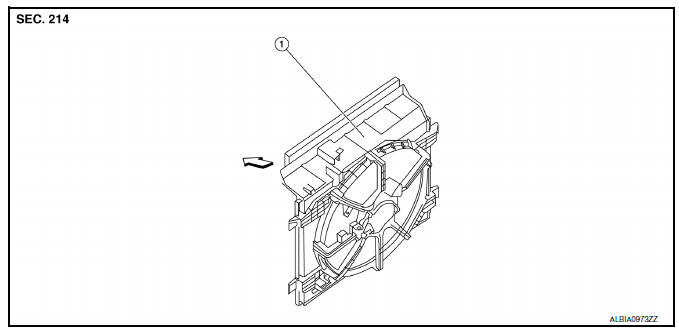
- Fan shroud and motor assembly
WARNING:
Do not remove the radiator cap when the engine is hot. Serious burns could occur from high-pressure engine coolant escaping from the radiator. Wrap a thick cloth around the cap. Slowly push down and turn it a quarter turn to allow built-up pressure to escape. Carefully remove the cap by pushing it down and turning it all the way.
NOTE:
- When removing components such as hoses, tubes/lines, etc., cap or plug openings to prevent fluid from spilling.
- Replace the fan shroud and motor assembly as a unit. Do not replace cooling fan motor or cooling fan blade separately.
Removal and Installation
REMOVAL
- Remove engine under cover. Refer to EXT-16, "Exploded View".
- Partially drain engine coolant from the radiator. Refer to CO-12, "Changing Engine Coolant".
CAUTION:
- Perform this step when the engine is cold.
- Do not spill engine coolant on the drive belt.
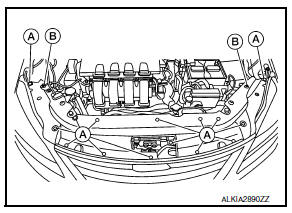
- Remove the radiator core support upper cover clips (A) and screws (B), and remove.

- Remove the hood lock assembly from radiator core support (upper). Refer to DLK-154, "HOOD LOCK CONTROL : Removal and Installation".
- Remove the radiator core support (upper) bolts, then remove the radiator core support (upper). Refer to CO-15, "Exploded View".
- Disconnect filler neck hose from radiator and radiator hose (upper) from water inlet.
- Remove filler neck screws from fan shroud and motor assembly, then remove filler neck with attached hoses.
- Remove reservoir tank and reservoir tank hose.
- Disconnect fan shroud and motor assembly harness connector.
- Remove fan shroud and motor assembly.
INSTALLATION
Installation is in the reverse order of removal.
- After installation refill engine coolant and check for leaks. Refer to CO-12, "Changing Engine Coolant" and CO-11, "System Inspection".
CAUTION:
Do not spill engine coolant in engine compartment. Use a shop cloth to absorb engine coolant.
- Fan shroud and motor assembly is controlled by ECM. Refer to EC-63, "On Board Diagnosis Function".
 Radiator
Exploded View
Mounting rubber (upper)
Radiator
Mounting rubber (lower)
Radiator drain plug
Reservoir tank cap
Reservoir tank hose
Reservoir tank
Clamp
Radiator hose (lower)
F ...
 Water pump
Exploded View
Gasket
Water pump
WARNING:
Do not remove the radiator cap when the engine is hot. Serious burns
could occur from high-pressure
engine coolant escaping from the radiator. ...
Other materials:
Precaution for Supplemental Restraint System (SRS) "AIR BAG" and "SEAT
BELT PRE-TENSIONER"
The Supplemental Restraint System such as “AIR BAG” and “SEAT BELT PRE-TENSIONER”,
used along
with a front seat belt, helps to reduce the risk or severity of injury to the
driver and front passenger for certain
types of collision. Information necessary to service the system ...
C1704, C1705, C1706, C1707 Low tire pressure
DTC Logic
NOTE:
The Signal Tech II Tool (J-50190) can be used to perform the following
functions. Refer to the Signal Tech II
User Guide for additional information.
Activate and display TPMS transmitter IDs
Display tire pressure reported by the TPMS transmitter
Read TPMS DTCs
Register ...
Automatic door locks
All doors lock automatically when the vehicle
speed reaches 15 MPH (24 km/h).
All doors unlock automatically when the ignition
is placed in the OFF position (models
with Intelligent Key system) or when the key
is removed from the ignition switch (models
without Intelligent Key system) ...
