Nissan Sentra Service Manual: Coil spring
Exploded View
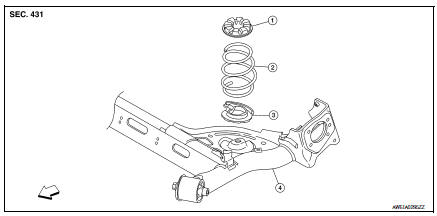
- Upper rubber seat
- Coil spring
- Lower rubber seat
- Rear suspension beam
 Front
Front
Removal and Installation
REMOVAL
- Set a suitable jack under the rear suspension beam.
CAUTION:
- At this step, the jack must be set only for supporting the removal procedure. For details on jacking up the vehicle, refer to GI-31, "Garage Jack and Safety Stand and 2-Pole Lift".
- Do not damage the rear suspension beam with the jack.
- Remove the lower shock absorber bolts. Refer to RSU-8, "Exploded View".
- Slowly lower the suitable jack. Remove the upper rubber seat, the coil spring, and the lower rubber seat from the rear suspension beam.
CAUTION:
Make sure the rear suspension beam is stable when using the jack.
- Inspect the components. Refer to RSU-12, "Inspection".
INSTALLATION
Installation is in the reverse order of removal.
- Identify the upper side of the coil spring.
 : Upper side
NOTE:
The top of the coil spring has a flat shape.
- Align the lower end of the coil spring with the steps on the lower rubber seat.
Inspection
INSPECTION AFTER REMOVAL
Check the upper rubber seat, the lower rubber seat, and the coil spring for deformation, cracks, and damage.
Replace the parts if necessary.
 Rear shock absorber
Exploded View
Rear suspension beam
Shock absorber
Bound bumper
Bound bumper cover
Washer
Bushing
Distance tube
Bushing
Washer
Piston rod lock nut
Cap
Front
Removal and ...
 Rear suspension beam
Exploded View
Rear suspension beam
Rear suspension arm bracket
Front
Removal and Installation
NOTE:
When removing components such as hoses, tubes, lines, etc., cap or plug
openings ...
Other materials:
P0132 A/F SENSOR 1
DTC Logic
DTC DETECTION LOGIC
To judge the malfunction, the diagnosis checks that the A/F signal computed
by ECM from the A/F sensor 1
signal is not inordinately high.
DTC No.
CONSULT screen terms
(Trouble diagnosis content)
DTC detecting condition
Possible cause
P0 ...
Washing
Wash dirt off with a wet sponge and plenty of
water. Clean the vehicle thoroughly using a mild
soap, a special vehicle soap or general purpose
dishwashing liquid mixed with clean, lukewarm
(never hot) water.
CAUTION
Do not use car washes that use acid in
the detergent. Some car washes, es ...
Wiring diagram
Eco mode system
Wiring Diagram
...
