Nissan Sentra B18 (2020-2025) Service Manual: Clutch :: Removal and Installation
Clutch Pedal. Exploded View
Exploded View
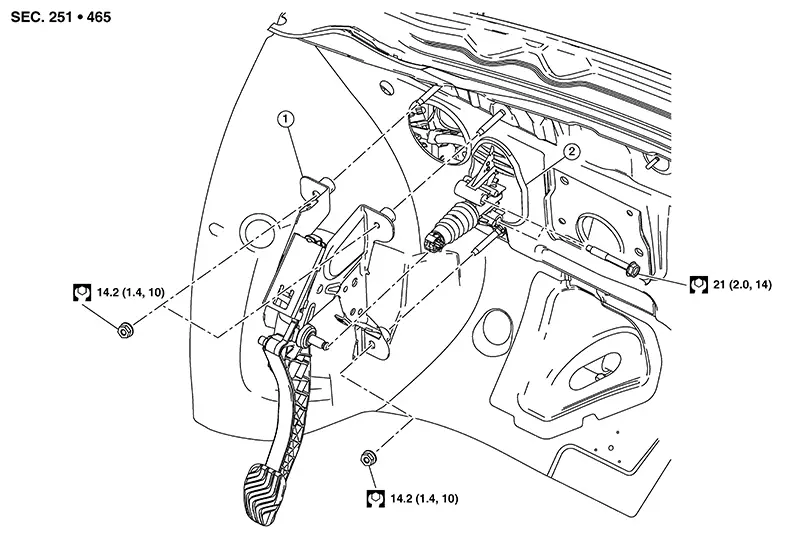
|
1. |
Clutch pedal |
2. |
Clutch master cylinder |
Removal and Installation
Removal and Installation
REMOVAL
If necessary, remove instrument lower panel LH. Refer to Removal and Installation.
Using a
suitable tool, release clutch master cylinder rod end (A) from
clutch pedal. 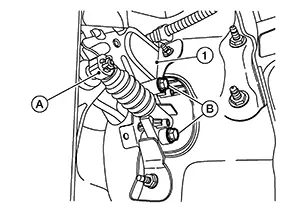
Remove bolts (B) from clutch pedal (1).
Using a suitable tool, release the wiring harness retainers from studs.
Remove nuts
(A) and (B) from clutch pedal assembly (1). 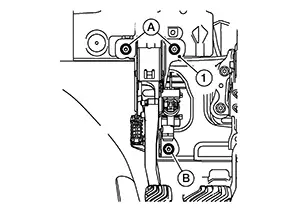
Remove clutch pedal assembly.
INSTALLATION
Installation is in the reverse order of removal.
CAUTION:
After applying recommended grease, press clutch master cylinder rod end into clutch pedal until it stops
Inspection and Adjustment
Inspection and Adjustment
INSPECTION AFTER REMOVAL
Check clutch pedal for bend, damage, or a cracked weld. If bend, damage, or a cracked weld is found, replace clutch pedal.
Check pedal pad. If wear or damage is found, replace pedal pad.
INSPECTION AFTER INSTALLATION
-
Check the height of clutch pedal. Refer to Inspection and Adjustment.
Clutch Master Cylinder. Exploded View
Exploded View
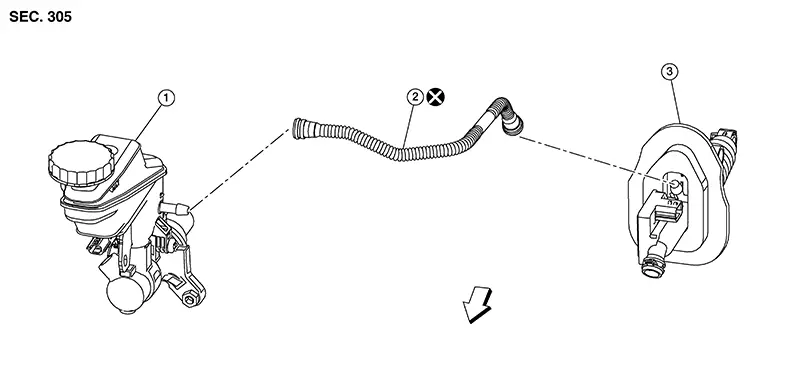
|
1. |
Reservoir tank |
2. |
Reservoir hose |
3. |
Clutch master cylinder |
|
|
: Front |

Removal and Installation
Removal and Installation
REMOVAL
CAUTION:
-
Keep painted surface on the body or other parts free of clutch fluid. If it spills, wipe up immediately and wash the affected area with water.
-
Do not disassemble clutch master cylinder.

When removing components such as hoses, tubes/lines, etc., cap or plug openings to prevent fluid from spilling.
Drain clutch fluid. Refer to Draining.
Remove battery. Refer to Removal and Installation (Battery).
Using a suitable tool, remove reservoir hose from reservoir tank.
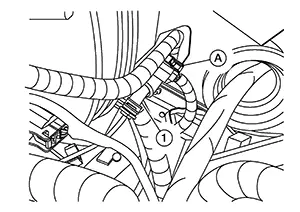
Disconnect
the wiring harness connector (A) from clutch master cylinder
(1). 
Release the
lock pin (1) from connector of clutch master cylinder (2) and
separate clutch tube (3). 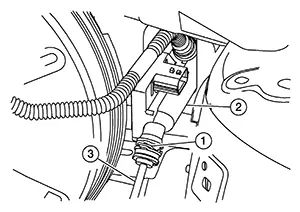
Remove clutch pedal. Refer to Removal and Installation.
Remove clutch master cylinder from the Nissan Sentra vehicle.
Using a suitable tool, remove reservoir hose from clutch master cylinder.
INSTALLATION
CAUTION:
Keep painted surface on the body or other parts free of clutch fluid. If it spills, wipe up immediately and wash the affected area with water.
Installation is in the reverse order of removal.
CAUTION:
Press clutch master cylinder rod end into clutch pedal until it stops.
Fill with clutch fluid and perform air bleeding procedure. Refer to Refilling and Air Bleeding.
Inspection and Adjustment
Inspection and Adjustment
INSPECTION AFTER INSTALLATION
Check for fluid leakage and the fluid level. Refer to Inspection.
Check the clutch pedal height. Refer to Inspection and Adjustment.
ADJUSTMENT AFTER INSTALLATION
-
Perform the air bleeding procedure. Refer to Air Bleeding.
Clutch Piping. Exploded View
Exploded View
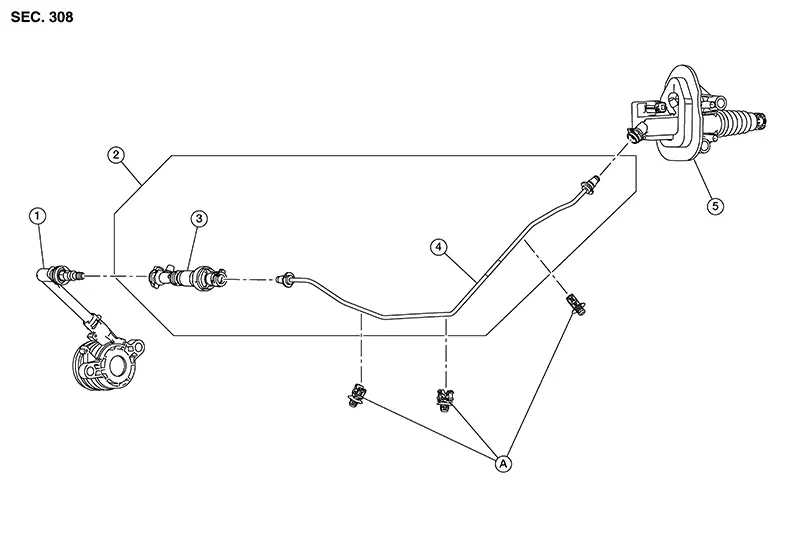
|
1. |
CSC (Concentric Slave Cylinder) |
2. |
Clutch tube and clutch damper assembly |
3 |
Clutch damper |
|
4. |
Clutch tube |
5. |
Clutch master cylinder |
A. |
Clip |
Hydraulic Layout
Hydraulic Layout

|
1. |
Clutch tube |
2. |
Lock pin |
3. |
CSC (Concentric Slave Cylinder) |
|
4. |
Clutch damper |
5. |
Clutch master cylinder |
6. |
Clutch pedal |
Removal and Installation
Removal and Installation
CAUTION:
Keep painted surface on the body or other parts free of clutch fluid. If it spills, wipe up immediately and wash the affected area with water.
Note:
When removing components such as hoses, tubes/lines, etc., cap or plug openings to prevent fluid from spilling.
REMOVAL
Drain clutch fluid. Refer to Draining.
Press the lock pin into the bleeding connector of the CSC, and then remove clutch tube from CSC.
Release the lock pins from the connectors of the clutch damper until the pins stop, and then remove clutch tubes from clutch damper.
Release the lock pin from the connector of the clutch master cylinder until the pin stops, and then remove clutch tube from clutch master cylinder.
INSTALLATION
Installation is in the reverse order of removal.
CAUTION:
Do not damage clutch tube.
-
Insert each clutch tube into the CSC bleeding connector, the clutch damper connector, and the clutch master cylinder connector until it contacts the end of each connector.
-
Install each lock pin into the clutch damper connector and the clutch master cylinder connector until it contacts the end of each connector.
Inspection and Adjustment
Inspection and Adjustment
INSPECTION AFTER REMOVAL
-
Check the clutch tube for cracks and damage. If the clutch tube has cracks or damage, replace it with a new one.
-
Check the O-ring of the clutch tube for cracks and damage. If the O-ring of the clutch tube has cracks or damage, replace clutch tube with a new one.
CAUTION:
Do not reuse O-rings.
-
Check the clutch damper for cracks and damage. If the clutch damper has cracks or damage, replace it with a new one.
INSPECTION AFTER INSTALLATION
Check the fluid leakage and the fluid level. Refer to Inspection.
Check the clutch pedal height. Refer to Inspection and Adjustment.
ADJUSTMENT AFTER INSTALLATION
Perform the air bleeding procedure. Refer to Air Bleeding.
Csc (concentric Slave Cylinder). Exploded View
Exploded View
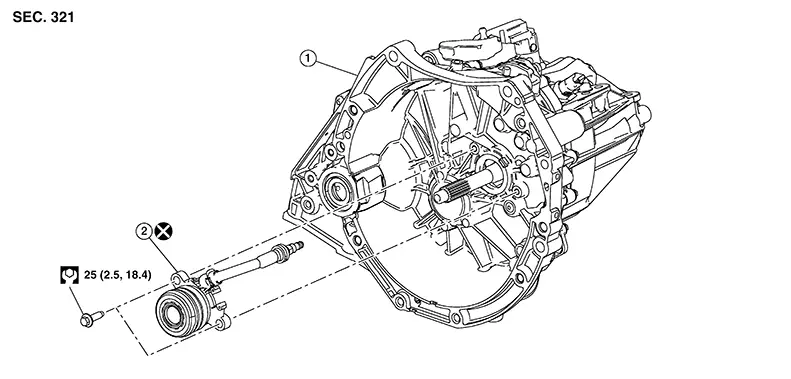
|
1. |
Transaxle assembly |
2. |
CSC (Concentric Slave Cylinder) |
Removal and Installation
Removal and Installation
CAUTION:
-
Do not reuse CSC (Concentric Slave Cylinder). The CSC slides back to the original position every time the transaxle assembly is removed. This action may allow dust or contaminants to gather on the sliding parts and damage a seal of CSC causing clutch fluid leakage.
-
Do not disassemble CSC.
-
Keep painted surface on the body or other parts free of clutch fluid. If clutch fluid spills, wipe up immediately and wash the affected area with water.
REMOVAL
Remove engine and transaxle assembly. Refer to Removal and Installation.
Remove CSC bolts, then remove the CSC from transaxle assembly.
INSTALLATION
Install CSC to transaxle assembly, then tighten CSC bolts to the specified torque.
CAUTION:
-
Do not reuse CSC.
-
Do not install then operate CSC immediately, the piston and stopper of CSC components may fall off.
Install engine and transaxle assembly in the reverse order of removal. Refer to Removal and Installation.
Inspection and Adjustment
Inspection and Adjustment
INSPECTION AFTER INSTALLATION
Check for fluid leakage and the fluid level. Refer Inspection.
ADJUSTMENT AFTER INSTALLATION
Perform the air bleeding. Refer to Air Bleeding
Clutch Disc and Clutch Cover. Exploded View
Exploded View
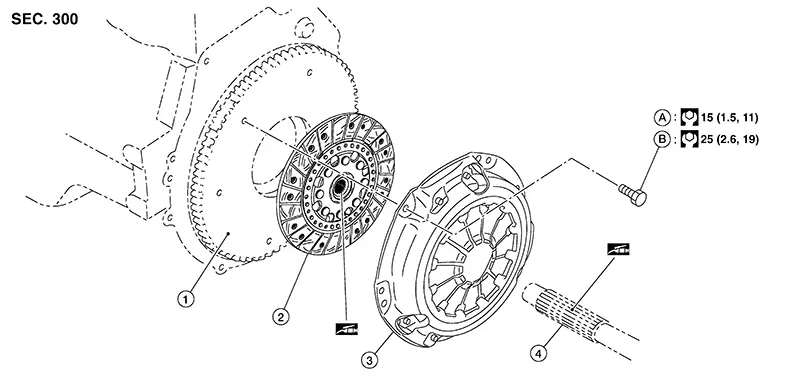
|
1. |
Flywheel |
2. |
Clutch disc |
3. |
Clutch cover |
|
4. |
Input shaft |
A. |
First step |
B. |
Final step |
 : Apply lithium-based grease including
molybdenum disulphide.
: Apply lithium-based grease including
molybdenum disulphide.
Removal and Installation
Removal and Installation
CAUTION:
-
Do not reuse CSC (Concentric Slave Cylinder). The CSC slides back to the original position every time the transaxle assembly is removed. This action may allow dust or contaminants to gather on the sliding parts and damage a seal of CSC causing clutch fluid leakage.
Refer to Removal and Installation.
-
Do not allow any grease to contact the clutch disc facing, pressure plate surface or flywheel surface.
-
Do not clean clutch disc using solvent.
REMOVAL
Remove engine and transaxle assembly. Refer to Removal and Installation.
Loosen clutch cover bolts evenly while holding clutch cover.
Remove clutch cover and clutch disc.
CAUTION:
Do not drop clutch disc.
INSTALLATION
Clean clutch disc and input shaft splines to remove grease and dust caused by abrasion.
Apply recommended grease to clutch
disc (1) and input shaft (2) splines area (A).
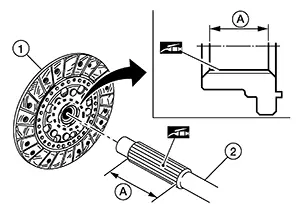
CAUTION:
Be sure to apply grease to the points specified. Otherwise, noise, poor disengagement, or damage to the clutch may result. Excessive grease may cause slip or shudder. And if it adheres to seal of CSC, it may cause clutch fluid leakage. Wipe off excess grease. Wipe off any grease oozing from the parts.
Install clutch disc, using a suitable
tool (A).
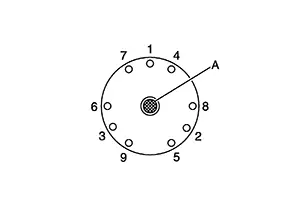
Install clutch cover, and then temporarily tighten clutch cover bolts.
Tighten clutch cover bolts to the specified torque evenly in two steps in the numerical order as shown.
Install engine and transaxle assembly. Refer to Removal and Installation.
Inspection
Inspection
INSPECTION AFTER REMOVAL
Clutch Disc
Measure clutch facing runout. If it is outside the specification, replace clutch disc.
Measure spline backlash at outer edge of clutch disc. If it is outside the specification, replace clutch disc.
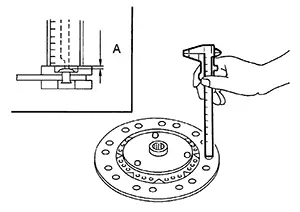
Measure the depth “A) to clutch
disc facing rivet heads, using suitable tool. If it exceeds the allowable
wear limit, replace clutch disc. 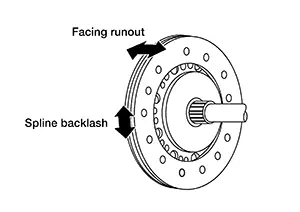
|
Runout limit/diameter of the area to be measured |
: Refer to Clutch Disc. |
|
Maximum allowable spline backlash (at outer edge of disc) |
: Refer to Clutch Disc. |
|
Facing wear limit (depth to the rivet head) “A� |
: Refer to Clutch Disc. |
Clutch Cover
-
Check clutch cover thrust ring for wear or damage. If wear or damage is found, replace clutch cover.
Note:
-
Worn thrust ring will generate a beating noise when tapped at the rivet using suitable tool.
-
Broken thrust ring will make a clinking sound when cover is shaken up and down.
-
-
If a trace of burn or discoloration is found on the clutch cover pressure plate to clutch disc contact surface, repair the surface with sandpaper. If surface is damaged or distorted, replace clutch cover.
INSPECTION AFTER INSTALLATION
Clutch Cover
Check diaphragm spring lever claws for unevenness with the clutch cover installed on the engine.
If they exceed the tolerance, adjust
diaphragm spring lever using Tool (A). 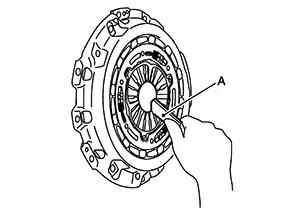
|
Tolerance for diaphragm spring lever unevenness |
: Refer to Clutch Cover. |
|
Tool number |
: ST20050240 ( — ) |
Other materials:
Low Tire Pressure Warning Lamp Does Not Turn Off
Symptom Description
Symptom Description
The low tire pressure warning lamp does not turn
OFF after several seconds is passed after the engine starts.
Diagnosis Procedure
Diagnosis Procedure
CHECK TIRE PRESSURE
Ignition switch ...
C1f4f-82 Bcm Can Circuit 1
Dtc Description
DTC Description
DTC DETECTION LOGIC
DTC
CONSULT screen terms
(Trouble diagnosis
content)
DTC detection
conditi ...
Ecu Diagnosis Information. Av Control Unit
Av Control Unit
List of Ecu Reference
List of ECU Reference
ECU
Reference
AV control unit
Values on the Diagnosis Tool
...