Nissan Sentra Service Manual: Washer nozzle & tube
Exploded view

- Check valve
- Washer tube
- Washer tank
- Washer pump
- Washer nozzle
 Clip
Clip
Washer nozzle
Washer nozzle : removal and installation
REMOVAL
- Disconnect the washer nozzle from the hood by pushing on the nozzle in the order and direction shown.
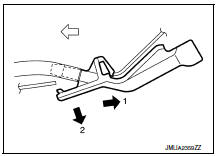
- Disconnect the washer tube from the washer nozzle.
- Remove the washer nozzle.
INSTALLATION
Installation is in the reverse order of removal.
CAUTION:
Adjust the nozzle spray pattern. Refer to WW-55, "WASHER NOZZLE : Adjustment".
Washer nozzle : adjustment
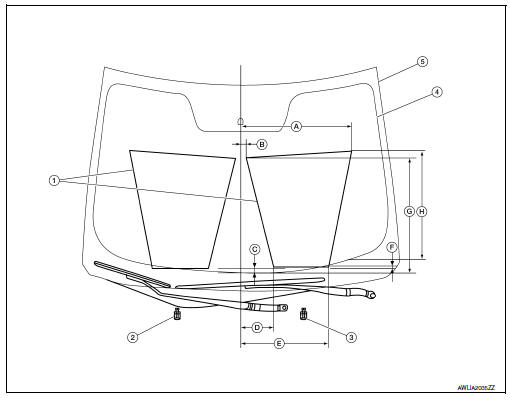
- Washer fluid spray pattern
- Washer nozzle (RH)
- Washer nozzle (LH)
- Black print
- Windshield glass
- 487.0 mm (19.2 in)
- 22.2 mm (0.9 in)
- 15.3 mm (0.6 in)
- 145.9 mm (5.7 in)
- 384.9 mm (15.2 in)
- 15.0 mm (0.6 in)
- 499.7 mm (19.7 in)
- 470.2 mm (18.5 in)
NOTE:
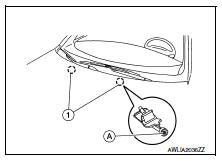
Spray position for (LH) shown. (RH) is symmetrical.
Insert a suitable tool into the nozzle hole (A) and move up/down and left/right to adjust the spray position of each nozzle (1).
Washer tube
Washer tube : removal and installation
REMOVAL
- Drain the washer fluid.
- Disconnect the washer tube from the washer nozzles (LH/RH). Refer to WW-54, "WASHER NOZZLE : Removal and Installation".
- Remove the front under cover. Refer to EXT-30, "FRONT UNDER COVER : Removal and Installation".
- Disconnect the washer tube from the washer pump.
- Remove the washer tube from the clips and remove the washer tube.
INSTALLATION
Installation is in the reverse order of removal.
NOTE:
Fill washer tank with specified amount of fluid. Refer to WW-64, "Specifications".
 Washer tank
Exploded view
Washer tank inlet
Washer tank
Washer level switch
Washer tank seal
Washer pump
Removal and installation
REMOVAL
Drain the washer fluid.
Remove the front under ...
 Front wiper arm
Exploded View
Wiper blade (RH)
Wiper arm (RH)
Wiper drive assembly
Wiper arm (LH)
Wiper blade (LH)
Removal and Installation
REMOVAL
Remove the wiper arm cap.
Remove the wipe ...
Other materials:
System description
DESCRIPTION
Engine Cooling System Schematic
CVT Models
Radiator
Water inlet
Reservoir tank
Thermostat
Engine oil cooler
Thermostat housing
Water pump
Cylinder head
Cylinder block
Water control valve
Water outlet
Heater
Electric throttle control actuator
CVT oil wa ...
FM/AM/SAT radio with compact disc (CD) player (Type B) (if so equipped)
For all operation precautions, see “Audio operation
precautions” in this section.
Audio main operation
ON-OFF button / VOL (volume) control
knob:
Place the ignition switch in the ACC or ON
position and press the ON-OFF button while the
system is off to call up the mode (radio, CD, AUX,
B ...
B0092 Rear side air bag satellite sensor LH
Description
DTC B0092 REAR SATELLITE SENSOR LH
The rear side air bag satellite sensor LH is wired to the air bag diagnosis
sensor unit. The air bag diagnosis
sensor unit will monitor the rear side air bag satellite sensor LH for internal
failures and its circuits for communication
errors.
...
