Nissan Sentra Service Manual: OIL PAN
Exploded View
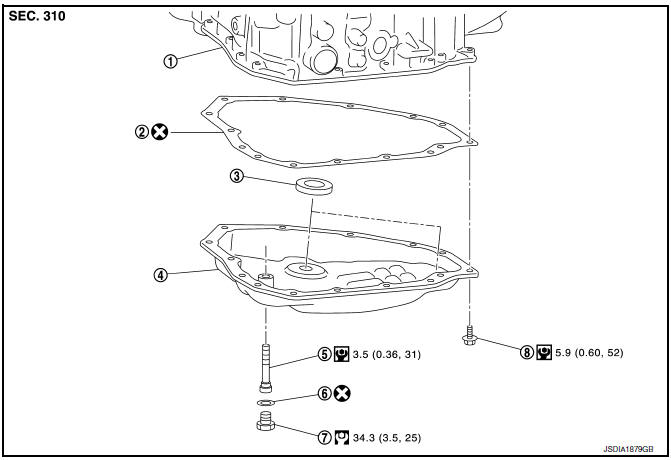
- Transaxle assembly
- Oil pan gasket
- Magnet
- Oil pan
- Overflow tube
- Drain plug gasket
- Drain plug
- Oil pan fitting bolt
 : Always replace after every
disassembly.
 : NВ·m (kg-m, ft-lb)
 : NВ·m (kg-m, it-lb)
Removal and Installation
REMOVAL
- Remove the engine under cover. Refer to EXT-31, "ENGINE UNDER COVER : Removal and Installation".
- Remove the drain plug and overflow tube, and then drain the CVT fluid.
CAUTION:
When draining CVT fluid use safety glasses.
- Remove the drain plug gasket from the drain plug.
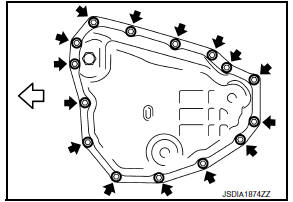
- Remove the oil pan bolts (

), and then remove the oil pan and oil pan gasket.
 : Front
- Remove the magnets from the oil pan.
INSTALLATION
Installation is in the reverse order of removal.
CAUTION:
- Do not reuse oil pan gasket and drain plug gasket.
- When installing the oil pan bolts, be sure to use new bolts.
- Completely remove all moisture, oil and old gasket, etc. from the oil pan gasket surface of transaxle case and oil pan.
- When installing the overflow tube, be sure to tighten to the specified torque. If it is not tightened to the specified torque, the tube may be damaged.
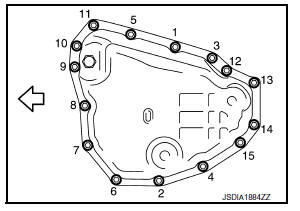
- When the oil pan is installed, tighten bolts in the order shown in the figure after temporarily tightening the oil pan bolt.
 : Front
Inspection
INSPECTION AFTER REMOVAL
Check oil pan for foreign material.
- If a large amount of worn material is found, clutch plate may be worn.
- If iron powder is found, bearings, gears, or clutch plates may be worn.
- If aluminum powder is found, bushing may be worn, or chips or burrs of aluminum casting parts may enter.
Check points where wear is found in all cases.
INSPECTION AFTER INSTALLATION
Start the engine and check visually that there is no leakage of CVT fluid.
 G Sensor
Exploded View
G sensor
Bracket
Vehicle front
NВ·m (kg-m, ft-lb)
NВ·m (kg-m, in-lb)
Removal and Installation
WARNING:
Do not leave any objects (screwdrivers, tools, etc.) on ...
 Primary speed sensor
Exploded View
Transaxle assembly
O-ring
Primary speed sensor
: Always replace after every
disassembly.
: N m (kg-m, in-lb)
: Genuine NISSAN CVT Fluid NS-3
Removal and Installat ...
Other materials:
B0092 Rear side air bag satellite sensor LH
Description
DTC B0092 REAR SATELLITE SENSOR LH
The rear side air bag satellite sensor LH is wired to the air bag diagnosis
sensor unit. The air bag diagnosis
sensor unit will monitor the rear side air bag satellite sensor LH for internal
failures and its circuits for communication
errors.
...
Key to Symbols Signifying Measurements or Procedures
...
Battery
How to handle battery
CAUTION:
If it becomes necessary to start the engine with a booster battery
and jumper cables, use a 12-volt
booster battery.
After connecting battery cables, ensure that they are tightly
clamped to battery terminals for good
contact.
Never add distilled wat ...
