Nissan Sentra Service Manual: License plate lamp
Removal and Installation
REMOVAL
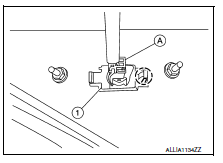
- Remove the license lamp finisher. Refer to EXT-44, "Removal and Installation".
- Disconnect the harness connector (A) from the license plate lamp (1).
- Release pawl and remove.
 : Pawl

INSTALLATION
Installation is in the reverse order of removal.
Bulb Replacement
WARNING:
Do not touch bulb while it is lit or right after being turned off. Burning may result.
CAUTION:
- Do not touch glass surface of the bulb with bare hands or allow oil or grease to get on it to prevent damage to bulb.
- Do not leave the bulb out of the lamp reflector for a long time
because dust, moisture, smoke, etc.
may affect the performance of the lamp.
REMOVAL
- Position trunk lid finisher aside. Refer to INT-45, "Removal and Installation".
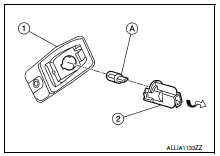
- Rotate license plate lamp bulb socket (2) counterclockwise and remove from license plate lamp (1).
- Remove license plate lamp bulb (A) from license plate lamp bulb socket (2).

INSTALLATION
Installation is in the reverse order of removal.
 High-mounted stop lamp
Removal and Installation
HIGH-MOUNTED STOP LAMP - WITH REAR SPOILER
Removal
Remove the rear air spoiler. Refer to EXT-46, "Removal and
Installation".
Remove the screws and the h ...
 Rear combination lamp
Exploded view
Rear combination lamp
Rear turn signal lamp bulb
Rear turn signal lamp socket
LED lamp harness connector
Rear combination lamp harness
connector
Back-up lamp bulb soc ...
Other materials:
Precaution
Precaution for supplemental restraint system (srs) "air bag" and "seat
belt pre-tensioner"
The supplemental restraint system such as “air bag” and “seat belt pre-tensioner”,
used along
with a front seat belt, helps to reduce the risk or severity of injur ...
M&a branch line circuit
Diagnosis procedure
1.Check connector
Turn the ignition switch off.
Disconnect the battery cable from the negative terminal.
Check the terminals and connectors of the combination meter for damage,
bend and loose connection
(unit side and connector side).
Is the inspection result nor ...
Engine compartment check locations
MRA8DE engine
Engine oil filler cap
Brake and clutch (if so equipped) fluid
reservoir
Air cleaner
Battery
Fuse/fusible link box
Engine coolant reservoir
Radiator cap
Engine oil dipstick
Drive belt location
Windshield-washer fluid reservoir
...
