Nissan Sentra Service Manual: High-mounted stop lamp
Removal and Installation
HIGH-MOUNTED STOP LAMP - WITH REAR SPOILER
Removal
- Remove the rear air spoiler. Refer to EXT-46, "Removal and Installation".
- Remove the screws and the high-mount stop lamp from the rear air spoiler.
Installation
Installation is in the reverse order of removal.
HIGH-MOUNTED STOP LAMP - WITHOUT REAR SPOILER
Removal
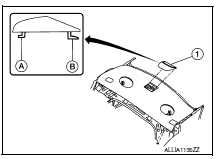
- Slide high-mounted stop lamp (1) rearward on parcel shelf to provide clearance for front tabs (A).
- Lift front of lamp assembly up and pull forward to provide clearance for rear tabs (B).

- Disconnect the harness connector from the high-mounted stop lamp and remove.
Installation
Installation is in the reverse order of removal.
Bulb Replacement
HIGH-MOUNTED STOP LAMP - WITH REAR SPOILER
The high-mounted stop lamp LED bulb is integrated into the high-mounted stop lamp and is serviced as an assembly. Refer to EXL-124, "Removal and Installation".
HIGH-MOUNTED STOP LAMP - WITHOUT REAR SPOILER
The high-mounted stop lamp LED bulb is integrated into the high-mounted stop lamp and is serviced as an assembly. Refer to EXL-124, "Removal and Installation".
 Door mirror turn signal lamp
Removal and installation
The door mirror side turn signal lamp is integrated into the door mirror
assembly and is serviced as an assembly.
Refer to MIR-18, "Exploded View". ...
 License plate lamp
Removal and Installation
REMOVAL
Remove the license lamp finisher. Refer to EXT-44, "Removal and
Installation".
Disconnect the harness connector (A) from the license plate
lamp ( ...
Other materials:
Keys
Remote keyless entry keyfob (if so equipped)
Integrated door lock keyfob
Key number plate
CAUTION
Do not leave the ignition key inside the
vehicle when you leave the vehicle.
A key number plate is supplied with your keys.
Record the key number and keep it in a safe place
(such as ...
Camshaft valve clearance
Inspection and Adjustment
INSPECTION
Perform inspection after removal, installation or replacement of camshaft or
valve-related parts, or if there are
unusual engine conditions regarding valve clearance.
Remove rocker cover. Refer to EM-46, "Exploded View".
Measure the valve cle ...
P1805 Brake switch
DTC Logic
DTC DETECTION LOGIC
DTC No.
CONSULT screen terms
(Trouble diagnosis content)
DTC detecting condition
Possible cause
P1805
BRAKE SW/CIRCUIT
(Brake switch circuit)
Stop lamp signal is not sent to ECM for extremely
long time while the vehicle is drivi ...
