Nissan Sentra Service Manual: Front seat belt
Exploded View
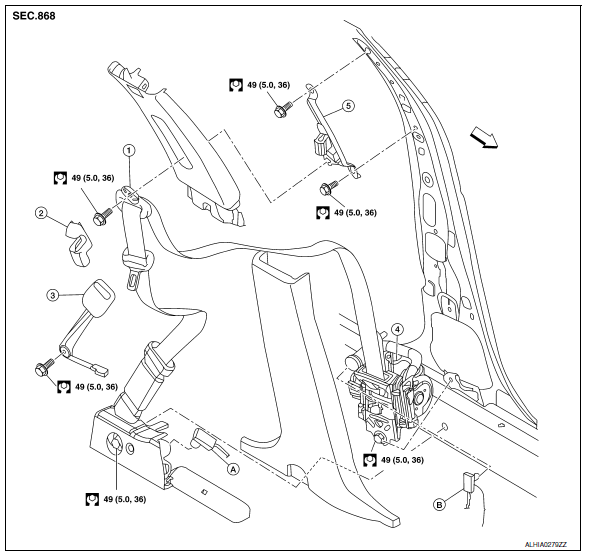
- D-ring anchor
- Seat belt height adjuster cover
- Seat belt buckle
- Seat belt retractor
- Seat belt height adjuster
- Lap belt pre-tensioner harness connector
- Shoulder belt pre-tensioner harness connector
 Front
Front
NOTE:
LH side shown; RH side similar.
Removal and Installation
SEAT BELT RETRACTOR
Removal
CAUTION:
Before servicing the SRS, turn the ignition switch off, disconnect both battery terminals and wait at least three minutes.
- Disconnect both the negative and positive battery terminals, then wait at least three minutes. Refer to PG- 50, "Removal and Installation (Battery)".
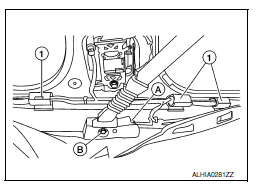
- Slide the front seat to the full forward position.
- Remove the center pillar lower finisher. Refer to INT-27, "CENTER PILLAR LOWER FINISHER : Removal and Installation".
- Release the floor trim hold downs (1) and pull floor trim back.
(B): Lap belt pre-tensioner anchor bolt
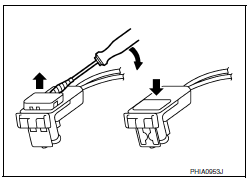
- Disconnect the harness connector (A) from the lap belt pre-tensioner.
CAUTION:
- For removing/installing the lap belt pre-tensioner harness connector, insert a thin screwdriver wrapped in tape into the notch, then lift the lock and remove the harness connector as shown.
- Install the harness connector with the lock raised, and push the lock into the harness connector as shown.
- After installing the harness connector, check that the lock is pushed in securely.
- Remove the lap belt pre-tensioner anchor bolt.
- Remove the seat belt height adjuster cover, then remove D-ring anchor bolt.
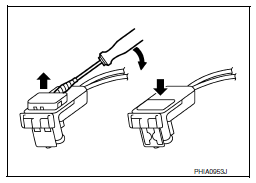
- Disconnect the harness connector from the shoulder belt pre-tensioner
CAUTION:
- For removing/installing the shoulder belt pre-tensioner harness connector, insert a thin screwdriver wrapped in tape into the notch, then lift the lock and remove the harness connector as shown.
- Install the harness connector with the lock raised, and push the lock into the harness connector as shown.
- After installing the harness connector, check that the lock is pushed in securely.
- Remove the seat belt retractor anchor bolt and upper bolt, then remove the seat belt retractor.
Installation
Installation is in the reverse order of removal.
- Install the seat belt retractor upper bolt first.
- Make sure the seat belt height adjuster is locked in the lowest position during installation.
- Tighten the seat belt retractor bolts to specification. Refer to SB-8, "Exploded View".
- Make sure both the D-ring anchor and seat belt height adjuster operate freely.
- Always perform an inspection after repair to be sure the system is functioning within specifications. Refer to SB-5, "Inspection".
SEAT BELT HEIGHT ADJUSTER
Removal
- Remove the center pillar upper finisher. Refer to INT-28, "CENTER PILLAR UPPER FINISHER : Removal and Installation".
- Remove the D-ring anchor bolt.
- Remove the seat belt height adjuster bolts and the seat belt height adjuster.
Installation
Installation is in the reverse order of removal.
- Make sure that the seat belt height adjuster is locked in the lowest position during installation.
- Make sure both the D-ring anchor and seat belt height adjuster operate freely.
- Tighten the D-ring anchor bolt and seat belt height adjuster bolts to specification. Refer to SB-8, "Exploded View".
SEAT BELT BUCKLE
Removal
- Remove the front seat assembly. Refer to SE-18, "DRIVER SIDE : Removal and Installation - Seat Assembly" (front seat driver side) or SE-20, "PASSENGER SIDE : Removal and Installation - Seat Assembly" (front seat passenger side).
- Disconnect the harness connector from the seat belt buckle.
- Remove the seat belt buckle anchor bolt and the seat belt buckle.
Installation
Installation is in the reverse order of removal.
- During installation, make sure the seat belt buckle anchor bolt (A) is inserted through the components in the following order:
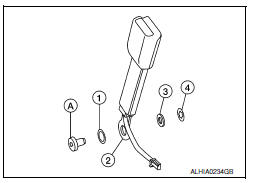
- Tighten the seat belt buckle anchor bolt to specification. Refer to SB-8, "Exploded View".

 Rear seat belt
Exploded View - Seat Belt Retractor
Seat belt retractor (RH)
Seat belt retractor (center)
Seat belt retractor (LH)
Front
Removal and Installation - Seat Belt Retractor
REMOVAL
R ...
Other materials:
DTC/circuit diagnosis
U1000 CAN COMM CIRCUIT
Description
Refer to lan-7, "can communication system : system description".
Dtc logic
Dtc detection logic
Note:
U1000 can be set if a module harness was disconnected and reconnected,
perhaps during a repair. Confirm
that there are actual CAN diagnostic symp ...
Moonroof motor assembly
Exploded view
Headlining
Sun visor
Moonroof motor assembly
Front
Removal and installation
REMOVAL
Close the glass lid.
Remove the map lamp. Refer to INL-52, "Removal and Installation".
Remove the moonroof motor bolts (A).
Front
Disconnect the harness connec ...
Removal and installation
Nats antenna amp
Removal and installation
Removal
Remove instrument finisher b. Refer to ip-14, "exploded view".
Using a suitable tool release the pawls on either side and remove the
NATS antenna amp. from the pushbutton
ignition switch.
Installation
Installation is in the ...
