Nissan Sentra Service Manual: Door lock
Front door lock
Front door lock : exploded view
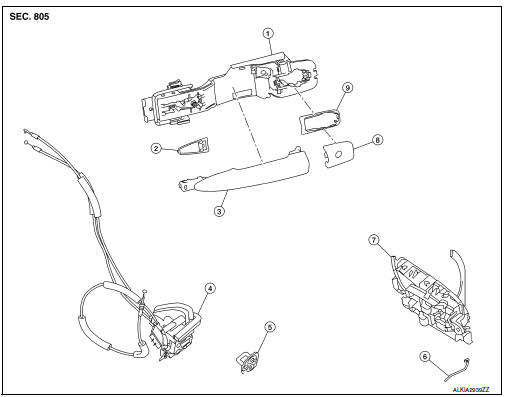
- Outside handle bracket
- Front gasket
- Outside handle
- Door lock assembly
- Door striker
- Door key cylinder rod
- Inside handle assembly
- Outside handle escutcheon
- Rear gasket
Front door lock : removal and installation
CAUTION:
Before servicing, turn ignition switch OFF, disconnect both battery terminals and wait at least three minutes.
REMOVAL
- Remove the front door outside handle. Refer to DLK-173, "FRONT DOOR HANDLE : Removal and Installation - Outside Handle".
- Remove the rear glass run.
- Disconnect the harness connector from the front door lock actuator.
- Remove screws, and the door lock assembly.
INSTALLATION
Installation is in the reverse order of removal.
Tighten front door lock screws to specified torque.
Front door lock screws: 5.8 NВ·m (0.59 kg-m, 51 in-lb)
CAUTION:
- Do not reuse front door lock assembly screws. Always replace screws with new ones when removed.
- Check front door lock cables are properly engaged to inside handle and outside handle bracket.
- When installing door key cylinder rod on the LH front door, be sure to rotate door key cylinder rod holder until a click is felt.
- After installation, check front door open/close, lock/unlock operation.
- Check front door lock assembly for poor lubrication. If necessary apply a suitable multi-purpose grease.
Rear door lock
REAR DOOR LOCK : Exploded View
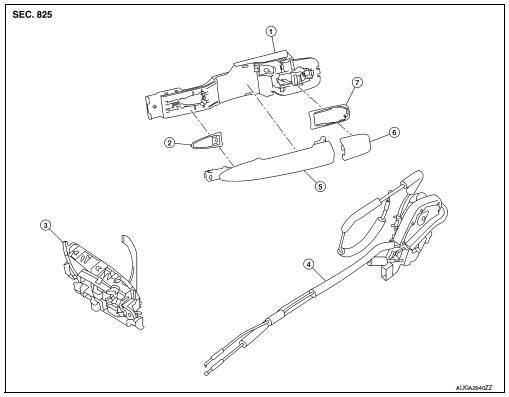
- Outside handle bracket
- Front gasket
- Inside handle assembly
- Door lock assembly
- Outside handle
- Outside handle escutcheon
- Rear gasket
REAR DOOR LOCK : Removal and Installation
REMOVAL
- Remove the rear door outside handle. Refer to DLK-176, "REAR DOOR HANDLE : Removal and Installation - Outside Handle".
- Disconnect the harness connector from the rear door lock actuator.
- Remove the screws, and the door lock assembly
INSTALLATION
Installation is in the reverse order of removal.
Tighten rear door lock screws to specified torque.
Rear door lock screws: 5.8 NВ·m (0.59 kg-m, 51 in-lb)
CAUTION:
- Do not reuse rear door lock assembly screws. Always replace screws with new ones when removed.
- Check rear door lock cables are properly engaged to inside handle and outside handle bracket.
- After installation, check rear door open/close, lock/unlock operation.
- Check rear door lock assembly for poor lubrication. If necessary apply a suitable multi-purpose grease.
 Door handle
Front door handle
Front door handle : exploded view
Outside handle bracket
Rear gasket
Front gasket
Outside handle escutcheon
Outside handle
Door key cylinder rod
Inside handle as ...
 Trunk lid
Trunk lid assembly
Trunk lid assembly : exploded view
Trunk lid hinge LH/RH
Torsion bar LH/RH
Torsion bar clips
Trunk lid finisher (if equipped)
Emergency release handle
Emergency rel ...
Other materials:
Rear rh side power window does not operate
When both power window main switch and rear power window switch RH are
operated
When both power window main switch and rear power window switch rh are
operated : diagnosis procedure
1.CHECK REAR POWER WINDOW SWITCH RH
Check rear power window switch RH.
Refer to PWC-40, "REAR POWER WIN ...
Water pump
Exploded View
Gasket
Water pump
WARNING:
Do not remove the radiator cap when the engine is hot. Serious burns
could occur from high-pressure
engine coolant escaping from the radiator. Wrap a thick cloth around the cap.
Slowly push down and
turn it a quarter turn to allow built-up ...
Moonroof unit assembly
Inspection
WIND DEFLECTOR
Open glass lid fully
Visually check for proper installation, damaged/deteriorated components,
or foreign objects within mechanism.
Correct as required for smooth operation.
Check for grease at the wind deflector arm (1) and pivot areas. If
necessary, apply ...
