Nissan Sentra Service Manual: Trunk lid
Trunk lid assembly
Trunk lid assembly : exploded view
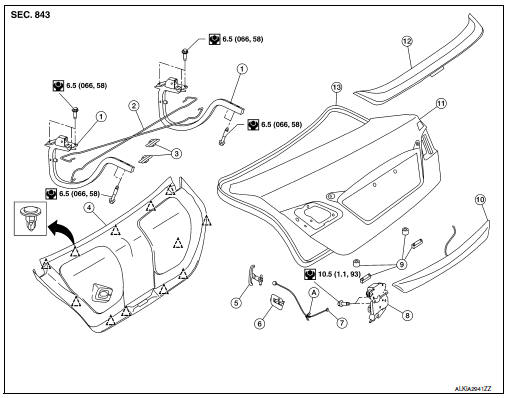
- Trunk lid hinge LH/RH
- Torsion bar LH/RH
- Torsion bar clips
- Trunk lid finisher (if equipped)
- Emergency release handle
- Emergency release handle clip
- Emergency release handle cable
- Trunk lid lock
- Trunk lid bumpers
- License lamp finisher
- Trunk lid
- Rear spoiler (if equipped)
- Weatherstrip
- Clip
 Clip
Clip
Trunk lid assembly : removal and installation
CAUTION:
- Use two people when removing or installing trunk lid assembly due to its heavy weight.
- Use protective tape or shop cloths to protect surrounding components from damage during removal and installation of trunk lid assembly.
REMOVAL
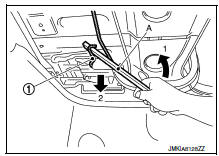
- Remove trunk lid finisher (if equipped). Refer to INT-45, "Removal and Installation".
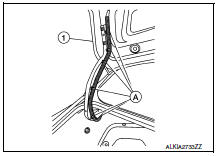
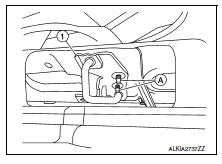
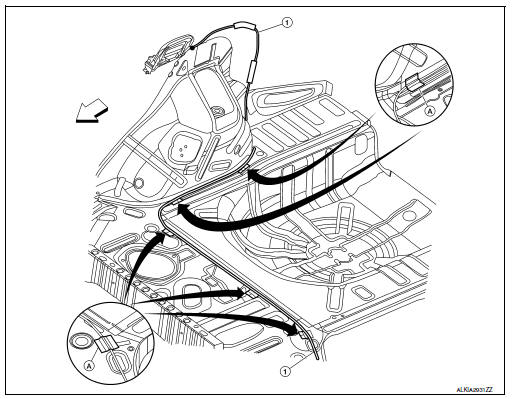
- Disconnect the harness connectors in the trunk lid assembly (1) and remove the harness clips (A) then pull out harness from the trunk lid assembly (1).
- Remove the bolts (A) and remove the trunk lid assembly (1).
INSTALLATION
Installation is in the reverse order of removal.
CAUTION:
After installation, perform the trunk lid assembly adjustment procedure. Refer to DLK-332, "TRUNK LID ASSEMBLY : Adjustment".
Trunk lid assembly : adjustment

- Trunk lid assembly
- Trunk lid hinge
- Trunk lid striker
- Body side outer
- Rear combination lamp
- Reflector
- Rear bumper fascia
- Trunk lid bolts
- Striker bolts
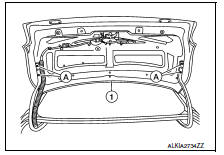
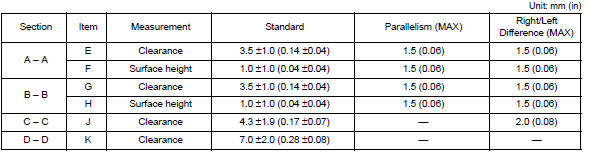
Check the clearance and the surface height between trunk lid and each part by visual inspection and tactile feel.
If the clearance and the surface height are out of specification, adjust them according to the adjustment procedures.
LONGITUDINAL CLEARANCE
Trunk Lid Removed From Hinge
- Loosen the trunk lid to hinge bolts
- Move the trunk lid so that the clearance measurements are within specifications provided.
- Tighten the trunk lid to hinge bolts.
Trunk Lid Hinge Removed From Vehicle
- Remove the rear parcel shelf finisher. Refer to INT-33, "Removal and Installation".
- Loosen the hinge to parcel shelf bolts.
- Move the trunk lid so that the clearance measurements are within specifications provided.
- Tighten the hinge to parcel shelf bolts.
- Install the rear parcel shelf finisher. Refer to INT-33, "Removal and Installation".
SURFACE HEIGHT ADJUSTMENT
- Loosen the bumper rubber.
- Loosen the striker bolts.
- Lift up the trunk lid approx. 100 - 150 mm (3.94 - 5.91 in) height then close it lightly. Make sure it engages firmly with the trunk lid closed.
- Tighten the trunk lid striker.
Trunk lid hinge
Trunk lid hinge : removal and installation
REMOVAL
- Remove trunk lid assembly. Refer to DLK-330, "TRUNK LID ASSEMBLY : Removal and Installation".
- Remove torsion bar. Refer to DLK-334, "TORSION BAR : Removal and Installation".
- Remove rear parcel shelf finisher. Refer to INT-33, "Removal and Installation".
- Remove trunk lid hinge bolts (body side) and remove.
INSTALLATION
Installation is in the reverse order of removal.
CAUTION:
- Check trunk lid open/close, lock/unlock operation after installation.
- After installation, perform the trunk lid assembly adjustment procedure. Refer to DLK-332, "TRUNK LID ASSEMBLY : Adjustment".
- Check trunk lid hinge rotating point for poor lubrication. If necessary, apply a suitable multi-purpose grease.
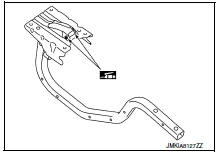
Torsion bar
TORSION BAR : Removal and Installation
REMOVAL
- Remove torsion bar clips.
- Support the trunk lid assembly using a suitable tool.
WARNING:
Bodily injury may occur if hood assembly is not supported properly when removing hood assembly.
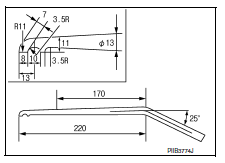
- Lift torsion bar (1) using a suitable tool (A) as shown to remove.
NOTE:
The suitable tool specifications are as shown.
INSTALLATION
Installation is in the reverse order of removal.
CAUTION:
After installation check the trunk lid open/close, lock/unlock operation.
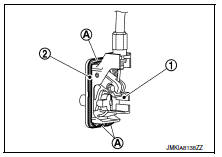
Trunk lid lock
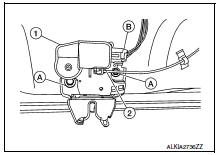
Trunk lid lock : removal and installation
REMOVAL
- Remove the trunk lid finisher (if equipped). Refer to INT-45, "Removal and Installation".
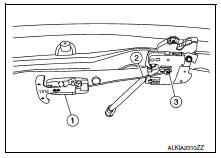
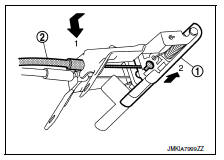
- Disconnect the harness connector (B) and emergency release handle (2) from the trunk lid lock (1).
- Remove the trunk lid lock bolts (A) and remove.
INSTALLATION
Installation is in the reverse order of removal.
CAUTION:
After installation, perform the trunk lid assembly adjustment procedure. Refer to DLK-332, "TRUNK LID ASSEMBLY : Adjustment".
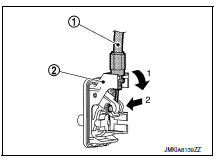
Emergency lever
Emergency lever : removal and installation
REMOVAL
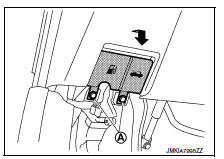
- Remove the trunk lid finisher (if equipped). Refer to INT-45, "Removal and Installation".
- Using a suitable tool release the pawls and remove emergency release handle (1) from trunk lid assembly.
 : Pawl
- Disconnect emergency release handle cable (2) from trunk lid lock assembly (3).
INSTALLATION
Installation is in the reverse order of removal.
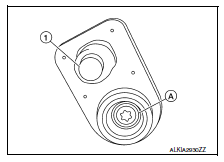
Trunk lid striker
Trunk lid striker : removal and installation
REMOVAL
- Remove the trunk kicking plate. Refer to INT-42, "Exploded View".
- Remove bolts (A) and striker (1).
INSTALLATION
Installation is in the reverse order of removal.
CAUTION:
After installation, perform the trunk lid assembly adjustment procedure. Refer to DLK-332, "TRUNK LID ASSEMBLY : Adjustment".
Fuel filler lid opener
Exploded View
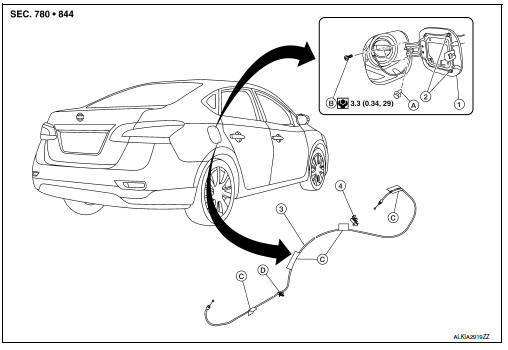
- Fuel filler lid
- Bumper rubber
- Fuel filler lid opener cable
- Fuel filler lid lock
- Clip
- Bolts
- Cable protector
Fuel filler lid
Fuel filler lid : removal and installation
REMOVAL
- Fully open fuel filler lid.
- Remove fuel cap clip (A).

- Remove fuel filler lid screws (A) and fuel filler lid (1).
INSTALLATION
Installation is in the reverse order of removal.
CAUTION:
After installation, check fuel filler lid assembly open/close, lock/unlock operation.
NOTE:
- The following table shows the specifications for a correctly installed fuel filler lid.
- Fitting adjustment cannot be performed.

Fuel filler opener cable
Fuel filler opener cable : removal and installation
REMOVAL
- Remove hood and fuel filler handle assembly bolts (A).
- Release fuel filler lid opener cable (2) by pulling downward and then sliding cable end to the side to remove from hood and fuel filler handle assembly (1).
- Remove dash side finisher (LH). Refer to INT-26, "DASH SIDE FINISHER : Removal and Installation".
- Remove center pillar lower finisher (LH). Refer to INT-27, "CENTER PILLAR LOWER FINISHER : Removal and Installation".
- Remove rear seat bolster (LH). Refer to SE-24, "Removal and Installation - Rear Seat Bolster".
- Remove trunk side finisher (LH). Refer to INT-43, "TRUNK SIDE FINISHER : Removal and Installation".
- Remove fuel filler lid opener cable (1) from fuel filler lid lock assembly. Refer to DLK-338, "FUEL FILLER OPENER CABLE : Removal and Installation".
 Front
Front
- Remove each cable protector (A), then remove fuel filler lid opener cable (1).
INSTALLATION
Installation is in the reverse order of removal.
CAUTION:
After installation, check fuel filler lid assembly open/close, lock/unlock operation.
Fuel filler lid lock
Fuel filler lid lock : removal and installation
REMOVAL
- Fully open fuel filler lid.
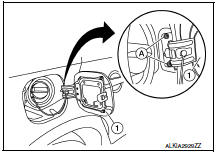
- Insert a suitable tool (A) as shown into bottom of fuel filler lock assembly(1).
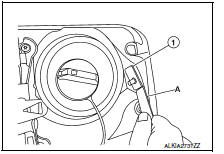
- Release upper and lower pawls (A) using a suitable tool and remove fuel filler lid lock assembly (1).
CAUTION:
Be careful not to damage gasket (2) when removing.
- Disconnect fuel filler lid opener cable (1) by pulling downward and then sliding cable end to the side to remove from fuel filler lid lock assembly (2).
INSTALLATION
Installation is in the reverse order of removal.
CAUTION:
After installation, check fuel filler lid assembly open/close, lock/unlock operation.
Door switch
Removal and Installation
REMOVAL
- Remove the door switch bolt (A).
- Disconnect the harness connector from the door switch (1) and remove.
INSTALLATION
Installation is in the reverse order of removal.
Remote keyless entry receiver
Removal and installation
REMOVAL
- Remove glove box assembly. Refer to IP-22, "Removal and Installation".
- Disconnect the harness connector from the remote keyless entry receiver.
- Remove the screw and remote keyless entry receiver.
INSTALLATION
Installation is in the reverse order or removal.
Keyfob battery
Exploded view
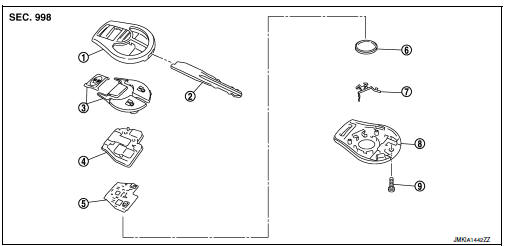
- Upper case
- Key
- Switch cover
- Switch rubber
- Board surface
- Battery
- Plate
- Lower case
- Screw
Removal and installation
REMOVAL
- Remove the keyfob screw.
- Seperate the upper and lower case using a suitable tool.
CAUTION:
- Do not touch the circuit board or battery terminal.
- The keyfob is water-resistant. However, if it does get wet, immediately wipe it dry.
- Remove the circuit board from the upper case.
CAUTION:
Do not touch the printed circuits directly.
- Remove the keyfob battery from the upper case.
Battery replacement : Coin-type lithium battery (CR1620)
CAUTION:
- When replacing battery, keep dirt, grease, and other foreign materials off the electrode contact area.
- After replacing the battery, Be sure to check that door locking operates normally using the keyfob.
INSTALLATION
Installation is in the reverse order of removal.
Trunk lid opener switch
Removal and Installation
REMOVAL
- Remove the instrument lower panel LH. Refer to IP-21, "Removal and Installation".
- Remove to the instrument finisher D (1).
- Remove the screws (A) that retain the instrument finisher D to the switch carrier.
- Release upper tab (B) and lower tab using a suitable tool (C), then remove the trunk lid opener switch from the upper switch carrier.
INSTALLATION
Installation is in the reverse order of removal.
 Door lock
Front door lock
Front door lock : exploded view
Outside handle bracket
Front gasket
Outside handle
Door lock assembly
Door striker
Door key cylinder rod
Inside handle assembly
Ou ...

Other materials:
Service data and specifications (SDS)
Wheel Alignment (Unladen*1)
UNITED STATES and CANADA
*1: Fuel, engine coolant, and lubricants are full. Spare tire, jack, hand
tools, and mats are in designated positions.
*2: The difference when assuming the (LH) side is the standard.
Ball Joint
Wheelarch Height (Unladen*)
UNITED S ...
Interior trunk lid release
WARNINGClosely supervise children when they are
around cars to prevent them from playing
and becoming locked in the trunk where
they could be seriously injured. Keep the
car locked, with the rear seatback and
trunk lid securely latched when not in use,
and prevent childr ...
System description
COMPONENT PARTS
Component Part Location
ECM
IPDM E/R
BCM (view with combination meter
removed)
A/C auto amp. (view with A/C switch
assembly removed)
A/C switch assembly
A/C Compressor
Refrigerant pressure sensor (view
with front bumper fascia removed)
Fuse Block (J/ ...
