Nissan Sentra Service Manual: Cowl top
Exploded view
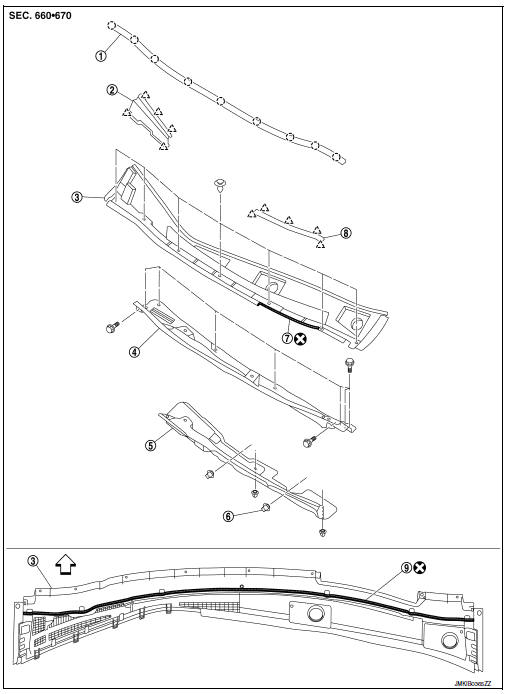
- Cowl top seal
- Cowl top grille cap
- Cowl top cover
- Cowl top extension
- Cowl top extension insulator
- Clip
- EPT seal [t: 3.0 mm (0.12 in)
- Cowl top cover cap
- EPT seal [t: 5.0 mm (0.20 in)]
 Pawl
Pawl
 Clip
Clip
 Front
Front
Removal and installation
COWL TOP COVER
Removal
- Remove front wiper arms (LH/RH). Refer to WW-57, "Removal and Installation".
- Remove front fender covers (LH/RH). Refer to DLK-159, "Exploded View".
- Remove front fender seals (LH/RH). Refer to DLK-306, "Exploded View".
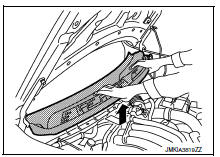
- Remove cowl top cover clips.
- Pull forward to release cowl top cover from windshield glass.
CAUTION:
When performing the procedure after removing cowl top cover, cover the lower end of windshield glass with urethane etc.
- Remove cowl top cover.
- Remove the following from the cowl top cover.
- EPT sealer
- Cowl top seal
- Cowl top grille cap
Installation
Installation is in the reverse order of removal.
CAUTION:
- Clean the joint between the cowl top cover and the windshield.
- Replace the EPT sealer on the back surface with new EPT sealer when reusing the cowl top cover.
- Remove the EPT sealer remaining on the cowl top cover using a double-faced adhesive tape remove.
- To maintain adhesion, do not wash the vehicle within 24 hours after installation.
- Perform the stop position adjustment at the installation of the front wiper arms.
Cowl Top Extension
Removal
- Remove the cowl top cover.
- Remove front wiper drive assembly. Refer to WW-62, "Removal and Installation".
- Remove cowl top extension bolts and cowl top extension.
- Remove cowl top extension insulator clips and cowl top extension insulator.
Installation
Installation is in the reverse order of removal.
 Front grille
Exploded view
Core support cover
Front grille
Emblem
Pawl
Removal and installation
REMOVAL
Remove core support cover bolts (A), clips (B) and core support
cover (1).
...
 Fender protector
Fender protector
Fender protector : exploded view
Front fender protector
Front wind deflector
U nut
Rivet
Grommet
Front
Fender protector : removal and installation - front f ...
Other materials:
Parking/parking on hills
WARNING
Do not stop or park the vehicle over
flammable materials such as dry grass,
waste paper or rags. They may ignite
and cause a fire.
Safe parking procedures require that
both the parking brake be set and the
transmission placed into P (Park) for
CVT m ...
USB interface (models without Navigation System) (if so equipped)
Connecting a device to the USB input
jack
WARNINGDo not connect, disconnect, or operate the
USB device while driving. Doing so can be
a distraction. If distracted you could lose
control of your vehicle and cause an accident
or serious injury.
CAUTION
Do not force t ...
Refrigeration system symptoms
Trouble diagnosis for unusual pressure
Diagnose using a manifold gauge whenever system’s high and/or low side
pressure(s) is/are unusual. The
marker above the gauge scale in the following tables indicates the standard
(usual) pressure range. Refer to
above table (Ambient air temperature ...
