Nissan Sentra Service Manual: Work Flow
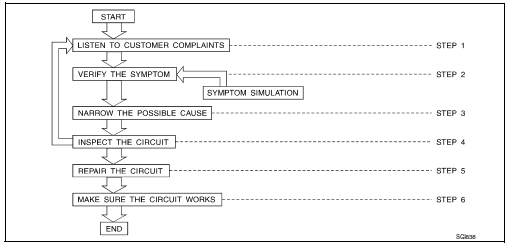
| STEP | DESCRIPTION | |
| STEP 1 | Get detailed information about the conditions and the
environment when the incident occurred.
The following are key pieces of information required to make a good analysis: |
|
| WHAT | Vehicle Model, Engine, Transmission/Transaxle and the System (i.e. Radio). | |
| WHEN | Date, Time of Day, Weather Conditions, Frequency. | |
| WHERE | Road Conditions, Altitude and Traffic Situation. | |
| HOW | System Symptoms, Operating Conditions (Other Components
Interaction).
Service History and if any After Market Accessories have been installed. |
|
| STEP 2 | Operate the system, road test if necessary.
Verify the parameter of the incident. If the problem cannot be duplicated, refer to “Incident Simulation Tests”. |
|
| STEP 3 | Get the proper diagnosis materials together including:
Identify where to begin diagnosis based upon your knowledge of the system operation and the customer comments. |
|
| STEP 4 | Inspect the system for mechanical binding, loose
connectors or wiring damage.
Determine which circuits and components are involved and diagnose using the Power Supply Routing and Harness Layouts. |
|
| STEP 5 | Repair or replace the incident circuit or component. | |
| STEP 6 | Operate the system in all modes. Verify the system works properly under all conditions. Make sure you have not inadvertently created a new incident during your diagnosis or repair steps. | |

 Control Units and Electrical Parts
PRECAUTIONS
Never reverse polarity of battery terminals.
Install only parts specified for a vehicle.
Before replacing the control unit, check the input and output and
functions of the compo ...
Other materials:
Transaxle side
TRANSAXLE SIDE : Removal and Installation
Remove boot after drive shaft is removed from the vehicle.
For drive shaft removal and installation, follow the instructions bellow.
6M/T: Refer to FAX-18, "6M/T : Removal and Installation (LH)".
Except 6M/T: Refer to FAX-26, "EXCEPT ...
System description
Refrigeration system
Component part location
High-pressure service port
High-pressure pipe
Expansion valve
Low-pressure service port
Low-pressure flexible hose
Compressor
Refrigerant pressure sensor
Condenser and liquid tank assembly
High-pressure flexible hose
Refrigera ...
System description
Component parts
CVT CONTROL SYSTEM
CVT CONTROL SYSTEM : Component Parts Location
No.
Component
Function
1
ECM
Mainly transmits the following signal to TCM via CAN
communication.
Engine and CVT integrated control signal
NOTE:
General term for the c ...
