Nissan Sentra B18 (2020-2025) Service Manual: Removal and Installation
Warning:
-
Before servicing the SRS, place the ignition switch in the OFF position, disconnect both battery terminals then wait at least three minutes.
-
Always work from the side of the driver air bag module. Do not work in front of it.
-
Do not use air tools or electric tools for servicing the driver air bag module.
-
Always place the driver air bag module with the pad side facing upward.
-
Do not cause impact to the driver air bag module by dropping, etc. Replace the driver air bag module if it has been dropped or sustained an impact.
-
Do not allow oil, grease, detergent, or water to come in contact with the driver air bag module.
REMOVAL
Disconnect negative and positive battery terminals, then wait at least three minutes. Refer to Battery Disconnect.
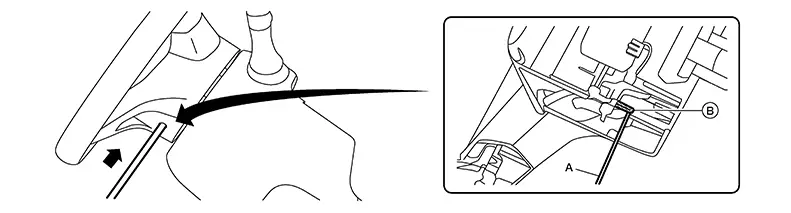
Locate the
access holes. 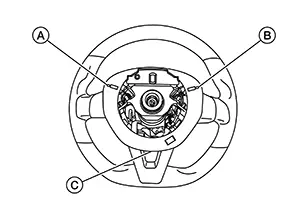 Note:
Note: 
Steering wheel removed for clarity.
|
(A) |
: Right side access hole |
|
(B) |
: Left side access hole |
|
(C) |
: Bottom access hole |
Turn the
steering wheel until the access hole (A) is visible from the top of
the steering column.
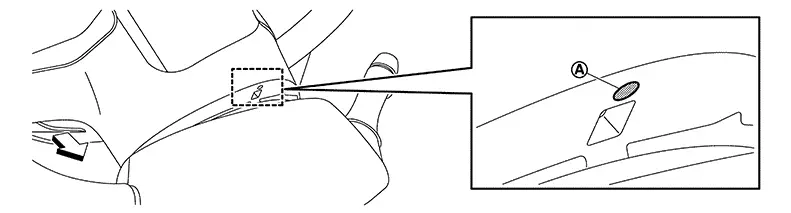
|
|
: Front |

Insert Tool
(A) into access hole and under spring (1) as shown.
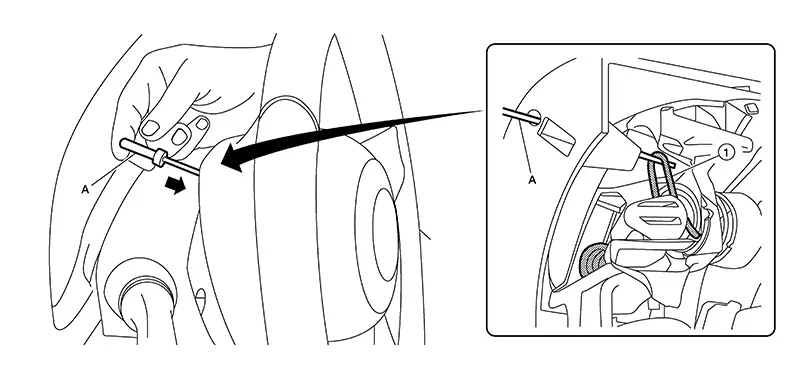
|
Tool Number |
: (NI-52551) |
Lift spring
(1) as shown using Tool (A) to disengage spring.
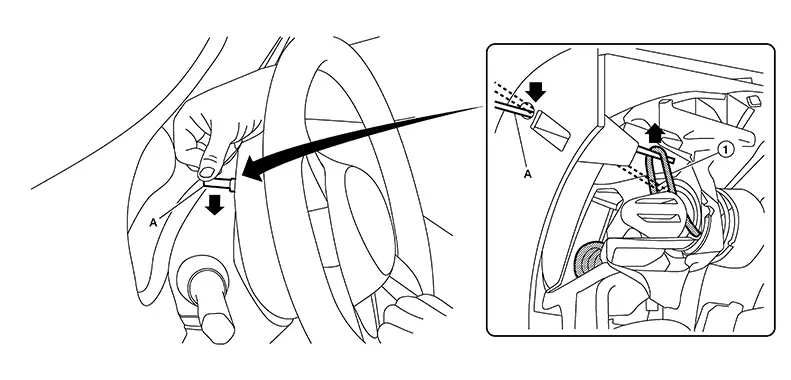
|
Tool Number |
: (NI-52551) |
Turn the steering wheel to the opposite side, then repeat steps 3–5.
Using suitable tool (A) gently push bottom pawl (B) and gently tilt the bottom of the driver air bag module outward so the pawl will not re-engage.
CAUTION:
To avoid possible damage to the driver air bag module bottom pawl, do not use excessive force while disengaging.
Disconnect
the harness connectors (A) from the driver air bag module. Remove
harnesses from the hook (B).
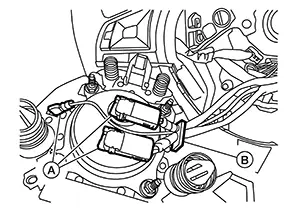
CAUTION:
-
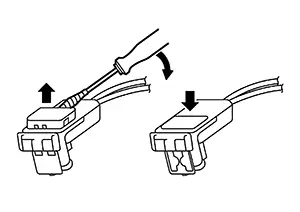
For installing/removing the driver air bag module harness connector, insert thin screwdriver wrapped in tape into notch, lift lock and remove the connector.
-
Install the connector with lock raised, and push lock into the connector.
-
After installing the connector, check that the lock is pushed securely into it.
Remove the driver air bag module.
CAUTION:
-
Always place the driver air bag module with pad side facing upward.
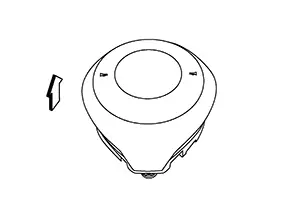
 :
Upward
:
Upward -
Do not strike or impact the driver air bag module.
-
Replace the driver air bag module if it has been dropped or sustained an impact.
-
Do not insert any foreign objects (screwdriver, etc.) into the driver air bag module.
-
Do not disassemble the driver air bag module.
-
Do not expose the driver air bag module to temperatures exceeding 93°C (199°F).
-
Do not allow oil, grease, detergent, or water to come in contact with the driver air bag module.
-
If the driver air bag module is being replaced due to deployment, the spiral cable must also be replaced. Refer to Removal and Installation.
INSTALLATION
Connect the
harness connectors to the driver air bag module.
CAUTION:
-
Always connect the horn harness and the driver air bag module harnesses (A) and route through the hook (B) on the driver air bag module as shown.
-
Do not pinch or damage the harnesses while installing the driver air bag module.
-
For installing/removing the driver air bag module harness connector, insert thin screwdriver wrapped in tape into notch, lift lock and remove the connector.
-
Install the connector with lock raised, and push lock into the connector.
-
After installing the connector, check that the lock is pushed securely into it.
Install the
driver air bag module to the steering wheel. 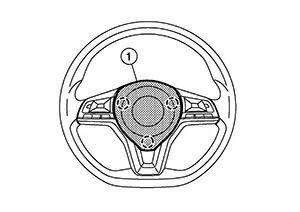
CAUTION: Press driver air bag module (1) until
it snaps into place with a clicking sound. : Pawl

Connect the negative and positive battery terminals. Refer to Battery Disconnect.
Check the horn and each function of the steering switches.
CAUTION:
-
After installation is complete, check that no system malfunction is detected causing the air bag warning lamp to illuminate.
-
If a malfunction is indicated by the air bag warning lamp after repair or replacement of the malfunctioning parts, perform the SRS Final Check. Refer to SRS Final Check.
 Exploded View
Exploded View
1.
Steering wheel
2.
...
 Spiral Cable
...
Other materials:
Special Service Tool
Special Service
Tool
The actual shape
of the tools may differ from those illustrated here.
Tool numbers
(TechMate No.)
Tool name
Description
...
How to erase permanent DTC
Description
OUTLINE
When a DTC is stored in ECM
When a DTC is stored in ECM and MIL is ON, a permanent DTC is erased with MIL
shutoff if the same malfunction
is not detected after performing the driving pattern for MIL shutoff three times
in a raw.
*1: When the same malfunction is detec ...
Special Service Tools
Special Service Tools
The actual shape of the tools may differ from those
illustrated here.
Tool number
(TechMate No.)
Tool name
Description
...
