Nissan Sentra Service Manual: Rear window defogger relay
Description
Power is supplied to the rear window defogger with BCM control.
Component Function Check
1. Check rear window defogger relay power supply circuit
- Turn ignition switch ON.
- Check that an operation noise of rear window defogger relay (located in IPDM E/R) can be heard when turning the rear window defogger switch ON.
Is the inspection result normal? Yes >> rear window defogger relay power supply circuit is ok.
No >> refer to def-32, "diagnosis procedure".
Diagnosis Procedure
Regarding wiring diagram information, refer to def-20, "wiring diagram".
1.Check fuses
Check if any of the following fuses in the ipdm e/r are blown.

Is the inspection result normal? Yes >> go to 2
No >> replace the fuse after repairing the affected circuit.
2. Check rear window defogger relay power supply circuit
- Turn ignition switch on.
- Check voltage between IPDM E/R connector E48 terminal 62 and ground.
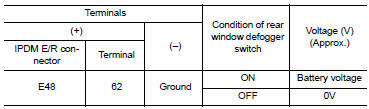
Is the inspection result normal? Yes >> go to 3
No >> replace ipdm e/r. Refer to pcs-30, "removal and installation" (with intelligent key system) or pcs-58, "removal and installation" (without intelligent key system).
3. Check intermittent incident
Check intermittent incident.
Refer to gi-39, "intermittent incident" is the inspection result normal? Yes >> check the following:
- Battery power supply circuit.
- Ipdm e/r.
No >> repair or replace the malfunctioning parts.
 Rear window defogger switch
Description
The rear window defogger is operated by pressing the rear window
defogger switch ON.
The indicator lamp in the rear window defogger switch illuminates while
the rear window def ...
 Rear window defogger power supply and ground circuit
Description
Heats the heating wire with the power supply from the rear window defogger
relay to prevent the rear window
from fogging up.
Component function check
1. Check rear window defogger
...
Other materials:
P0014 EVT control
DTC Logic
DTC DETECTION LOGIC
NOTE:
If DTC P0014 is displayed with DTC P0078, first perform trouble
diagnosis for DTC P0078. Refer to
EC-183, "DTC Logic".
If DTC P0014 is displayed with P1078, first perform trouble diagnosis
for P1078. Refer to EC-359,
"DTC Logic&quo ...
Air fresheners
Most air fresheners use a solvent that could affect
the vehicle interior. If you use an air freshener,
take the following precautions:
Hanging-type air fresheners can cause permanent
discoloration when they contact vehicle
interior surfaces. Place the air freshener
in a location that all ...
System description
Component parts
Nissan vehicle immobilizer system-nats
Nissan vehicle immobilizer systemnats
: component parts location
Bcm
(view with instrument panel removed)
Dongle unit (canada only)
(behind instrument panel lh)
Ignition switch
Nats antenna amp.
(Inside steering column) ...
