Nissan Sentra B18 (2020-2025) Service Manual: Rear Seat
Exploded View
Exploded View
60:40 SPLIT SEATBACK
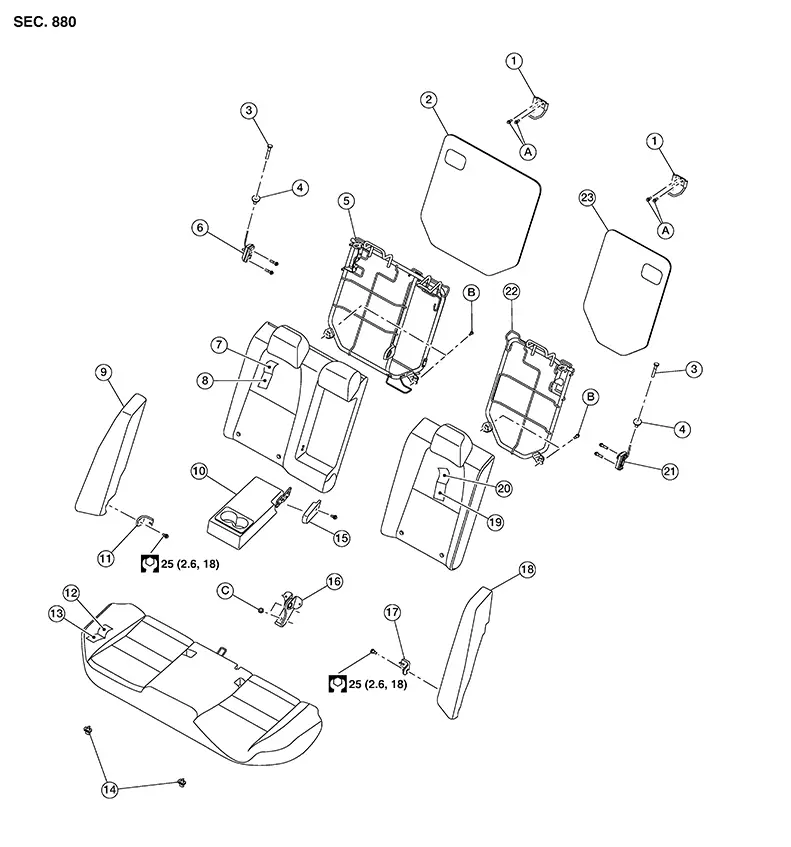
|
1. |
Seatback striker |
2. |
Rear seatback insulator (RH) |
3. |
Seatback latch release knob |
|
4. |
Seatback latch release knob finisher |
5. |
Rear seatback frame (RH) |
6. |
Seatback latch assembly (RH) |
|
7. |
Seatback trim (RH) |
8. |
Seatback pad (RH) |
9. |
Rear seat bolster (RH) |
|
10. |
Armrest assembly |
11. |
Seatback hinge bracket (RH) |
12. |
Seat cushion trim |
|
13. |
Seat cushion pad |
14. |
Seat cushion hook |
15. |
Armrest hinge finisher |
|
16. |
Seatback hinge bracket (center) |
17. |
Seatback hinge bracket (LH) |
18. |
Seatback bolster (LH) |
|
19. |
Seatback pad (LH) |
20. |
Seatback trim (LH) |
21. |
Seatback latch assembly (LH) |
|
22. |
Rear seatback frame (LH) |
23. |
Rear seatback insulator (LH) |
A. |
Refer to Removal and Installation |
|
B. |
Refer to Removal and Installation |
C. |
Refer to Removal and Installation |
Disassembly and Assembly - Seatback
Disassembly and Assembly - Seatback
REAR SEATBACK ASSEMBLY (RH)
Disassembly
Remove the rear seatback assembly (RH). Refer to Removal and Installation - 60:40 Split Seatback.
Remove the armrest assembly. Refer to Removal and Installation - Armrest Assembly.
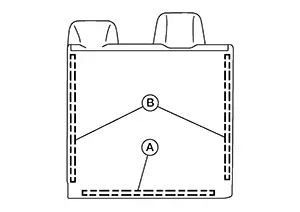
Release the
J-hook retainer (A) and un-zip the seatback trim zippers
(B).
Pull back seatback trim and remove rear seatback insulator (RH).
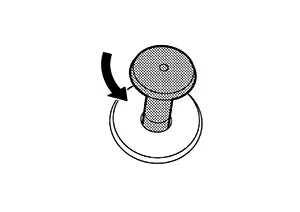
Rotate the
seatback latch release knob counterclockwise and remove.
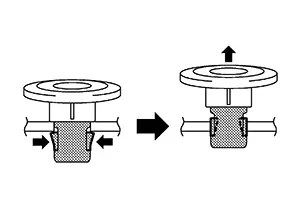
Reach up
through the seatback pad and remove the seatback latch release knob
finisher as shown.
CAUTION:
Before installing the seatback release knob finisher, check its orientation (front/rear and right/left).
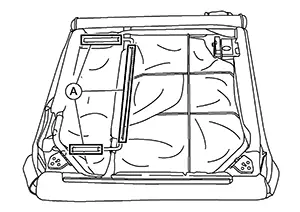
Release the
J-hook retainer (A) and remove the seatback trim and seatback pad
as an assembly from the rear seatback frame.
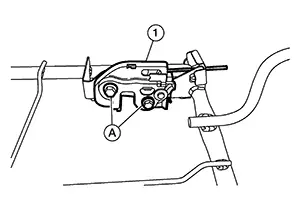
If
necessary remove bolts (A) and the seatback latch assembly (1) from
the rear seatback frame.
Remove the
hog rings and separate the seatback trim from the seatback
pad.
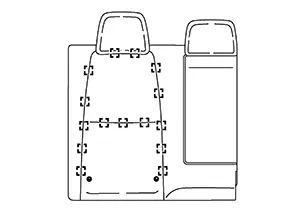
|
|
: Hog ring |


Remove all pieces of hog rings and discard them.
Assembly
Assembly is in the reverse order of disassembly.
CAUTION:
-
Make sure hog rings are correctly fastened around both the seatback trim and seatback pad wires.
-
Replace any deformed or damaged hog rings.
-
Make sure any old hog ring pieces are removed from seat.
-
Install new hog rings on the seatback trim in original positions.
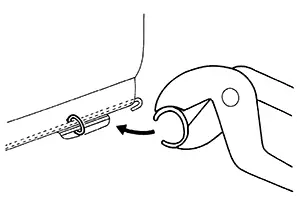
-
Use only one hog ring in each designated location.
REAR SEATBACK ASSEMBLY (LH)
Disassembly
Remove the rear seatback assembly (LH). Refer to Removal and Installation - 60:40 Split Seatback.
Release the
J-clip retainers (A) then partial pull back seaback trim and
release the J-clip retaniers (B).
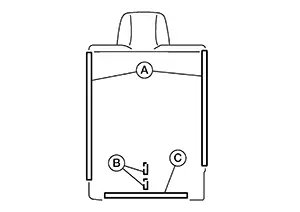
Un-zip the seatback trim zipper (A) and pull back seatback trim.
Remove rear seatback insulator (LH).
Rotate the
seatback latch release knob counterclockwise and remove.
Reach up
through the seatback pad and remove the seatback latch release knob
finisher as shown.
CAUTION:
Before installing the seatback release knob finisher, check its orientation (front/rear and right/left).
Remove the seatback trim and seatback pad as an assembly from the rear seatback frame.
If
necessary remove bolts (A) and the seatback latch assembly (1) from
the rear seatback frame.
Remove the
hog rings and separate the seatback trim from the seatback
pad.
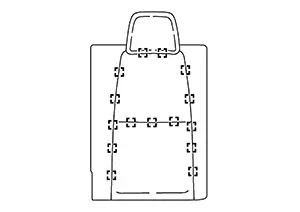 Note:
Note:
Models equipped with armrest shown, models without armrest similar.
|
|
HogRing-25B34B29
: Hog ring |
Remove all pieces of hog rings and discard them.
Assembly
Assembly is in the reverse order of disassembly.
CAUTION:
-
Make sure hog rings are correctly fastened around both the seatback trim and seatback pad wires.
-
Replace any deformed or damaged hog rings.
-
Make sure any old hog ring pieces are removed from seat.
-
Install new hog rings on the seatback trim in original positions.
-
Use only one hog ring in each designated location.
Disassembly and Assembly - Seat Cushion
Disassembly and Assembly - Seat Cushion
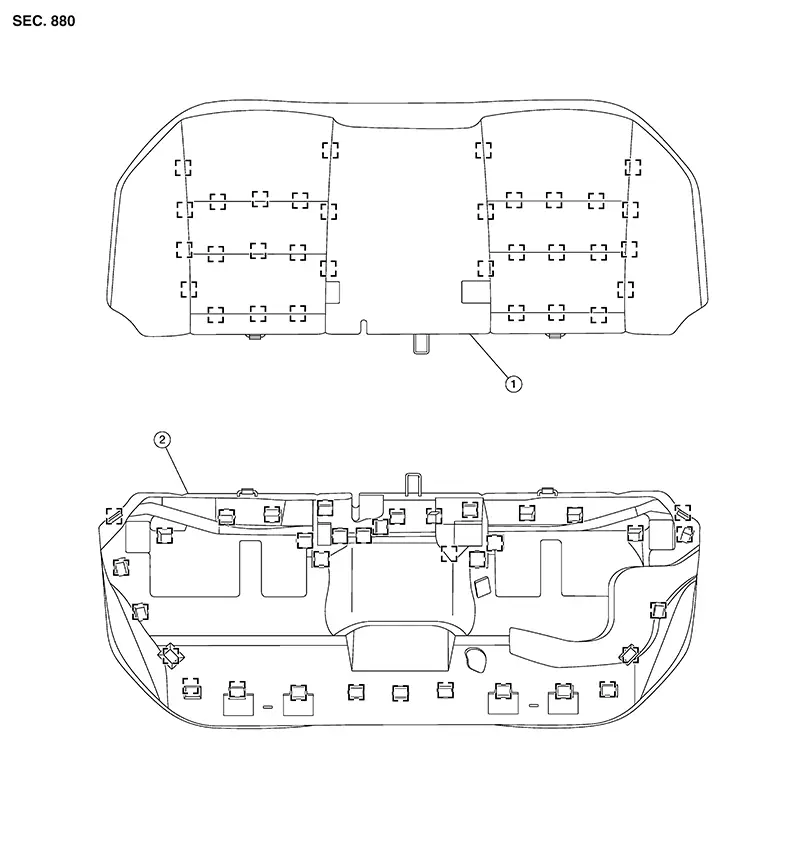
|
1. |
Seat cushion trim |
2. |
Seat cushion pad |
|
Hog rings |
Disassembly
Remove the seat cushion assembly. Refer to Removal and Installation - Seat Cushion Assembly.
Remove the hog rings on the bottom side of seat cushion.
Remove the
hog rings on the top side of seat cushion and separate the seat
cushion trim from the seat cushion pad. Note:
Remove all pieces of hog rings and discard them.
Assembly
Assembly is in the reverse order of disassembly.
CAUTION:
-
Make sure hog rings are correctly fastened around both the seat cushion trim and seat cushion pad wires.
-
Replace any deformed or damaged hog rings.
-
Make sure any old hog ring pieces are removed from seat.
-
Install new hog rings on the seat cushion trim in original positions.
-
Use only one hog ring in each designated location.
Other materials:
Door Lock and Unlock Switch
Driver Side
Component Function Check
Component Function
Check
CHECK FUNCTION
CONSULT
Ignition switch ON.
Select ″CDL LOCK SW″, ″CDL UNLOCK SW″ in ″Data
...
Diagnosis System (distance Sensor)
Consult Function (laser/radar)
CONSULT Function (LASER/RADAR)
APPLICATION ITEMS
CONSULT performs the following functions via CAN communication
with ADAS control unit 2 and the communication with distance sensor.
...
Abs Warning Lamp
Component Function Check
Component Function Check
CHECK ABS WARNING LAMP FUNCTION
Check that ABS warning lamp in combination meter
turns ON for 1 second after ignition switch is placed ON.
CAUTION:
Never start th ...