Nissan Sentra Service Manual: Parking brake control
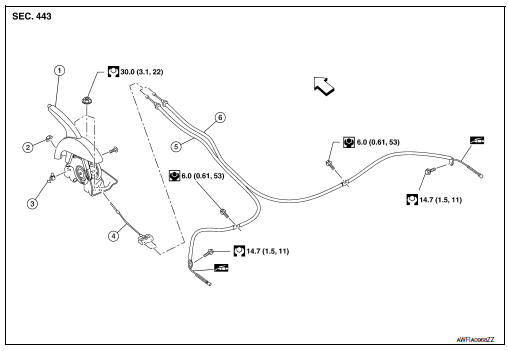
Exploded View
-
Parking brake lever assembly
-
Adjusting nut
-
Parking brake switch
-
Front parking brake cable
-
Rear parking brake cable (LH)
-
Rear parking brake cable (RH)
 Front
Front
Removal and Installation
REMOVAL
Parking Brake Control
-
Remove rear wheels and tires using power tool. Refer to WT-47, "Adjustment".
-
Remove the center console assembly. Refer to IP-14, "Removal and Installation".
-
Disconnect the parking brake switch harness connector.
-
Remove adjusting nut and loosen front parking brake cable.
-
Remove the parking brake lever assembly.
Rear Parking Brake Cable
-
Pull equalizer (A) of the front parking brake cable (1) in a rearward direction and then push upward to remove each rear parking brake cable (2)
-
Remove sub muffler and heat plate. Refer to EX-5, "Removal and Installation".
-
Remove rear parking brake cable from toggle lever. Refer to BR-42, "Exploded View" (drum brake) or PB- 9, "Exploded View - Disc Brake" (disc brake).
-
Remove rear parking brake cable bolts.
-
Press the pawl (1) to remove each rear parking brake cable from the vehicle.
INSTALLATION
Installation is in the reverse order of removal.
CAUTION:
Do not reuse adjusting nut.
-
Perform adjustment after installation. Refer to PB-4, "Inspection and Adjustment".
Adjustment
ADJUSTMENT AFTER INSTALLATION
Adjust the parking brake lever stroke. Refer to PB-4, "Inspection and Adjustment".

 Parking brake shoe
Removal and Installation - Drum Brake
If equipped with drum brakes, refer to BR-42, "Removal and
Installation".
Exploded View - Disc Brake
Anti-rattle pin
Back plate
...
Other materials:
Tire chains
CAUTION
Tire chains/cables should not be installed
on P205/50R17 size tires. Installation of
the tire chains/cables on P205/50R17 size
tires will cause damage to the vehicle. If
you plan to use tire chains/cables, you
should install P205/55R16 size tires on
your vehicle.
Use of tire chains m ...
Basic inspection
DIAGNOSIS AND REPAIR WORK FLOW
Work Flow
NOTE:
“DTC” includes DTC at the 1st trip.
1.OBTAIN INFORMATION ABOUT SYMPTOM
Refer to TM-140, "Diagnostic Work Sheet" and interview the customer to obtain
the malfunction information
(conditions and environment when the malfunctio ...
Precaution for Work
When removing or disassembling each component, be careful not to damage
or deform it. If a component
may be subject to interference, be sure to protect it with a shop cloth.
When removing (disengaging) components with a screwdriver or similar
tool, be sure to wrap the component
with a ...
