Nissan Sentra B18 (2020-2025) Service Manual: Occupant Classification System
Occupant Classification System Control Unit
Removal and Installation
Removal and Installation
OCCUPANT CLASSIFICATION SYSTEM CONTROL UNIT
Warning:
-
When working near the Air Bag Diagnosis Sensor Unit or other Air Bag System sensors with the Ignition ON or engine running, DO NOT use air or electric power tools or strike near the sensor(s) with a hammer. Heavy vibration could activate the sensor(s) and deploy the air bag(s), possibly causing serious injury.
-
Before servicing the SRS, place the ignition switch in the OFF position, disconnect both battery terminals then wait at least three minutes.
CAUTION:
-
When working with the metal seat frame, use caution to avoid injury from sharp edges.
-
When removing or installing the seat, use shop cloths to protect components from damage.
-
When disconnecting or connecting the harness and harness connectors, handle them carefully to avoid damage.
Removal
Remove the front passenger seat. Refer to Removal and Installation – Seat Assembly.
Remove
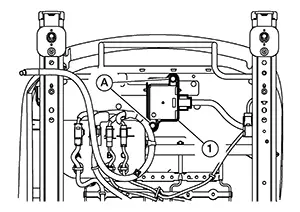
screws (A) from the occupant classification system control unit
(1). 
Disconnect the harness connector from the occupant classification system control unit.
Remove occupant classification system control unit.
CAUTION:
-
Replace the occupant classification control unit if it has been dropped or sustained an impact.
-
Do not strike the occupant classification control unit.
Installation
Installation is in the reverse order of removal.
Warning:
-
After installation is complete, perform additional services (Zero point reset) when replacing control unit. Refer to Special Repair Requirement.
-
Zero point reset must be performed every time the front passenger seat is removed from the Nissan Sentra vehicle.
-
Zero point reset is done after the front passenger seat is installed in vehicle and all nuts and bolts are tightened to specification.
CAUTION:
-
After installation is complete, check that no system malfunction is detected causing the air bag warning lamp to illuminate.
-
If a malfunction is indicated by the air bag warning lamp after repair or replacement of the malfunctioning parts, perform the SRS final check. Refer to SRS Final Check.
Occupant Classification System Sensor
Removal and Installation
Removal and Installation
OCCUPANT CLASSIFICATION SYSTEM SENSORS
Warning:
-
When working near the occupant classification system sensor or other air bag system sensors with the ignition switch ON or engine running, DO NOT use air or electric power tools or strike near the sensors with a hammer. Heavy vibration could activate the sensor(s) and deploy the air bag(s), possibly causing serious injury.
-
Before servicing the SRS, place the ignition switch in the OFF position, disconnect both battery terminals then wait at least three minutes.
-
Do not use air tools or electric tools for servicing the occupant classification system sensor.
-
Do not cause impact to the occupant classification system sensor by dropping, etc. Replace the occupant classification system sensor if it has been dropped or sustained an impact.
-
Do not allow oil, grease, detergent, or water to come in contact with the occupant classification system sensor.
CAUTION:
-
When working with the metal seat frame, use caution to avoid injury from sharp edges.
-
When removing or installing the seat trim, handle it carefully to keep dirt out and to avoid damage.
-
When removing or installing the seat, use shop cloths to protect components from damage.
-
When disconnecting or connecting the harness and harness connectors, handle them carefully to avoid damage.
REMOVAL
Remove the passenger seat cushion. Refer to Disassembly and assembly .
Disconnect
the harness connectors (A) from the occupant classification system
sensors. 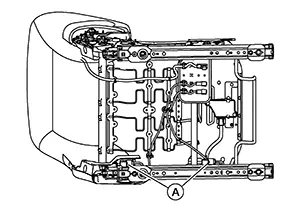
Install the
passenger seat to the Nissan Sentra vehicle and tighten bolts to specification in
the order shown: 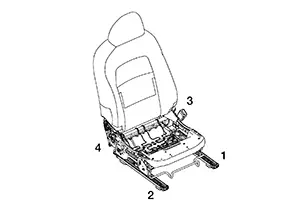
|
Passenger seat bolts |
: 50 N·m (5.1 kg-m, 37 ft-lb) |
Remove the
passenger seat frame assembly from the seat track using the
following procedure:
Release pawl and position aside the
seat cushion inner finisher [LH (1)].
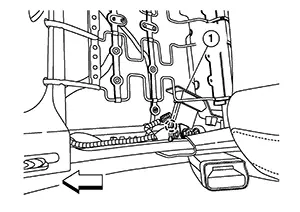
|
|
: Pawl |
|
|
: Front |


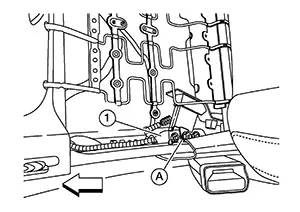
CAUTION:
Do not reuse nut (A).
Remove nut (A) from the RH (outboard) rear of the seat frame assembly (1).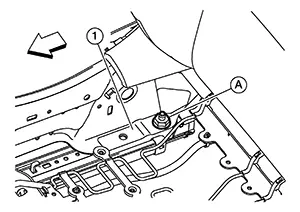
|
|
: Front |
CAUTION:
Do not reuse nut (A).
Remove nut (A) from the RH (outboard) front of the seat frame assembly (1).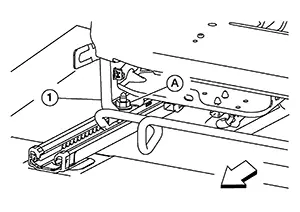
|
|
: Front |
CAUTION:
Do not reuse nut (A).
Remove nut (A) from the LH (inboard) front of the seat frame assembly (1).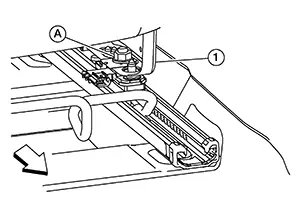
|
|
: Front |
CAUTION:
Do not reuse nut (A).
Separate the seat frame assembly from the seat track and remove the seat frame assembly from Nissan Sentra vehicle. Remove nuts
(A) and remove the front occupant classification system sensor (1)
from the seat track. 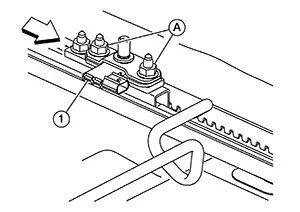
|
|
: Front |
CAUTION:
-
Make sure spacer plates under the occupant classification system sensors remain on the seat track.
-
Do not reuse nut (A).
Remove nuts
(A) and remove the rear occupant classification system sensor (1)
from the seat track. 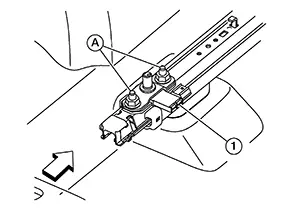
|
|
: Front |
CAUTION:
Do not reuse nut (A).
INSTALLATION
CAUTION:
-
Do not damage the occupant classification system sensor during installation.
-
Do not damage occupant classification system sensor harness during installation.
-
After installation is complete, check that no system malfunction is detected causing the air bag warning lamp to illuminate.
-
If a malfunction is indicated by the air bag warning lamp after repair or replacement of the malfunctioning parts, perform the SRS final check. Refer to SRS Final Check.
-
Perform zero point reset function after the front passenger seat is installed in the Nissan Sentra vehicle and all bolts are tightened to specification. Refer to Special Repair Requirement.
Install the
rear occupant classification system sensor (1) to the seat track
and tighten nuts (A) to specification.
|
Occupant classification system sensor nut |
: 24 N·m (2.4 kg-m, 18 ft-lb) |
|
|
: Front |
Install
front classification system sensor (1) to the seat track and
tighten nuts to specification.
|
Occupant classification system sensor nut |
: 24 N·m (2.4 kg-m, 18 ft-lb) |
|
|
: Front |
Install the passenger seat frame assembly to the seat track using the following procedure: Gently place the passenger seat frame assembly on the seat track.
CAUTION:
-
Do not cause impact to the occupant classification sensors when placing the seat frame assembly on the seat track.
-
Do not damage the occupant classification system sensor harness connectors.
|
Seat frame assembly nut |
: 45 N·m (4.6 kg-m, 33 ft-lb) |
|
|
: Front |
|
Seat frame assembly nut |
: 45 N·m (4.6 kg-m, 33 ft-lb) |
|
|
: Front |
|
Seat frame assembly nut |
: 45 N·m (4.6 kg-m, 33 ft-lb) |
|
|
: Front |
|
Seat frame assembly nut |
: 45 N·m (4.6 kg-m, 33 ft-lb) |
|
|
: Front |
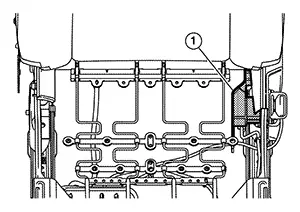
|
|
: Front |
Installation of the remaining components is in the reverse order of removal.
Other materials:
Text messaging
WARNING
Laws in some jurisdictions may restrict the use of Text-to-Speech features.
Always check local regulations before using this function in your Nissan
Sentra.
Laws in some jurisdictions may limit the use of certain applications
and features, including social networking a ...
Seat belt warning light and chime
The driver and front passenger seats in the Nissan Sentra are equipped with an
enhanced seat belt reminder system. When this feature is active, both a visual warning
and an audible chime will operate if the driver or front passenger seat belt remains
unbuckled while the vehicle is travelin ...
P0127 Iat Sensor
Dtc Description
DTC Description
DTC DETECTION LOGIC
DTC
CONSULT screen terms
(Trouble diagnosis
content)
DTC detection
condition
...