Nissan Sentra B18 (2020-2025) Service Manual: Heater & Air Conditioning System :: Symptom Diagnosis
Heater and Air Conditioning System Symptoms. Symptom Table. Symptom Table
Symptom Table
SYMPTOM TABLE
|
Symptom |
Reference Page |
|
|---|---|---|
|
A/C system does not come on. |
Go to Trouble Diagnosis Procedure for A/C System. |
Refer to Diagnosis Procedure (with Automatic A/C) or Diagnosis Procedure (with Manual A/C). |
|
A/C system cannot be controlled. |
Go to Self-diagnosis Function. |
Refer to Work Flow (with Automatic A/C) or Work Flow (with Manual A/C). |
|
Air outlet does not change. |
Go to Trouble Diagnosis Procedure for Mode Door Motor. |
Refer to Diagnosis Procedure (with Automatic A/C). Refer to Diagnosis Procedure (with Manual A/C). |
|
Mode door motor is malfunctioning. |
||
|
Discharge air temperature does not change. |
Go to Trouble Diagnosis Procedure for Air Mix Door Motor. |
Refer to Diagnosis Procedure (Automatic A/C driver side) or Diagnosis Procedure (Manual A/C driver side). Refer to Diagnosis Procedure (Automatic A/C passenger side) or Diagnosis Procedure (Manual A/C passenger side). |
|
Air mix door motor is malfunctioning. |
||
|
Intake door does not change. |
Go to Trouble Diagnosis Procedure for Intake Door Motor. |
Refer to Diagnosis Procedure (with Automatic A/C) or Diagnosis Procedure (with Manual A/C). |
|
Intake door motor is malfunctioning. |
||
|
Blower motor operation is malfunctioning. |
Go to Trouble Diagnosis Procedure for Blower Motor. |
Refer to Diagnosis Procedure (with Automatic A/C) or Diagnosis Procedure (with Manual A/C). |
|
Magnet clutch does not engage. |
Go to Trouble Diagnosis Procedure for Magnet Clutch. |
Refer to Diagnosis Procedure (with Automatic A/C) or Diagnosis Procedure (with Manual A/C). |
|
Insufficient cooling. |
Go to Trouble Diagnosis Procedure for Insufficient Cooling. |
Refer to Diagnosis Procedure (with Automatic A/C) or Component Function Check (with Manual A/C). |
|
Insufficient heating. |
Go to Trouble Diagnosis Procedure for Insufficient Heating. |
Refer to Diagnosis Procedure (with Automatic A/C) or Component Function Check (with Manual A/C). |
|
Noise. |
Go to Trouble Diagnosis Procedure for Noise. |
Refer to Symptom Table. |
|
A/C switch LED does not illuminate. |
Go to Trouble Diagnosis Procedure for A/C System. |
Refer to Diagnosis Procedure (with Automatic A/C) or Diagnosis Procedure (with Manual A/C). |
|
Mode button LED(s) does not illuminate. |
Go to Trouble Diagnosis Procedure for A/C System. |
Refer to Diagnosis Procedure (with Automatic A/C) or Diagnosis Procedure (with Manual A/C). |
|
Both high- and low-pressure sides are too high. |
Go to Trouble Diagnosis Procedure for Abnormal Pressure. |
Refer to Trouble Diagnosis For Unusual Pressure. |
|
High-pressure side is too high and low-pressure side is too low. |
Go to Trouble Diagnosis Procedure for Abnormal Pressure. |
Refer to Trouble Diagnosis For Unusual Pressure. |
|
High-pressure side is too low and low-pressure side is too high. |
Go to Trouble Diagnosis Procedure for Abnormal Pressure. |
Refer to Trouble Diagnosis For Unusual Pressure. |
|
Both high- and low-pressure sides are too low. |
Go to Trouble Diagnosis Procedure for Abnormal Pressure. |
Refer to Trouble Diagnosis For Unusual Pressure. |
|
Low-pressure side sometimes becomes negative. |
Go to Trouble Diagnosis Procedure for Abnormal Pressure. |
Refer to Trouble Diagnosis For Unusual Pressure. |
|
Low-pressure side becomes negative. |
Go to Trouble Diagnosis Procedure for Abnormal Pressure. |
Refer to Trouble Diagnosis For Unusual Pressure. |
Refrigeration System Symptoms. Trouble Diagnosis for Unusual Pressure
Trouble Diagnosis For Unusual Pressure
Diagnose using a manifold gauge whenever system’s high and/or low side pressure(s) is/are unusual. The marker above the gauge scale in the following tables indicates the standard (usual) pressure range. Refer to above table (Ambient air temperature-to-operating pressure table) since the standard (usual) pressure, however, differs from Nissan Sentra vehicle to vehicle.
Symptom Table
Symptom Table
|
Gauge indication |
Refrigerant cycle |
Probable cause |
Corrective action |
|---|---|---|---|
|
Both high and low pressure sides are too high. 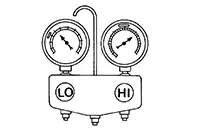
|
The pressure returns to normal soon after sprinkling water on condenser. |
Overfilled refrigerant. |
Collect all refrigerant, evacuate refrigerant cycle again, and then refill it with the specified amount of refrigerant. |
|
Air flow to condenser is insufficient. |
Insufficient condenser cooling performance.
|
|
|
|
When A/C compressor is stopped, a high-pressure reading quickly drops by approximately 196 kPa (2 kg/cm2, 28 psi). It then gradually decreases. |
Air mixed in refrigerant cycle. |
Collect all refrigerant, evacuate refrigerant cycle again, and then refill it with the specified amount of refrigerant. |
|
|
Expansion valve opened too much (excessive flow of refrigerant). |
Replace expansion valve. |
|
|
High-pressure side is excessively high and low-pressure side is too low. 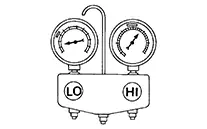
|
High-pressure pipe and upper side of condenser become hot, however, liquid tank does not become so hot. |
Clogged or crushed high-pressure pipe located between A/C compressor and condenser. |
Repair or replace the malfunctioning parts. |
|
High-pressure side is too low and low-pressure side is too high. 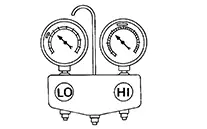
|
|
Malfunction in A/C compressor system (insufficient A/C compressor pressure operation).
|
Replace A/C compressor. |
|
Both high and low pressure sides are too low. 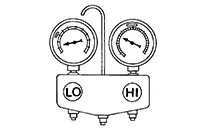
|
|
Clogged expansion valve.
|
Eliminate foreign material from expansion valve or replace it. |
|
Malfunction in inner liquid tank (clogged strainer). |
Replace liquid tank. |
|
|
Evaporator becomes frosted. |
Clogged or crushed low-pressure pipe. |
Repair or replace malfunctioning parts. |
|
|
Malfunction in intake air temperature sensor. |
Check intake sensor system. Refer to Diagnosis Procedure (automatic A/C) or Component Inspection (manual A/C). |
||
|
There is a small temperature difference between the high and low pressure pipes for refrigerant cycle. |
|
|
|
|
Low-pressure side sometimes becomes negative. 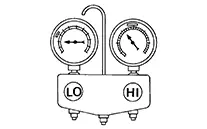
|
|
|
|
|
Hunting in high-pressure side. |
There is no temperature difference between high- and low-pressure sides. |
Malfunctioning variable valve in A/C compressor. |
|
Noise. Symptom Table. Symptom Table
Symptom Table
|
Symptom |
Noise source |
Probable cause |
Corrective action |
|---|---|---|---|
|
Unusual noise from A/C compressor when A/C is ON. |
Inside of A/C compressor |
Wear, breakage or clogging of foreign material in inner parts. |
Check A/C compressor oil. Refer to Inspection. |
|
Magnet clutch |
Contact of clutch disc with pulley. |
Check clearance between clutch disc and pulley. |
|
|
A/C compressor body |
Loosened A/C compressor mounting bolts. |
Check bolts for tightness. Refer to Exploded View. |
|
|
Unusual noise from cooler piping. |
Cooler piping (pipe and flexible hose) |
Improper installation of clip and bracket. |
Check the installation condition of the cooler piping. Refer to Exploded View. |
|
Unusual noise from expansion valve when A/C is ON. |
Expansion valve |
Shortage of refrigerant. |
|
|
Wear, breakage or clogging of foreign material in inner parts. |
Eliminate foreign material from expansion valve or replace it. |
||
|
Unusual noise from belt. |
— |
Loosened belt |
Check belt tension. Refer to Inspection. |
|
Internal A/C compressor parts get locked |
Replace A/C compressor. Refer to Removal and Installation. |
Other materials:
U2141 Can Comm Err (tcm)
Dtc Description
DTC Description
DTC DETECTION LOGIC
DTC No.
CONSULT screen
terms
(Trouble
diagnosis content)
DTC detection condition
...
Traffic Sign Recognition (TSR)
The Traffic Sign Recognition (TSR) system in the Nissan Sentra provides the driver
with information about the most recently detected speed limit and certain traffic
signs. The system captures road sign data using the multi-sensing front camera unit
(A), which is mounted on the windshield i ...
Seat Belt. Removal and Installation
Front Seat Belt
Exploded View
Exploded View
1.
Seat belt height
adjuster
2.
Seat belt height adjuster
...