Nissan Sentra B18 (2020-2025) Service Manual: Evap Canister Vent Control Valve
Component Inspection
Component Inspection
-
CHECK EVAP CANISTER VENT CONTROL VALVE-1
-
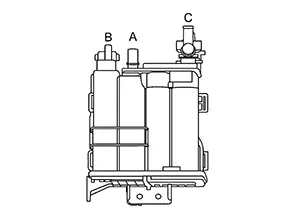
Disconnect hose from (A), (B), and (C) with remaining harness connector connected.
-
Block port (B).
-
Blow air into port (A) and check that it flows freely out of port (C).
Is sufficient air flowed from port (C)?
YES >>GO TO 2.
NO >>Replace EVAP canister vent control valve. Refer to Removal and Installation.
-
-
CHECK EVAP CANISTER VENT CONTROL VALVE-2
 With CONSULT
-
Turn iginition switch ON.
-
Perform “VENT CONTROL/V” in “ACTIVE TEST” mode of “ENGINE” using CONSULT and select "ON" to close EVAP canister vent control valve.
-
Block port (B).
-
Blow air into port (A) and check that where is leakage point of air.
Where is leakage point?
Port (C)>>Replace EVAP canister vent control valve. Refer to Removal and Installation.
Between EVAP canister vent control valve and EVAP canister >>GO TO 3.
No air leakage>>INSPECTION END
-
-
CHECK EVAP CANISTER VENT CONTROL VALVE-3
Visually check connection portion between EVAP canister vent control valve and EVAP canister for cracks and damage.
Is the inspection result normal?
YES >>INSPECTION END
NO >>Replace the EVAP canister or EVAP canister vent control valve if crack, damage, or unusual conditions are found. Refer to Removal and Installation.
Other materials:
Fuel Tank Temperature Sensor
Component Inspection
Component Inspection
CHECK FUEL TANK TEMPERATURE (FTT)
SENSOR
Turn ignition switch OFF.
Disconnect fuel level sensor unit and
fuel pump harness connector.
Remov ...
P0746-00 Pressure Control Solenoid a
Dtc Description
DTC Description
DTC DETECTION LOGIC
DTC
CONSULT screen terms
(Trouble diagnosis
content)
DTC detection
conditi ...
Rear Bumper
Exploded View
Exploded View
EXCEPT FOR SR
1.
Rear bumper side bracket (LH)
2.
Rear bumper reinforcement support
(L ...