Nissan Sentra Service Manual: Evap canister
Exploded View
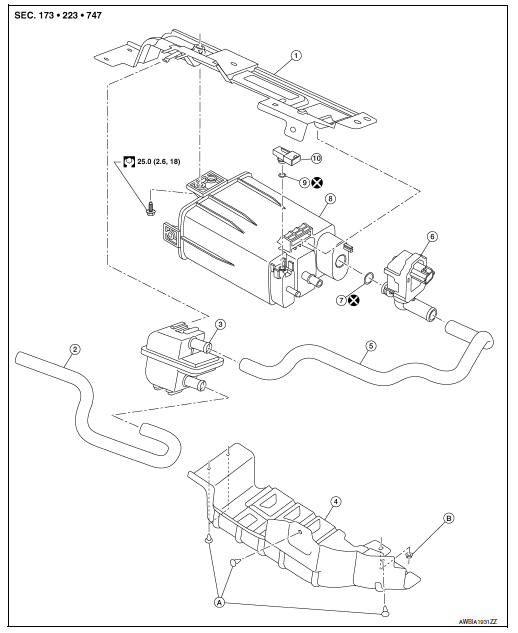
- EVAP canister bracket
- EVAP canister filter drain hose
- EVAP canister filter
- EVAP canister protector
- EVAP hose
- EVAP canister vent control valve
- O-ring
- EVAP canister
- O-ring
- EVAP canister control pressure sensor
- Clip
- Nut
Removal and Installation
EVAP CANISTER
Removal
- Remove EVAP canister protector.
- Disconnect the harness connector from EVAP canister control pressure sensor.
- Remove the EVAP canister control pressure sensor and O-ring, if necessary.
CAUTION:
Do not reuse O-ring.
- Disconnect EVAP canister purge hose.
- Disconnect fuel tank EVAP breather hose.
- Disconnect the harness connector from EVAP vent control valve.
- Disconnect the EVAP vent control valve hose.
- Remove the EVAP canister bolt.
- Remove the EVAP canister.
- Remove the EVAP vent control valve and O-ring, if necessary.
CAUTION:
Do not reuse O-ring.
Installation
Installation is in the reverse order of removal.
CAUTION:
Do not reuse O-ring.
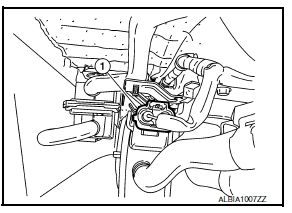
EVAP CANISTER CONTROL PRESSURE SENSOR
Removal
- Remove EVAP canister protector.
- Disconnect the EVAP control pressure sensor harness connector (1).
- Remove the EVAP canister control pressure sensor and O-ring.
CAUTION:
Do not reuse O-ring.
Installation
Installation is in the reverse order of removal.
CAUTION:
Do not reuse O-ring.
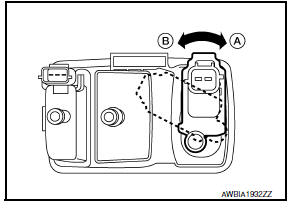
EVAP CANISTER VENT CONTROL VALVE
Removal
- Remove EVAP canister protector.
- Disconnect the harness connector from EVAP vent control valve.
- Disconnect the EVAP vent control valve hose.
- Turn EVAP canister vent control valve counterclockwise.
- Clock
- Unclock
- Remove the EVAP canister vent control valve and O-ring.
CAUTION:
Do not reuse O-ring.
Installation
Installation is in the reverse order of removal.
CAUTION:
Do not reuse O-ring.
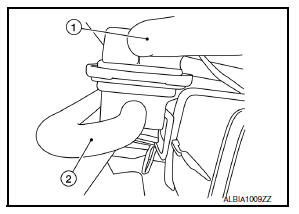
EVAP CANISTER FILTER
Removal
- Remove EVAP canister protector
- Disconnect the EVAP canister filter drain hose (1).
- Disconnect the EVAP hose (2).
- Remove the EVAP canister filter.
Installation
Installation is in the reverse order of removal.
 Fuel tank
Exploded View
Fuel filler cap
Grommet
Fuel filler tube
Clamp
Fuel filler hose
Fuel tank
Fuel tank mounting band (RH)
Fuel tank mounting band (LH)
Vent hose
Removal and Insta ...
 Disassembly and assembly
FUEL LEVEL SENSOR UNIT
Exploded View
Fuel Level Sensor Unit
Fuel filter and pump assembly
Fuel level sensor unit
Float arm assembly
Fuel tank temperature sensor
Fuel level sensor uni ...
Other materials:
Abs branch line circuit
Diagnosis procedure
1.CHECK CONNECTOR
Turn the ignition switch OFF.
Disconnect the battery cable from the negative terminal.
Check the terminals and connectors of the ABS actuator and electric unit
(control unit) for damage, bend
and loose connection (unit side and connector side).
...
Floor mats
WARNING
To avoid potential pedal interference that
may result in a collision or injury:
NEVER place a floor mat on top of another
floor mat in the driver front
position.
Use only genuine NISSAN floor mats
specifically designed for use in your vehicle
model. See ...
B0091 Front side air bag satellite sensor LH
Description
DTC B0091 FRONT SATELLITE SENSOR LH
The front side air bag satellite sensor LH is wired to the air bag diagnosis
sensor unit. The air bag diagnosis
sensor unit will monitor the front side air bag satellite sensor LH for internal
failures and its circuits for communication
errors. ...
