Nissan Sentra Owners Manual: Engine compartment
CAUTION
Never use a fuse of a higher or lower amperage rating than specified on the fuse box cover. This could damage the electrical system or cause a fire.
If any electrical equipment does not come on, check for an open fuse.
- Be sure the ignition switch and the headlight switch are OFF.
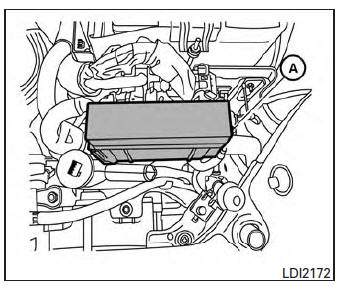
- Open the engine hood.
- Remove the fuse box cover by pushing the tab A and lifting the cover up.
- Remove the fuse with the fuse puller, which is located in the center of the fuse block in the passenger compartment.
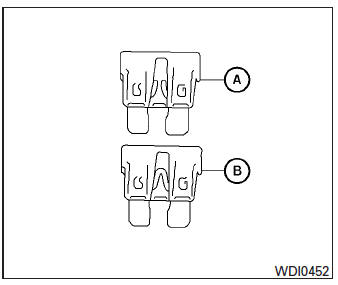
- If the fuse is open A , replace it with a new fuse B .
- If a new fuse also opens, have the electrical system checked and repaired by a NISSAN dealer.
Fusible links
If the electrical equipment does not operate and fuses are in good condition, check the fusible links. If any of these fusible links are melted, replace with only Genuine NISSAN parts.
 Fuses
Fuses
Two types of fuses are used. Type A is used in
the fuse boxes in the engine compartment. Type
B is used in the passenger compartment fuse
box.
Type A fuses are provided as spare fuses. They
a ...
 Passenger compartment
CAUTION
Never use a fuse of a higher or lower
amperage rating than specified on the
fuse box cover. This could damage the
electrical system or cause a fire.
If any electrical equipment does n ...
Other materials:
Abbreviations
Abbreviation List
The following ABBREVIATIONS are used:
A
ABBREVIATION
DESCRIPTION
A/C
Air conditioner
A/C
Air conditioning
A/F sensor
Air fuel ratio sensor
A/T
Automatic transaxle/transmission
ABS
Anti-lock braking sys ...
Ecm branch line circuit
Diagnosis procedure
1.Check connector
Turn the ignition switch off.
Disconnect the battery cable from the negative terminal.
Check the terminals and connectors of the ecm for damage, bend and loose
connection (unit side and
connector side).
Is the inspection result normal?
Yes > ...
VDC OFF Indicator lamp
Description
Component Function Check
1.CHECK VDC OFF INDICATOR LAMP FUNCTION
Check that VDC OFF indicator lamp in combination meter turns ON
for approximately 2 seconds after ignition
switch is turned ON.
Is the inspection result normal?
YES >> Inspection End.
NO >> Proc ...
