Nissan Sentra Service Manual: Diagnosis system (bcm)
Common item
COMMON ITEM : CONSULT Function (BCM - COMMON ITEM)
Application item
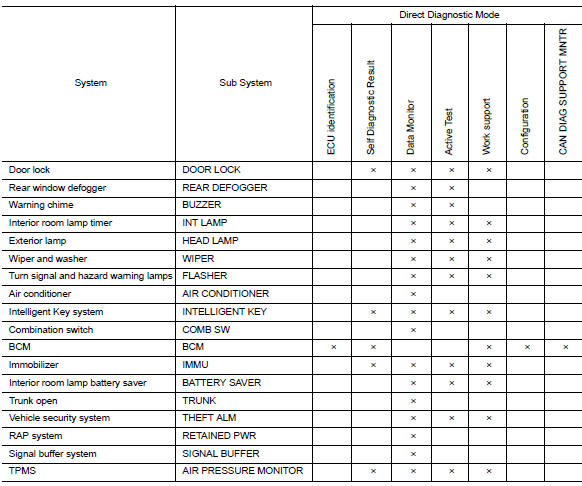
Consult performs the following functions via can communication with bcm.
| Direct diagnostic mode | Description |
| Ecu identification | The bcm part number is displayed. |
| Self diagnostic result | The BCM self diagnostic results are displayed. |
| Data Monitor | The bcm input/output data is displayed in real time. |
| Active test | The bcm activates outputs to test components. |
| Work support | The settings for BCM functions can be changed. |
| Configuration |
|
| Can diag support mntr | The result of transmit/receive diagnosis of can communication is displayed. |
System application
BCM can perform the following functions.
Door lock
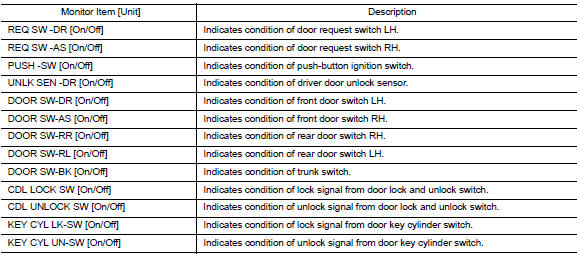
Door lock : consult function (bcm - door lock)
Data monitor

Active test

WORK SUPPORT
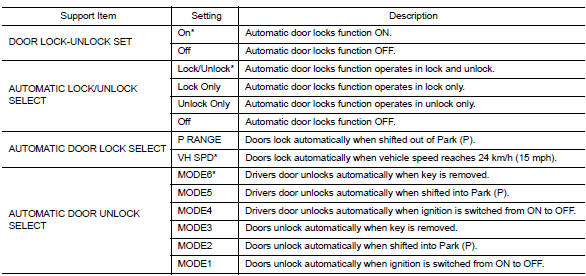
*: Initial setting
Rear defogger
Rear defogger : consult function (bcm - rear defogger)
Data monitor

Active test

Buzzer
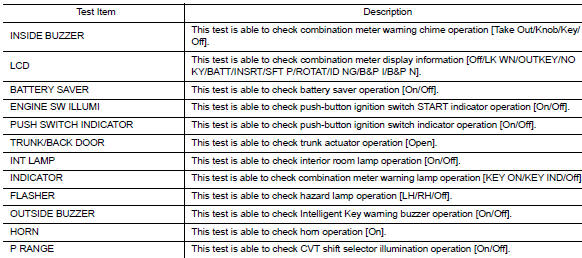
Buzzer : consult function (bcm - buzzer)
Data monitor

Active test

Int lamp
Int lamp : consult function (bcm - int lamp)
Data monitor

Active test

Work support
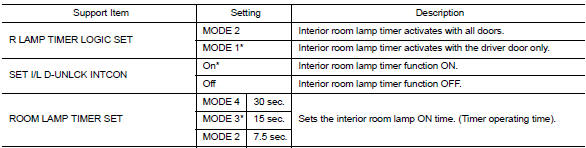
*: Initial setting
Headlamp
HEADLAMP : CONSULT Function (BCM - HEAD LAMP)
Data monitor
Active test

Work support

*: Initial setting
Wiper
Wiper : consult function (bcm - wiper)
Data monitor

Active test

Work support

* : Initial setting
Flasher
FLASHER : CONSULT Function (BCM - FLASHER)
Data monitor
Active test

Work support
* : Initial setting
Air conditioner
AIR CONDITIONER : CONSULT Function (BCM - AIR CONDITIONER)
Data monitor

Intelligent key
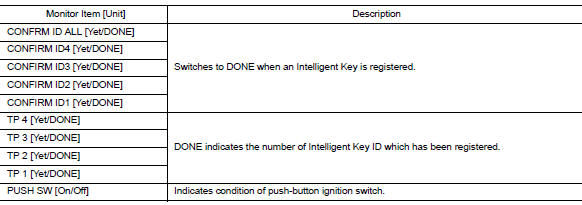
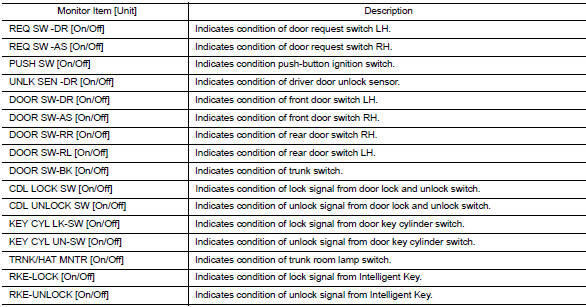
INTELLIGENT KEY : CONSULT Function (BCM - INTELLIGENT KEY)
Self diagnostic result
Refer to BCS-49, "DTC Index".
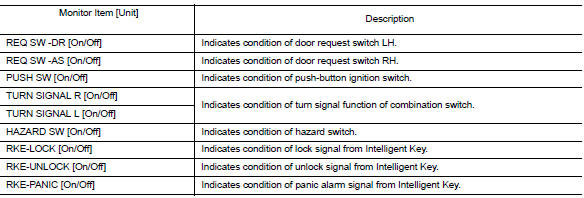
Data monitor

Active test
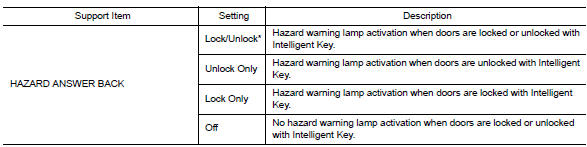
Work support
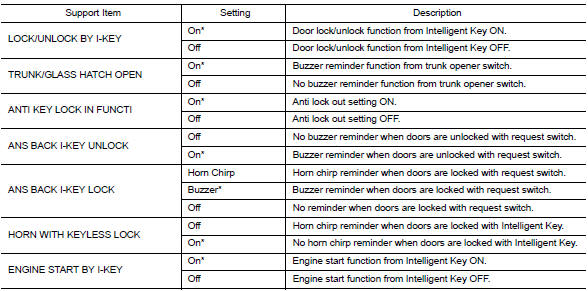
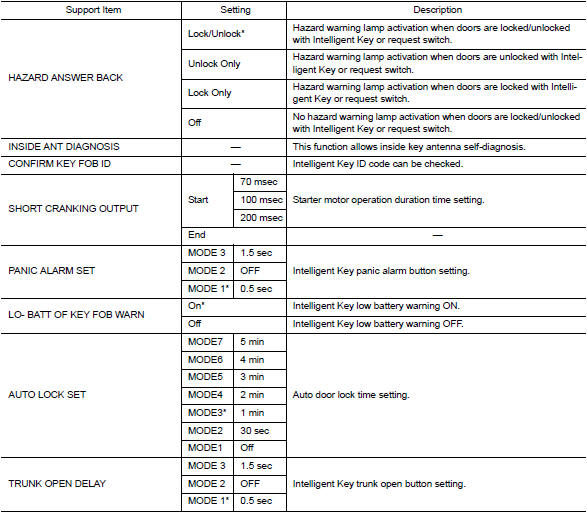
*: Initial setting
Comb SW
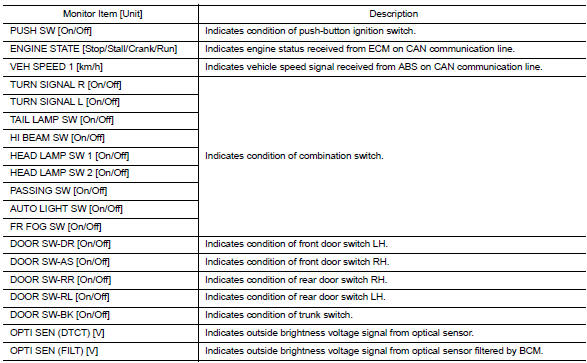
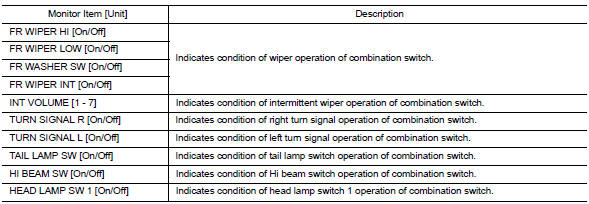
Comb sw : consult function (bcm - comb sw)
Data monitor

BCM
BCM : CONSULT Function (BCM - BCM)
Ecu identification
The bcm part number is displayed.
Self diagnostic result
Refer to bcs-49, "dtc index".
Work support

Configuration
Refer to bcs-61, "configuration (bcm) : description".
Can diag support mntr
Refer to LAN-13, "CAN Diagnostic Support Monitor".
Immu
IMMU : CONSULT Function (BCM - IMMU)
Self diagnostic result
Refer to BCS-49, "DTC Index".
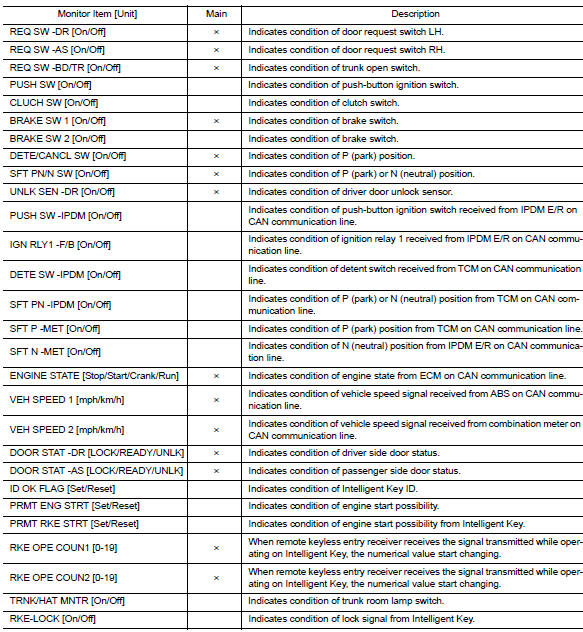
Data monitor
Active test
![]()
Work support
![]()
Battery saver
BATTERY SAVER : CONSULT Function (BCM - BATTERY SAVER)
Data monitor
Active test
![]()
Work support

*: Initial setting
Trunk
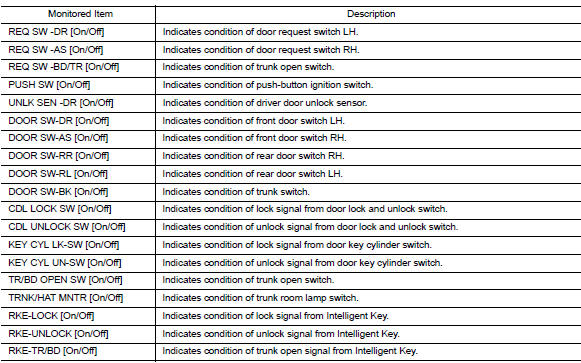
Trunk : consult function (bcm - trunk)
Data monitor


Theft alm
Theft alm : consult function (bcm - theft)
Data monitor
Active test

Work support

*: Initial setting
Retained PWR
Retained pwr : consult function (bcm - retained pwr)
Data monitor

Signal buffer
Signal buffer : consult function (bcm - signal buffer)
Data monitor
![]()
Air pressure monitor
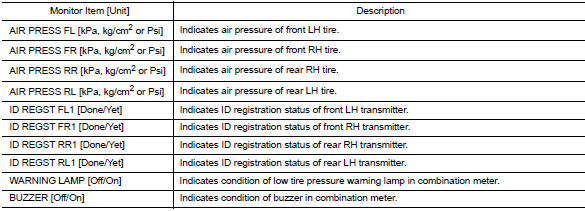
Air pressure monitor : consult function (bcm - air pressure monitor)
Note:
The signal tech ii tool (j-50190) can be used to perform the following functions. Refer to the signal tech ii user guide for additional information.
- Activate and display TPMS transmitter IDs
- Display tire pressure reported by the TPMS transmitter
- Read tpms dtcs
- Register tpms transmitter ids
Self diagnostic result
Note:
Before performing self diagnostic result, be sure to register the id, or else the actual malfunction may be different from that displayed on consult.
Refer to BCS-49, "DTC Index".
Data monitor
Active test

Work support

 System
Body control system
Body control system : system description
OUTLINE
BCM (Body Control Module) controls the various electrical components. It
inputs the information required to
the control ...
 Ecu diagnosis information
BCM
Reference value
Note:
The signal tech ii tool (j-50190) can be used to perform the following
functions. Refer to the signal tech ii
user guide for additional information.
Activate and di ...
Other materials:
C1708, C1709, C1710, C1711 Transmitter (no data)
DTC Logic
NOTE:
The Signal Tech II Tool (J-50190) can be used to perform the following
functions. Refer to the Signal Tech II
User Guide for additional information.
Activate and display TPMS transmitter IDs
Display tire pressure reported by the TPMS transmitter
Read TPMS DTCs
Registe ...
Door sash tape
Exploded view
Front door sash upper tape
Front door assembly
Rear door assembly
Front door sash rear tape
Rear door sash front tape
Rear door sash rear tape
Rear door sash upper tape
Front door sash tape
FRONT DOOR SASH TAPE : Removal and Installation
REMOVAL
Heat door sash ...
Changing engine oil filter
Park the vehicle on a level surface and apply
the parking brake.
Turn the engine off.
Place a large drain pan under the oil filter C .
Loosen the oil filter with an oil filter wrench
by turning it counterclockwise. Then remove
the oil filter by turning it by hand.
CAUTION
Be c ...
