Nissan Sentra Service Manual: Removal and installation
Power socket
Removal and installation
Front console power socket
Removal
- Remove the cvt/mt shift selector finisher. Refer to ip-14, "exploded view".
- Remove cap from the front console power socket.
- Remove the screws (a) and the storage bin (1).
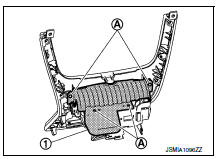
- Disconnect the harness connector (a) from the front console power socket (1).
- Release the power socket pawls from the back of the console finisher assembly and remove.
Installation
Installation is in the reverse order of removal.
Console power socket (if equipped)
Removal
- Remove the center console rear finisher. Refer to ip-23, "disassembly and assembly".
- Release the tabs and remove the center console rear finisher cover.
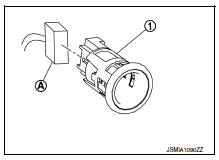
- Disconnect the harness connectors from the power socket and the usb connector (if equipped).
- Release the power socket pawls from the back of the center console rear finisher cover and remove.
Installation
Installation is in the reverse order of removal.
 Wiring diagram
Power socket
Wiring Diagram
...
 Service data and specifications (SDS)
Power Socket
...
Other materials:
Steering angle sensor
Exploded View
Steering angle sensor
Screw
Front
Removal and Installation
REMOVAL
Remove spiral cable assembly. Refer to SR-16, "Removal and
Installation".
Remove the two screws and the steering angle sensor from
spiral cable.
INSTALLATION
Ins ...
Vehicle Recovery (Freeing a Stuck Vehicle)
Front
Remove the hook cover from the bumper using a remover tool.
Securely install the vehicle recovery hook stored with jacking
tools.
Check that the hook is properly secured in the stored place after use.
WARNING:
Stand clear of a stuck vehicle.
Do not spin your tires at high s ...
ECU diagnosis information
EPS control unit
Reference Value
VALUES ON THE DIAGNOSIS TOOL
The following table includes information (items) inapplicable to
this vehicle. For information (items) applicable
to this vehicle, refer to CONSULT display items.
CAUTION:
The output signal indicates the EPS control unit
calcula ...
