Nissan Sentra Service Manual: Precaution for Liquid Gasket
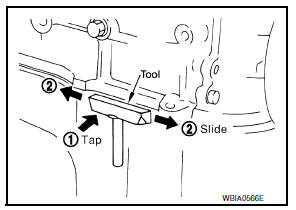
Removal of liquid gasket
- After removing the bolts and nuts, separate the mating surface and remove the old liquid gasket using tool.
Tool number : kv10111100 (j-37228)
Caution:
Do not damage the mating surfaces.
- Tap the seal cutter to insert it (1).
- In areas where the tool is difficult to use, lightly tap to slide it (2).
Liquid gasket application procedure
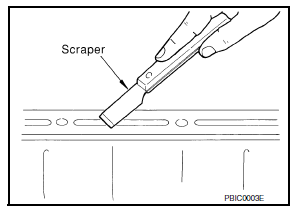
- Remove the old liquid gasket adhering to the gasket application surface and the mating surface using suitable tool.
- Remove the liquid gasket completely from the groove of the liquid gasket application surface, bolts, and bolt holes.
- Thoroughly clean the mating surfaces and remove adhering moisture, grease and foreign material.
- Attach the liquid gasket tube to the suitable tool.
Use genuine rtv silicone sealant or equivalent. Refer to gi-21, "recommended chemical products and sealants".
- Apply the liquid gasket without breaks to the specified location with the specified dimensions.

- Attach the liquid gasket tube to the suitable tool.
Use genuine rtv silicone sealant or equivalent. Refer to gi-21, "recommended chemical products and sealants".
- Apply the liquid gasket without breaks to the specified location with the specified dimensions.
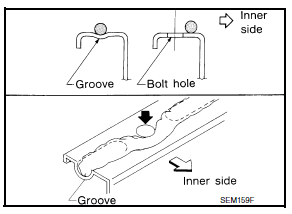
- If there is a groove for the liquid gasket application, apply the liquid gasket to the groove.
- Normally apply the liquid gasket on the inside edge of the bolt holes. Also apply to the outside edge of the bolt holes when specified in the procedure.
- Within five minutes of liquid gasket application, install the mating component.
- If the liquid gasket protrudes, wipe it off immediately.
- Do not retighten after the installation.
- Wait 30 minutes or more after installation before refilling the engine with oil or coolant.
Caution:
If there are more specific instructions in the procedures contained in this manual concerning liquid gasket application, observe them.
 Precaution for Supplemental Restraint System (SRS)
"AIR BAG" and "SEAT BELT PRE-TENSIONER"
Precaution for Supplemental Restraint System (SRS)
"AIR BAG" and "SEAT BELT PRE-TENSIONER"
The Supplemental Restraint System such as “AIR BAG” and “SEAT BELT PRE-TENSIONER”,
used along
with a front seat belt, helps to reduce the risk or severity of injury to the
dri ...
 Preparation
Special Service Tool
The actual shape of the tools may differ from those illustrated here.
Commercial Service Tool
...
Other materials:
Precautions for Suspension
When installing rubber bushings, the final tightening must be carried
out under unladen conditions with tires
on ground. Spilled oil might shorten the life of rubber bushings. Be sure to
wipe off any spilled oil.
Unladen conditions mean that fuel, engine coolant and lubricant are
...
Ipdm-e branch line circuit
Diagnosis Procedure
1.Check connector
Turn the ignition switch off.
Disconnect the battery cable from the negative terminal.
Check the terminals and connectors of the ipdm e/r for damage, bend and
loose connection (unit side
and connector side).
Is the inspection result normal?
Yes ...
Wiring diagram
Navigation with bose
Wiring diagram
...
