Nissan Sentra Owners Manual: NISSAN Intelligent Key® (if so equipped)
Replace the battery in the Intelligent Key as follows:
- Remove the mechanical key from the Intelligent Key.
- Insert a small screwdriver A into the slit B of the corner and twist it to separate the upper part from the lower part. Use a cloth to protect the casing.
- Replace the battery with a new one.
Recommended battery: CR2025 or equivalent.
- Do not touch the internal circuit and electric terminals as doing so could cause a malfunction.
- Hold the battery by the edges. Holding the battery across the contact points will seriously deplete the storage capacity.
- Make sure that the + side faces the bottom of the case.
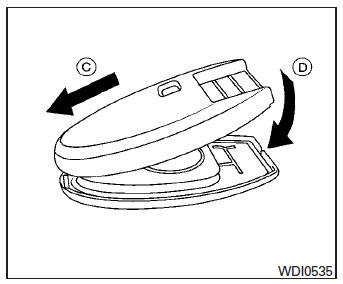
- Close the lid securely as illustrated C D .
- Operate the buttons to check the operation.
See a NISSAN dealer if you need assistance for replacement.
FCC Notice: For USA: This device complies with Part 15 of the FCC Rules. Operation is subject to the following two conditions: (1) This device may not cause harmful interference, and (2) this device must accept any interference received, including interference that may cause undesired operation.
Note:
Changes or modifications not expressly approved by the party responsible for compliance could void the userŌĆÖs authority to operate the equipment.
For Canada: This device complies with RSS-210 of Industry Canada. Operation is subject to the following two conditions: (1) this device may not cause interference, and (2) this device must accept any interference, including interference that may cause undesired operation of the device.
 Keyfob (if so equipped)
Replace the battery in the keyfob as follows:
Remove the screw A .
Insert a small screwdriver into the slit of the
corner B and twist it to separate the upper
part from the lower part. U ...
 Lights
...
Other materials:
P0139 HO2S2
DTC Logic
DTC DETECTION LOGIC
The heated oxygen sensor 2 has a much longer switching time
between rich and lean than the air fuel ratio (A/F) sensor 1. The oxygen
storage capacity of the three way catalyst 1 causes the longer
switching time. To judge the malfunctions of heated oxygen sensor
2, ...
Periodic maintenance
M/T OIL
Inspection
OIL LEAKAGE
Make sure that gear oil is not leaking from transaxle or around it.
OIL LEVEL
Remove filler plug (1) and gasket from transaxle case.
Check the oil level from filler plug mounting hole as shown.
CAUTION:
Do not start engine while checking oil level.
Se ...
Replacing
Replace the wiper blades if they are worn.
To replace the windshield wiper blades, follow
the procedure below:
When ignition switch is ON or within
60 seconds after placing the ignition switch
from ON to OFF position.
Quickly push the windshield wiper and
washer lever to the mist pos ...
