Nissan Sentra Service Manual: ID registration procedure
Description
This procedure must be performed after replacing wheels, transmitters or the BCM, or rotating wheels.
Work Procedure
TPMS ID registration can be performed using one of the following procedures:
- Transmitter Activation tool (J-45295-A) with CONSULT (preferred method)
- Signal Tech II tool (J-50190) with CONSULT (preferred method)
- Signal Tech II tool (J-50190) without CONSULT
- CONSULT only
TPMS REGISTRATION WITH TRANSMITTER ACTIVATION TOOL (J-45295-A)
 With CONSULT
- Turn the ignition switch ON.
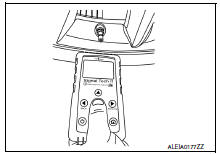
- Using CONSULT, select “WORK SUPPORT” in BCM (AIR PRESSURE MONITOR). Then, select “ID REGIST.”
- Select “Start” on “ID REGIST” screen.
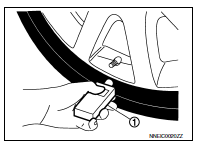
- Hold the transmitter activation tool (J-45295-A) (1) against the side of the left front tire, near the valve stem.
- With the tool held at a 0 to 15 degree angle to the tire, press and hold the transmitter activation tool button until the indicator lamp turns OFF (approximately 5 seconds)
- Repeat steps 4 and 5 for the remaining tires in this order: right front, right rear and left rear.
- When ID registration is complete, check the following pattern at each wheel.

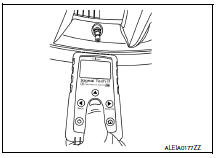
- After the ID registration procedure for all wheels is complete, press “End” on the CONSULT to finish ID registration.
- Test drive the vehicle to ensure that the TPMS lamp is OFF and no warning messages are present.
TPMS REGISTRATION WITH SIGNAL TECH II TOOL (J-50190)
NOTE:
The Signal Tech II must be updated with software version 1.1.48 or newer in order to perform the below procedures.
The Signal Tech II software updates can only be downloaded from a CONSULT unit with ASIST. Other versions of ASIST will not show the updates.
 With CONSULT
- Adjust the tire pressure for all tires to the recommended value. Refer to WT-54, "Tire Air Pressure".
- Turn the ignition switch ON.
- Using CONSULT, select “WORK SUPPORT” in BCM (AIR PRESSURE MONITOR). Then, select “ID REGIST.”
- Select “Start” on “ID REGIST” screen.
- Turn on the Signal Tech II tool (J-50190).
- Hold the Signal Tech II against the side of the left front tire, near the valve stem.
- With the tool held at a 0 to 15 degree angle to the tire, select “Activate Sensor” from the main menu, then press and release the “OK” button to activate the sensor. Once the sensor is activated, the vehicle parking lamps will flash and the sensor ID will appear on the CONSULT screen.
- Repeat steps 6 and 7 for the remaining tires in this order: right front, right rear and left rear.
- When ID registration is complete, check the following pattern at each wheel.

- Once all sensors have been activated, select “End” on the CONSULT to finish ID registration.
- Test drive the vehicle to ensure that the TPMS lamp is OFF and no warning messages are present.
 Without CONSULT
- Adjust the tire pressure for all tires to the recommended value. Refer to WT-54, "Tire Air Pressure".
- Turn on the Signal Tech II tool (J-50190) and select “TPMS Check” from the main menu.
- Select vehicle model and year.
- When prompted, hold the Signal Tech II against the side of the left front tire, near the valve stem
- With the tool held at a 0 to 15 degree angle to the tire, press and release the “OK” button to activate the sensor. Once the sensor is activated, the tool will sound a tone and the tire pressure will be displayed.
- Repeat steps 4 and 5 for the remaining tires in this order: right front, right rear and left rear.
- When prompted, connect the tool to the data link connector. The tool will connect to the BCM, read the VIN, read sensor IDs and check for TPMS DTCs. Along with DTCs detected, one of the following will be displayed next to each wheel:
- N/A - Not applicable because no ID found by the tool
- OK - Wheel and sensor are in original position
- NEW - New ID found compared to BCM
- RT - Wheel has been rotated
- Low Press - Low tire pressure
- If no DTC is present or the repair has been completed, press the “OK” button to register the IDs and clear DTCs.
- Test drive the vehicle to ensure that the TPMS lamp is OFF and no warning messages are present.
- Print a Signal Tech II Audit Report for your records. Refer to the Signal Tech II User Guide for instructions.
TPMS REGISTRATION WITH CONSULT ONLY
 With CONSULT
- Adjust the tire pressure for all wheels to match the list below.

- Turn the ignition switch ON.
- Using CONSULT, select “WORK SUPPORT” in BCM (AIR PRESSURE MONITOR). Then, select “ID REGIST.”
- Select “Start” on “ID REGIST” screen.
- Drive the vehicle at a speed greater than 40 km/h (25 MPH) for 3 minutes or more.
- After ID registration for all wheels is complete, press “End” on the CONSULT to finish ID registration.

- Adjust the tire pressures for all tires to the recommended value. Refer to WT-54, "Tire Air Pressure".
- Test drive the vehicle to ensure that the TPMS lamp is OFF and no warning messages are present.
 Diagnosis and repair work flow
Work Flow
NOTE:
The Signal Tech II Tool (J-50190) can be used to perform the following
functions. Refer to the Signal Tech II
User Guide for additional information.
Activate and display TPMS ...

Other materials:
Precaution
Precaution for Supplemental Restraint System (SRS) "AIR BAG" and "SEAT
BELT PRE-TENSIONER"
The Supplemental Restraint System such as “AIR BAG” and “SEAT BELT PRE-TENSIONER”,
used along
with a front seat belt, helps to reduce the risk or severity of injur ...
Wiring diagram
Meter system
Wiring diagram
Compass
Wiring diagram
...
Power supply and ground circuit
Bcm (body control system) (with intelligent key system)
BCM (BODY CONTROL SYSTEM) (WITH INTELLIGENT KEY SYSTEM) : Diagnosis Procedure
Regarding Wiring Diagram information, refer to BCS-51, "Wiring Diagram".
1.CHECK FUSES AND FUSIBLE LINK
Check that the following fuses and fusible link ...
