Nissan Sentra Service Manual: Evap canister
Exploded View
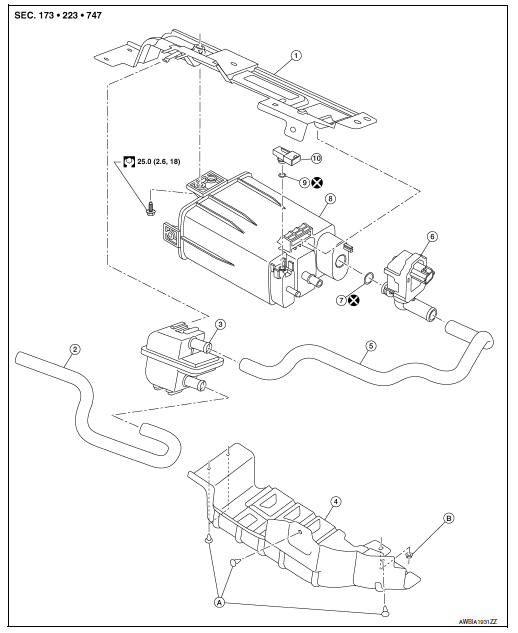
- EVAP canister bracket
- EVAP canister filter drain hose
- EVAP canister filter
- EVAP canister protector
- EVAP hose
- EVAP canister vent control valve
- O-ring
- EVAP canister
- O-ring
- EVAP canister control pressure sensor
- Clip
- Nut
Removal and Installation
EVAP CANISTER
Removal
- Remove EVAP canister protector.
- Disconnect the harness connector from EVAP canister control pressure sensor.
- Remove the EVAP canister control pressure sensor and O-ring, if necessary.
CAUTION:
Do not reuse O-ring.
- Disconnect EVAP canister purge hose.
- Disconnect fuel tank EVAP breather hose.
- Disconnect the harness connector from EVAP vent control valve.
- Disconnect the EVAP vent control valve hose.
- Remove the EVAP canister bolt.
- Remove the EVAP canister.
- Remove the EVAP vent control valve and O-ring, if necessary.
CAUTION:
Do not reuse O-ring.
Installation
Installation is in the reverse order of removal.
CAUTION:
Do not reuse O-ring.
EVAP CANISTER CONTROL PRESSURE SENSOR
Removal
- Remove EVAP canister protector.
- Disconnect the EVAP control pressure sensor harness connector (1).
- Remove the EVAP canister control pressure sensor and O-ring.
CAUTION:
Do not reuse O-ring.
Installation
Installation is in the reverse order of removal.
CAUTION:
Do not reuse O-ring.
EVAP CANISTER VENT CONTROL VALVE
Removal
- Remove EVAP canister protector.
- Disconnect the harness connector from EVAP vent control valve.
- Disconnect the EVAP vent control valve hose.
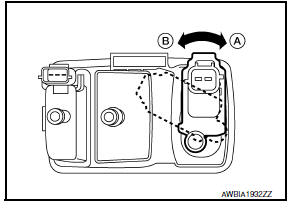
- Turn EVAP canister vent control valve counterclockwise.
- Clock
- Unclock
- Remove the EVAP canister vent control valve and O-ring.
CAUTION:
Do not reuse O-ring.
Installation
Installation is in the reverse order of removal.
CAUTION:
Do not reuse O-ring.
EVAP CANISTER FILTER
Removal
- Remove EVAP canister protector
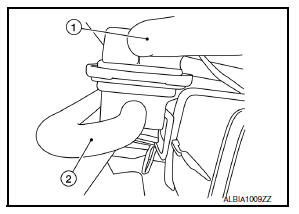
- Disconnect the EVAP canister filter drain hose (1).
- Disconnect the EVAP hose (2).
- Remove the EVAP canister filter.
Installation
Installation is in the reverse order of removal.
 Fuel tank
Exploded View
Fuel filler cap
Grommet
Fuel filler tube
Clamp
Fuel filler hose
Fuel tank
Fuel tank mounting band (RH)
Fuel tank mounting band (LH)
Vent hose
Removal and Insta ...
 Disassembly and assembly
FUEL LEVEL SENSOR UNIT
Exploded View
Fuel Level Sensor Unit
Fuel filter and pump assembly
Fuel level sensor unit
Float arm assembly
Fuel tank temperature sensor
Fuel level sensor uni ...
Other materials:
Battery terminal with fusible link
Exploded view
Battery terminal with fusible link
Harness connector
Removal and installation
Removal
Loosen the battery terminal nuts and disconnect both battery negative and
positive terminals. Refer to
pg-50, "exploded view".
Caution:
To prevent damage to the parts, di ...
Precaution for Supplemental Restraint System (SRS) "AIR BAG" and "SEAT BELT
PRE-TENSIONER"
The Supplemental Restraint System such as “AIR BAG” and “SEAT BELT PRE-TENSIONER”,
used along
with a front seat belt, helps to reduce the risk or severity of injury to the
driver and front passenger for certain
types of collision. Information necessary to service the system ...
P050A, P050B, P050E Cold start control
Description
ECM controls ignition timing and engine idle speed when engine is started
with pre-warming up condition.
This control promotes the activation of three way catalyst by heating the
catalyst and reduces emissions.
DTC Logic
DTC DETECTION LOGIC
NOTE:
If DTC P050A, P050B or P050E ...
