Nissan Sentra Service Manual: Precaution for Liquid Gasket
REMOVAL OF LIQUID GASKET
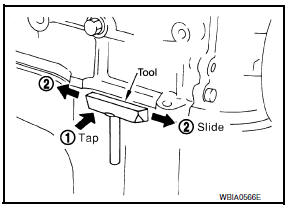
- After removing nuts and bolts, separate the mating surface, using Tool and remove old liquid gasket.
Tool number : KV10111100 (J-37228)
CAUTION:
Be careful not to damage the mating surfaces.

- Tap (1) Tool to insert it, and then slide it (2) by tapping on the side as shown.
- In areas where Tool is difficult to use, use plastic hammer to lightly tap the parts, to remove it.
CAUTION:
Do not damage the mating surfaces.
Liquid gasket application procedure
Do not damage the mating surfaces.
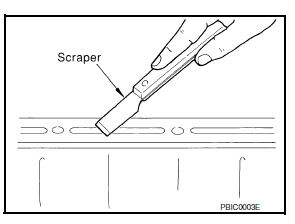
- Remove old liquid gasket adhering to the liquid gasket application surface and the mating surface, using scraper.
- Remove liquid gasket completely from the groove of the liquid gasket application surface, bolts, and bolt holes.
- Thoroughly clean the mating surfaces and remove adhering moisture, grease and foreign materials.

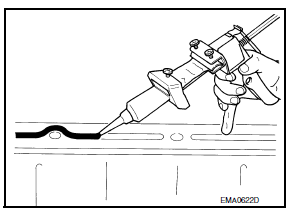
- Attach liquid gasket tube using suitable tool.
Use genuine rtv silicone sealant or equivalent. Refer to gi-21, "recommended chemical products and sealants".
- Apply liquid gasket without breaks to the specified location with the specified dimensions.
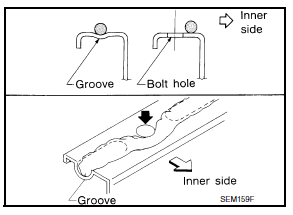
- If there is a groove for the liquid gasket application, apply liquid gasket to the groove.

- As for the bolt holes, normally apply liquid gasket inside the
holes. Occasionally, it should be applied outside the holes.
Make sure to read the text of service manual.
- Within five minutes of liquid gasket application, install the mating component.
- If liquid gasket protrudes, wipe it off immediately
- Do not retighten nuts or bolts after the installation.
- After 30 minutes or more have passed from the installation, fill engine oil and engine coolant.

Caution:
If there are more specific instructions in the procedures contained in this manual concerning liquid gasket application, observe them.
 Precaution for Supplemental Restraint System (SRS) "AIR BAG" and "SEAT
BELT PRE-TENSIONER"
The Supplemental Restraint System such as “AIR BAG” and “SEAT BELT PRE-TENSIONER”,
used along
with a front seat belt, helps to reduce the risk or severity of injury to the
dri ...
 Preparation
Special Service Tools
The actual shape of the tools may differ from those illustrated here.
Commercial Service Tools
...
Other materials:
DTC/circuit diagnosis
U1000 CAN COMM CIRCUIT
Description
Refer to lan-7, "can communication system : system description".
Dtc logic
Dtc detection logic
Note:
U1000 can be set if a module harness was disconnected and reconnected,
perhaps during a repair. Confirm
that there are actual CAN diagnostic symp ...
U1000 can comm circuit
Dtc logic
Dtc detection logic
Dtc
Consult
Detection condition
Possible malfunction location
U1000
Can comm circ
[u1000]
When combination meter is not receiving can communication
signals for 2 seconds or more.
Combination meter
Diagnosis procedure
1.Ch ...
Normal operating condition
Compass
Compass : description
Compass
The electronic compass is highly protected from changes in most magnetic
fields. However, some large
changes in magnetic fields can affect it. Some examples are (but not limited
to): high tension power lines,
large steel buildings, subways, steel ...
