Nissan Sentra Service Manual: Parking brake control
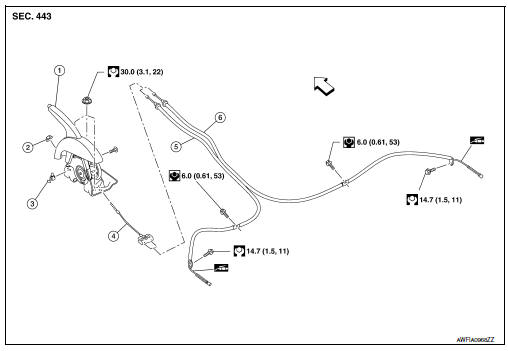
Exploded View
-
Parking brake lever assembly
-
Adjusting nut
-
Parking brake switch
-
Front parking brake cable
-
Rear parking brake cable (LH)
-
Rear parking brake cable (RH)
 Front
Front
Removal and Installation
REMOVAL
Parking Brake Control
-
Remove rear wheels and tires using power tool. Refer to WT-47, "Adjustment".
-
Remove the center console assembly. Refer to IP-14, "Removal and Installation".
-
Disconnect the parking brake switch harness connector.
-
Remove adjusting nut and loosen front parking brake cable.
-
Remove the parking brake lever assembly.
Rear Parking Brake Cable
-
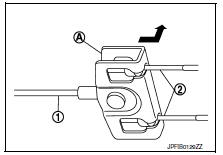
Pull equalizer (A) of the front parking brake cable (1) in a rearward direction and then push upward to remove each rear parking brake cable (2)
-
Remove sub muffler and heat plate. Refer to EX-5, "Removal and Installation".
-
Remove rear parking brake cable from toggle lever. Refer to BR-42, "Exploded View" (drum brake) or PB- 9, "Exploded View - Disc Brake" (disc brake).
-
Remove rear parking brake cable bolts.
-
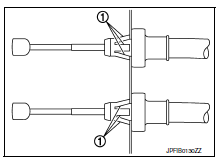
Press the pawl (1) to remove each rear parking brake cable from the vehicle.
INSTALLATION
Installation is in the reverse order of removal.
CAUTION:
Do not reuse adjusting nut.
-
Perform adjustment after installation. Refer to PB-4, "Inspection and Adjustment".
Adjustment
ADJUSTMENT AFTER INSTALLATION
Adjust the parking brake lever stroke. Refer to PB-4, "Inspection and Adjustment".

 Parking brake shoe
Removal and Installation - Drum Brake
If equipped with drum brakes, refer to BR-42, "Removal and
Installation".
Exploded View - Disc Brake
Anti-rattle pin
Back plate
...
Other materials:
Precaution for Supplemental Restraint System (SRS) "AIR BAG"
and "SEAT BELT PRE-TENSIONER"
The Supplemental Restraint System such as “AIR BAG” and “SEAT
BELT PRE-TENSIONER”, used along
with a front seat belt, helps to reduce the risk or severity of injury to the
driver and front passenger for certain
types of collision. Information necessary to service the system ...
Symptom diagnosis
Door does not lock/unlock with door lock and unlock switch
All door
ALL DOOR : Description
All doors do not lock/unlock using door lock and unlock switch.
ALL DOOR : Diagnosis Procedure
1.CHECK DOOR LOCK AND UNLOCK SWITCH
Check door lock and unlock switch.
Refer to DLK-97, "Component F ...
Fuses
Two types of fuses are used. Type A is used in
the fuse boxes in the engine compartment. Type
B is used in the passenger compartment fuse
box.
Type A fuses are provided as spare fuses. They
are stored in the passenger compartment fuse
box.
Type A fuses can be installed in the engine com ...
