Nissan Sentra Owners Manual: Hood
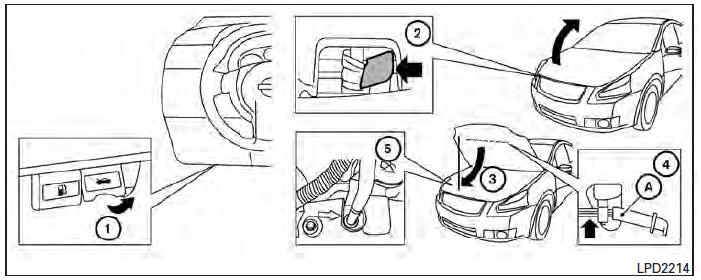
- Pull the hood lock release handle 1 located below the instrument panel until the hood springs up slightly.
- Locate the lever 2 in between the hood and grille and push the lever sideways with your fingertips.
- Raise the hood 3 .
- Remove the support rod 4 and insert it into the slot marked by an arrow 5 .
NOTE:
Do not place the support rod in a location other than the designated slot.
Hold the coated parts A when removing or resetting the support rod. Avoid direct contact with the metal parts, as they may be hot immediately after the engine has been stopped.
When closing the hood, return the support rod to its original position, lower the hood to approximately 12 in (30 cm) above the latch and release it. This allows proper engagement of the hood latch.
WARNING
|
 Troubleshooting guide
Symptom
Possible Cause
When pushing the ignition switch to stop
the engine
The P (Park) warning light in the instrument
panel illuminates and the inside chime
...
 Trunk lid
...
Other materials:
Cluster lid C
Removal and Installation - Cluster Lid C
REMOVAL
Remove cluster lid C lower. Refer to IP-20, "Removal and Installation -
Cluster Lid C Lower".
Remove the cluster lid C screws (A).
Disconnect the harness connector from cluster lid C.
Remove the center ventilator grill ...
Tire Pressure Monitoring System (TPMS)
This vehicle is equipped with the Tire Pressure
Monitoring System (TPMS). It monitors tire pressure
of all tires except the spare. When the low
tire pressure warning light is lit, and the CHECK
TIRE PRES warning message is displayed in the
odometer, one or more of your tires is significantly
u ...
C1116 Stop lamp switch
DTC Logic
DTC DETECTION LOGIC
DTC
Display item
Malfunction detected condition
Possible cause
C1116
STOP LAMP SW
When stop lamp switch circuit is open.
Harness or connector
Stop lamp switch
ABS actuator and electric unit
(control unit)
...
