Nissan Sentra Service Manual: Front seat belt
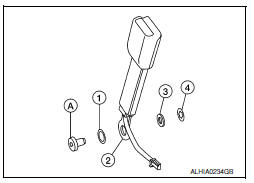
Exploded View

- D-ring anchor
- Seat belt height adjuster cover
- Seat belt buckle
- Seat belt retractor
- Seat belt height adjuster
- Lap belt pre-tensioner harness connector
- Shoulder belt pre-tensioner harness connector
 Front
Front
NOTE:
LH side shown; RH side similar.
Removal and Installation
SEAT BELT RETRACTOR
Removal
CAUTION:
Before servicing the SRS, turn the ignition switch off, disconnect both battery terminals and wait at least three minutes.
- Disconnect both the negative and positive battery terminals, then wait at least three minutes. Refer to PG- 50, "Removal and Installation (Battery)".
- Slide the front seat to the full forward position.
- Remove the center pillar lower finisher. Refer to INT-27, "CENTER PILLAR LOWER FINISHER : Removal and Installation".
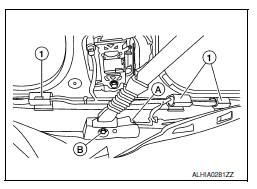
- Release the floor trim hold downs (1) and pull floor trim back.
(B): Lap belt pre-tensioner anchor bolt
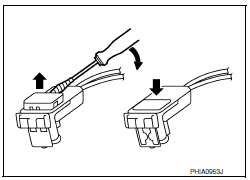
- Disconnect the harness connector (A) from the lap belt pre-tensioner.
CAUTION:
- For removing/installing the lap belt pre-tensioner harness connector, insert a thin screwdriver wrapped in tape into the notch, then lift the lock and remove the harness connector as shown.
- Install the harness connector with the lock raised, and push the lock into the harness connector as shown.
- After installing the harness connector, check that the lock is pushed in securely.
- Remove the lap belt pre-tensioner anchor bolt.
- Remove the seat belt height adjuster cover, then remove D-ring anchor bolt.
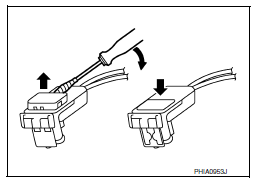
- Disconnect the harness connector from the shoulder belt pre-tensioner
CAUTION:
- For removing/installing the shoulder belt pre-tensioner harness connector, insert a thin screwdriver wrapped in tape into the notch, then lift the lock and remove the harness connector as shown.
- Install the harness connector with the lock raised, and push the lock into the harness connector as shown.
- After installing the harness connector, check that the lock is pushed in securely.
- Remove the seat belt retractor anchor bolt and upper bolt, then remove the seat belt retractor.
Installation
Installation is in the reverse order of removal.
- Install the seat belt retractor upper bolt first.
- Make sure the seat belt height adjuster is locked in the lowest position during installation.
- Tighten the seat belt retractor bolts to specification. Refer to SB-8, "Exploded View".
- Make sure both the D-ring anchor and seat belt height adjuster operate freely.
- Always perform an inspection after repair to be sure the system is functioning within specifications. Refer to SB-5, "Inspection".
SEAT BELT HEIGHT ADJUSTER
Removal
- Remove the center pillar upper finisher. Refer to INT-28, "CENTER PILLAR UPPER FINISHER : Removal and Installation".
- Remove the D-ring anchor bolt.
- Remove the seat belt height adjuster bolts and the seat belt height adjuster.
Installation
Installation is in the reverse order of removal.
- Make sure that the seat belt height adjuster is locked in the lowest position during installation.
- Make sure both the D-ring anchor and seat belt height adjuster operate freely.
- Tighten the D-ring anchor bolt and seat belt height adjuster bolts to specification. Refer to SB-8, "Exploded View".
SEAT BELT BUCKLE
Removal
- Remove the front seat assembly. Refer to SE-18, "DRIVER SIDE : Removal and Installation - Seat Assembly" (front seat driver side) or SE-20, "PASSENGER SIDE : Removal and Installation - Seat Assembly" (front seat passenger side).
- Disconnect the harness connector from the seat belt buckle.
- Remove the seat belt buckle anchor bolt and the seat belt buckle.
Installation
Installation is in the reverse order of removal.
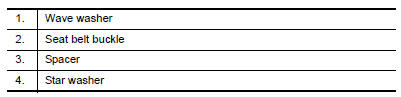
- During installation, make sure the seat belt buckle anchor bolt (A) is inserted through the components in the following order:
- Tighten the seat belt buckle anchor bolt to specification. Refer to SB-8, "Exploded View".

 Rear seat belt
Exploded View - Seat Belt Retractor
Seat belt retractor (RH)
Seat belt retractor (center)
Seat belt retractor (LH)
Front
Removal and Installation - Seat Belt Retractor
REMOVAL
R ...
Other materials:
Service Notice and Precautions for TPMS
WARNING:
Radio waves could adversely affect electric medical equipment. Those
who use a pacemaker should
contact the electric medical equipment manufacturer for the possible influences
before use.
Low tire pressure warning lamp blinks for 1 minute, then turns ON when
occurring any malfu ...
Clutch disc and clutch cover
Exploded View
Flywheel
Clutch disc
Clutch cover
Input shaft
First step
Final step
Apply lithium-based grease
including molybdenum disulphide.
Removal and Installation
CAUTION:
Do not reuse CSC (Concentric Slave Cylinder). The CSC slides back
to the original posit ...
A/c auto amp. Connection recognition signal circuit
Description
A/c auto amp. Transmits the a/c auto amp. Connection recognition signal to
the combination meter
Diagnosis procedure (with manual a/c)
Regarding wiring diagram information, refer to mwi-28, "wiring diagram".
1.Check a/c auto amp. Connection recognition signal
Turn ig ...
