Nissan Sentra Service Manual: Evap leak check
Inspection
CAUTION:
- Do not use compressed air or a high pressure pump.
- Do not exceed 4.12 kPa (0.042 kg/cm2, 0.6 psi) of pressure in EVAP system.
NOTE:
- Do not start engine.
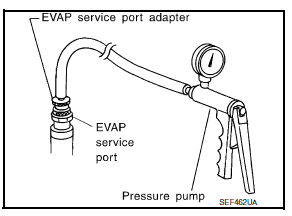
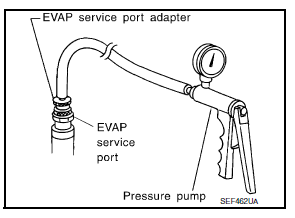
- Improper installation of EVAP service port adapter [commercial service tool: (J-41413-OBD)] to the EVAP service port may cause a leak.
1.EVAP LEAK CHECK
 With CONSULT
- Install EVAP service port adapter [commercial service tool: (J- 41413-OBD)] and pressure pump to EVAP service port.
- Turn ignition switch ON.
- Select the “EVAP SYSTEM CLOSE” in “WORK SUPPORT” mode of “ENGINE” using CONSULT.
- Touch “START”. A bar graph (Pressure indicating display) will appear on the screen.
- Apply positive pressure to the EVAP system until the pressure indicator reaches the middle of the bar graph.
- Remove EVAP service port adapter [commercial service tool: (J-41413-OBD)] and hose with pressure pump.
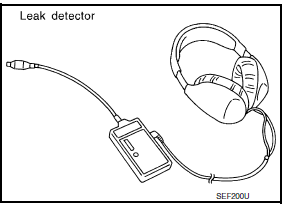
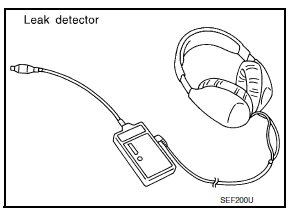
- Locate the leak using a leak detector [commercial service tool: (J-41416)]. Refer to EC-49, "EVAPORATIVE EMISSION SYSTEM : System Description".
 Without CONSULT
- Install EVAP service port adapter [commercial service tool: (J- 41413-OBD)] and pressure pump to EVAP service port.
- Apply battery voltage between the terminals of EVAP canister vent control valve to make a closed EVAP system.
- To locate the leak, deliver positive pressure to the EVAP system until pressure gauge points reach 1.38 to 2.76 kPa (0.014 to 0.028 kg/cm2, 0.2 to 0.4 psi).
- Remove EVAP service port adapter [commercial service tool: (J-41413-OBD)] and hose with pressure pump.
- Locate the leak using a leak detector [commercial service tool: (J-41416)]. Refer to EC-49, "EVAPORATIVE EMISSION SYSTEM : System Description".
>> INSPECTION END
 Evaporative emission system
Inspection
EVAP CANISTER
1.CHECK EVAP CANISTER
Block port (B).
Blow air into port (A) and check that it flows freely out of port (C).
Release blocked port (B).
Apply vacuum pressure to por ...
 Positive crankcase ventilation
Inspection
1.CHECK PCV VALVE
With engine running at idle, remove PCV valve from rocker cover. A
properly working valve makes a hissing noise as air passes through
it. A strong vacuum should be fel ...
Other materials:
Brakes
If the brakes do not operate properly, have the
brakes checked by a NISSAN dealer.
Self-adjusting brakes
Your vehicle is equipped with self-adjusting
brakes.
The front (and rear– if so equipped) disc-type
brakes self-adjust every time the brake pedal is
applied. The rear drum-type brakes ...
Forward-facing child restraint installation using the seat belts
WARNINGThe three-point seat belt with Automatic
Locking Retractor (ALR) must be used
when installing a child restraint. Failure to
use the ALR mode will result in the child
restraint not being properly secured. The
restraint could tip over or be loose and
cause injury to a c ...
Moonroof motor assembly
Exploded view
Headlining
Sun visor
Moonroof motor assembly
Front
Removal and installation
REMOVAL
Close the glass lid.
Remove the map lamp. Refer to INL-52, "Removal and Installation".
Remove the moonroof motor bolts (A).
Front
Disconnect the harness connec ...
