Nissan Sentra Service Manual: Evap canister
Exploded View
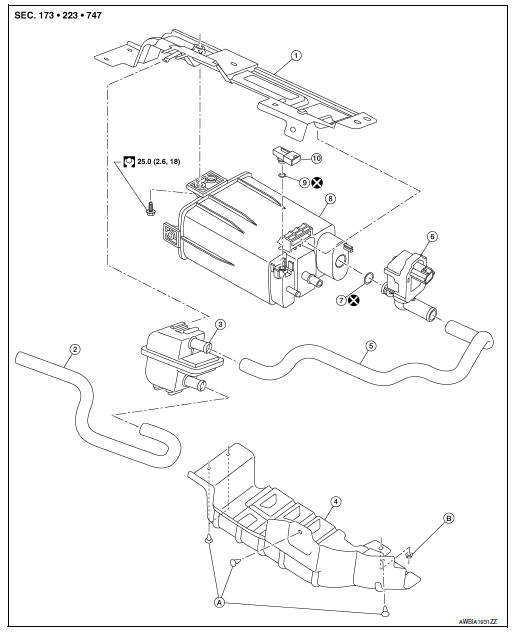
- EVAP canister bracket
- EVAP canister filter drain hose
- EVAP canister filter
- EVAP canister protector
- EVAP hose
- EVAP canister vent control valve
- O-ring
- EVAP canister
- O-ring
- EVAP canister control pressure sensor
- Clip
- Nut
Removal and Installation
EVAP CANISTER
Removal
- Remove EVAP canister protector.
- Disconnect the harness connector from EVAP canister control pressure sensor.
- Remove the EVAP canister control pressure sensor and O-ring, if necessary.
CAUTION:
Do not reuse O-ring.
- Disconnect EVAP canister purge hose.
- Disconnect fuel tank EVAP breather hose.
- Disconnect the harness connector from EVAP vent control valve.
- Disconnect the EVAP vent control valve hose.
- Remove the EVAP canister bolt.
- Remove the EVAP canister.
- Remove the EVAP vent control valve and O-ring, if necessary.
CAUTION:
Do not reuse O-ring.
Installation
Installation is in the reverse order of removal.
CAUTION:
Do not reuse O-ring.
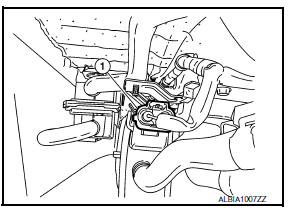
EVAP CANISTER CONTROL PRESSURE SENSOR
Removal
- Remove EVAP canister protector.
- Disconnect the EVAP control pressure sensor harness connector (1).
- Remove the EVAP canister control pressure sensor and O-ring.
CAUTION:
Do not reuse O-ring.
Installation
Installation is in the reverse order of removal.
CAUTION:
Do not reuse O-ring.
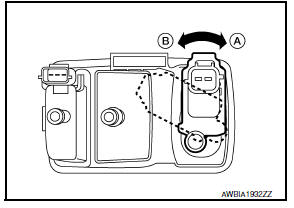
EVAP CANISTER VENT CONTROL VALVE
Removal
- Remove EVAP canister protector.
- Disconnect the harness connector from EVAP vent control valve.
- Disconnect the EVAP vent control valve hose.
- Turn EVAP canister vent control valve counterclockwise.
- Clock
- Unclock
- Remove the EVAP canister vent control valve and O-ring.
CAUTION:
Do not reuse O-ring.
Installation
Installation is in the reverse order of removal.
CAUTION:
Do not reuse O-ring.
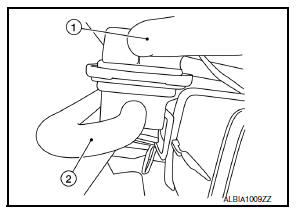
EVAP CANISTER FILTER
Removal
- Remove EVAP canister protector
- Disconnect the EVAP canister filter drain hose (1).
- Disconnect the EVAP hose (2).
- Remove the EVAP canister filter.
Installation
Installation is in the reverse order of removal.
 Fuel tank
Exploded View
Fuel filler cap
Grommet
Fuel filler tube
Clamp
Fuel filler hose
Fuel tank
Fuel tank mounting band (RH)
Fuel tank mounting band (LH)
Vent hose
Removal and Insta ...
 Disassembly and assembly
FUEL LEVEL SENSOR UNIT
Exploded View
Fuel Level Sensor Unit
Fuel filter and pump assembly
Fuel level sensor unit
Float arm assembly
Fuel tank temperature sensor
Fuel level sensor uni ...
Other materials:
Diagnosis system (BCM)
Common item
Common item : consult function (bcm -
common item)
Application item
Consult performs the following functions via can communication with bcm.
Direct diagnostic mode
Description
ECU identification
The bcm part number is displayed.
Self Diagnostic Result
...
If the vehicle is
submerged or water
on the road is rising
This vehicle is not designed to be able to drive on roads that are
deeply flooded with water. Do not drive on roads where the
roads may be submerged or the water may be rising. It is dangerous
to remain in the vehicle, if it anticipated that the vehicle
will be flooded or set a drift. Remain cal ...
Rear lh side power window does not operate
When both power window main switch and rear power window switch lh are
operated
When both power window main switch and rear power window switch lh are
operated : diagnosis procedure
1.CHECK REAR POWER WINDOW SWITCH LH
Check rear power window switch LH.
Refer to PWC-40, "REAR POWER WIN ...
