Nissan Sentra Service Manual: Coil spring
Exploded View
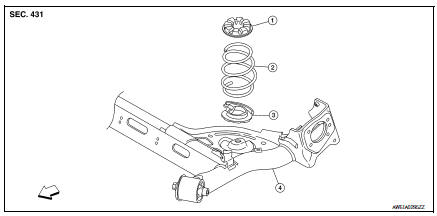
- Upper rubber seat
- Coil spring
- Lower rubber seat
- Rear suspension beam
 Front
Front
Removal and Installation
REMOVAL
- Set a suitable jack under the rear suspension beam.
CAUTION:
- At this step, the jack must be set only for supporting the removal procedure. For details on jacking up the vehicle, refer to GI-31, "Garage Jack and Safety Stand and 2-Pole Lift".
- Do not damage the rear suspension beam with the jack.
- Remove the lower shock absorber bolts. Refer to RSU-8, "Exploded View".
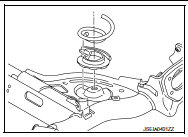
- Slowly lower the suitable jack. Remove the upper rubber seat, the coil spring, and the lower rubber seat from the rear suspension beam.
CAUTION:
Make sure the rear suspension beam is stable when using the jack.
- Inspect the components. Refer to RSU-12, "Inspection".
INSTALLATION
Installation is in the reverse order of removal.
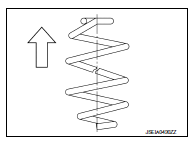
- Identify the upper side of the coil spring.
 : Upper side
NOTE:
The top of the coil spring has a flat shape.
- Align the lower end of the coil spring with the steps on the lower rubber seat.
Inspection
INSPECTION AFTER REMOVAL
Check the upper rubber seat, the lower rubber seat, and the coil spring for deformation, cracks, and damage.
Replace the parts if necessary.
 Rear shock absorber
Exploded View
Rear suspension beam
Shock absorber
Bound bumper
Bound bumper cover
Washer
Bushing
Distance tube
Bushing
Washer
Piston rod lock nut
Cap
Front
Removal and ...
 Rear suspension beam
Exploded View
Rear suspension beam
Rear suspension arm bracket
Front
Removal and Installation
NOTE:
When removing components such as hoses, tubes, lines, etc., cap or plug
openings ...
Other materials:
Tilt operation
Pull the lock lever down 1 and adjust the steering
wheel up or down 2 to the desired position.
Push the lock lever up 1 firmly to lock the
steering wheel in place.
WARNINGDo not adjust the steering wheel while
driving. You could lose control of your
vehicle and cause an accide ...
M&a branch line circuit
Diagnosis procedure
1.Check connector
Turn the ignition switch off.
Disconnect the battery cable from the negative terminal.
Check the terminals and connectors of the combination meter for damage,
bend and loose connection
(unit side and connector side).
Is the inspection result nor ...
C1609 Vehicle speed signal
DTC Logic
Dtc detection logic
DTC
Display item
Malfunction detected condition
Possible cause
C1609
CAN VHCL SPEED
Malfunction is detected in vehicle speed signal that
is output from abs actuator and electric unit (control
unit) via can communication. ...
