Nissan Sentra Service Manual: Unit disassembly and assembly
Center console assembly
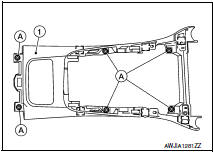
Exploded View

- Center console upper finisher
- Center console side finisher (RH)
- Center console side finisher (LH)
- Center console side finisher screw cover (LH/RH)
- Center console assembly
- Center console screw cover (LH/RH)
- Center console rear finisher
- Center console rear finisher cover
- Center console coin tray (if equipped)
- Heated seat switch finisher (if equipped)
- Center console cup holder finis
- Shift selector finisher
- Storage bin
Disassembly and Assembly
DISASSEMBLY
- Remove the center console assembly. Refer to IP-17, "Removal and Installation".
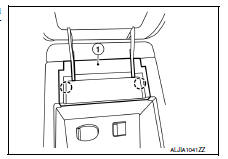
- Remove the center console upper finisher.
- Remove the center console upper finisher screws (A).
- Release the center console upper finisher pawls using a suitable tool.
 : Pawl
- Remove the center console upper finisher (1).
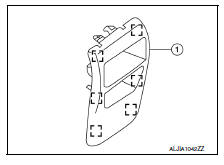
- Remove the center console rear finisher
- Release the center console rear finisher cover pawls using a suitable tool, then remove the center console rear finisher cover (1).
 : Pawl
- Release the center console rear finisher clips using a suitable tool, then remove the center console rear finisher (1).
 : Metal clip
- Release the center console accessory finisher pawls using a suitable tool and remove.
ASSEMBLY
Assembly is in the reverse order of disassembly.
 Glove box assembly
Removal and Installation
REMOVAL
Remove the instrument side finisher RH using a suitable tool.
Remove the glove box assembly upper screws (A).
Remove the glove box assembly lower scre ...
 Seat
Seat
...
Other materials:
P2765 Input speed sensor B
DTC Logic
DTC DETECTION LOGIC
DTC
CONSULT screen terms
(Trouble diagnosis content)
DTC detection condition
Possible causes
P2765
INPUT SPEED SENSOR B
(Input/Turbine Speed Sensor
B Circuit)
The secondary speed sensor value is less
than 150 rpm continuously ...
Rear power window motor
Removal and Installation
REMOVAL
Remove the rear door glass regulator (1). Refer to GW-21,
"Removal and Installation"
Remove the screws and the rear power window motor (2).
INSTALLATION
Installation is in the reverse order of removal. ...
Maintenance requirements
Your NISSAN has been designed to have minimum
maintenance requirements with long service
intervals to save you both time and money;
however, some day-to-day and regular maintenance
is essential to maintain your NISSAN’s
good mechanical condition as well as its emissions
and engine performanc ...
