Toyota Camry (XV70): Summary of functions
The multi-information display presents the driver with a variety of driving- related data, such as the current outside temperature. The multiinformation display can also be used to change the display settings and other settings.
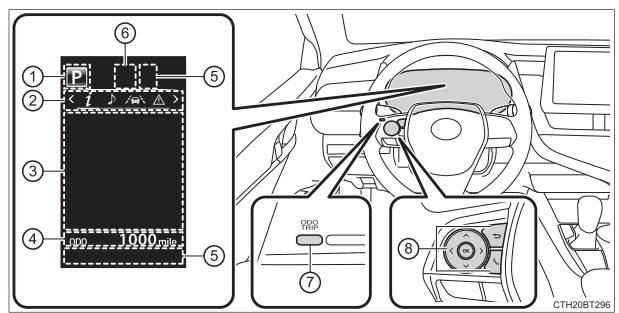
- Shift position
- Menu icon display area
Displays the following items.When a menu icon is not selected, the outside temperature and clock are displayed.
- Menu icons
- Outside temperature
- Clock*
- Content display area
A variety of information can be displayed by selecting a menu icon. Additionally, warning or suggestion/advice pop-up displays will be displayed in some situations.- Menu icon content
- Suggestion function
- Warning message
- Odometer/trip meter
- Indicators
- RSA (Road Sign Assist) (if equipped)
- "ODO/TRIP" switch
- Meter control switches
*: For clock settings, refer to "NAVIGATION AND MULTIMEDIA SYSTEM OWNER'S MANUAL".
Using the multi-information display
◆ Using the content display area
The content display area is operated using the meter control switches.
- Scroll screens*, change the displayed content* and move the cursor
- Press: Enter/Set
Press and hold: Reset - Return to the previous
screen
Pressing and holding the switch will display the first screen of the selected menu icon. - Call sending/receiving and history display
Linked with the hands-free system, sending or receiving call is displayed.For details regarding the hands-free system, refer to "NAVIGATION AND MULTIMEDIA SYSTEM OWNER'S MANUAL".
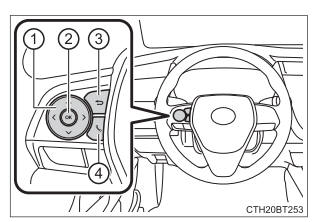
*: When the screen can be scrolled or different content can be displayed, a mark, such as an arrow, will be displayed to suggest which switch to operate.
◆ Using the odometer/trip meter
Items in this area are operated using the "ODO/TRIP" switch.
Press: Change displayed item
Each time the switch is pressed, the displayed item will be changed.
Press and hold: Reset
Display the desired trip meter and press and hold the switch to reset the trip meter.

Menu icons
Select a menu icon to display its content.
 Drive information
Select to display various drive data.
 Audio system-linked display
Select to enable selection of an audio source or track on the meter using the meter control switches.
 Driving assist system
information
Driving assist system
information
Select to display the operational status of the following systems:
- Dynamic radar cruise control with full-speed range (if equipped)
- Dynamic radar cruise control (if equipped)
- LTA (Lane Tracing Assist)
- RSA (Road Sign Assist) (if equipped)
 Warning message display
Select to display warning messages and measures to be taken if a malfunction is detected.
 Settings display
Select to change the meter display settings and other settings.
READ NEXT:
 Drive information
■ Trip (after start)
Average fuel economy*
Displays the average fuel consumption
since engine start.
Average vehicle speed
Displays the average vehicle
speed since engine start.
Elap
Settings display
◆ Changing settings
Use the meter control switches on the steering wheel to change
settings.
1. Press or
to select
.
2. Operate the switches to select a desired item.
3. Change the setting
Suggestion function
Displays suggestions to the driver in the following situations. To select
a response to a displayed suggestion, use the meter control switches.
The suggestion function can be turned on/off.
■ S
SEE MORE:
Abbreviations Used In Manual
ABBREVIATIONS USED IN MANUAL
Abbreviation Meaning
ABS Anti-Lock Brake System
A/C Air Conditioner
AC Alternating Current
ACC Accessory
ACIS Acoustic Control Induction System
ACM Active Control Engine Mount
ACSD Automatic Co
Precaution
PRECAUTION PRECAUTION FOR DISCONNECTING CABLE FROM NEGATIVE BATTERY TERMINAL
NOTICE: When disconnecting the cable from the negative (-) battery terminal, initialize the following systems after the terminal is reconnected.
System Name See Procedure
Lane Tracing Assist System
