Nissan Sentra B18 (2020-2025) Service Manual: Removal and Installation
Av Control Unit
Exploded View
Exploded View
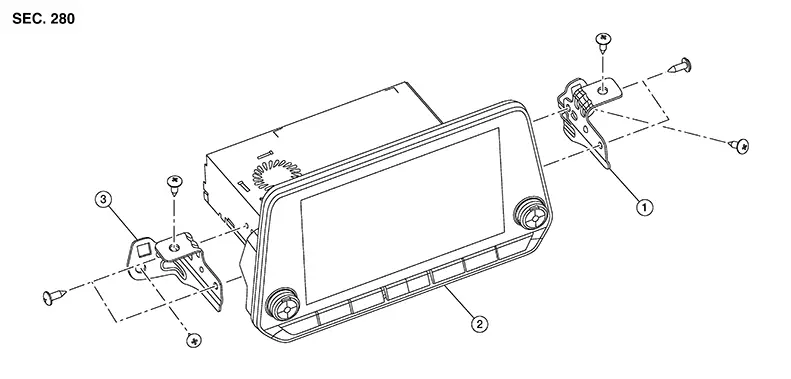
|
1. |
AV control unit bracket (LH) |
2. |
AV control unit |
3. |
AV control unit bracket (RH) |
Removal and Installation
Removal and Installation
REMOVAL
CAUTION:
-
Before disconnecting the AV control unit and battery terminals, place the ignition switch in the OFF position and wait at least 30 seconds.
-
When replacing AV control unit, perform "ADDITIONAL SERVICE WHEN REPLACING AV CONTROL UNIT. Refer to Work Procedure (Without BOSE®) or Work Procedure (With BOSE®).

After the ignition switch is turned OFF, the AV control unit continues operating for approximately 30 seconds. Data corruption may occur if battery voltage is cut off within 30 seconds.
Disconnect the battery. Refer to Battery Disconnect.
Remove A/C switch assembly. Refer to Removal and Installation(Auto A/C) or Removal and Installation (Manual A/C).
Remove AV control unit screws then pull out AV control unit.
Disconnect the harness connectors from AV control unit and remove.
Remove AV control unit bracket (LH/RH) screws and AV control unit brackets [(LH/RH) (if necessary)].
INSTALLATION
Installation is in the reverse order of removal.
CAUTION:
When replacing AV control unit, perform "ADDITIONAL SERVICE WHEN REPLACING AV CONTROL UNIT. Refer to Work Procedure (Without BOSE®) or Work Procedure (With BOSE®).
Tcu
Removal and Installation
Removal and Installation
REMOVAL
Note:
-
Before replacing TCU, perform "SAVE VIN DATA" to save current Nissan Sentra vehicle specification. For details, refer to Description.
-
When replacing the TCU, a new TCU must be used. The functions controlled by the TCU do not operate properly if a TCU from another Nissan Sentra vehicle is used.
Remove AV control unit. Refer to Removal and Installation.
Disconnect
the harness connectors (A) from TCU (1).
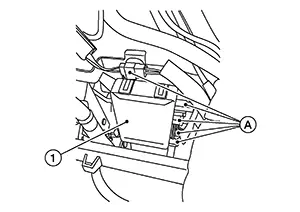
Remove screws, then remove TCU with the bracket attached.
Remove the bracket from TCU, if necessary.
INSTALLATION
Installation is in the reverse order of removal.
Note:
Perform "ADDITIONAL SERVICE WHEN REPLACING TCU". Refer to Description.
Telematics Switch
Removal and Installation
Removal and Installation
The telematics switch is serviced as part of the room/map lamp. Refer to Removal and Installation.
Gps Antenna
Removal and Installation
Removal and Installation
REMOVAL
Remove instrument panel assembly. Refer to Removal and Installation.
Remove screw to remove GPS antenna from instrument panel.
INSTALLATION
Installation is in the reverse order of removal.
Microphone
Removal and Installation
Removal and Installation
REMOVAL
Remove front room/map lamp assembly. Refer to Removal and Installation.
Disconnect
the harness connector (A) from front room\map lamp assembly
(2). 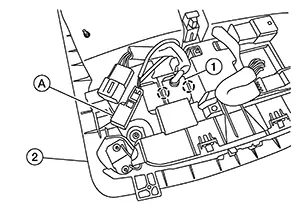
Release pawls and remove microphone (1).
|
|
: Pawl |

INSTALLATION
Installation is in the reverse order of removal.
Other materials:
Heated Seat Rh Relay
Component Function Check
Component Function
Check
CHECK HEATED SEAT RH RELAY FUNCTION
Check that seat cushion and seat back warm to the
preset temperature when operating the heated seat switch RH to HIGH
and LOW.
...
P0447 Evap Canister Vent Control Valve
Dtc Description
DTC Description
DTC DETECTION LOGIC
DTC
CONSULT screen terms
(Trouble diagnosis
content)
DTC detection
condition
...
P0181 Ftt Sensor
Dtc Description
DTC Description
DTC DETECTION LOGIC
DTC
CONSULT screen terms
(Trouble diagnosis
content)
DTC detection
conditi ...